Use point-and-click, drag-and-drop, and query builder in Oracle SQL Developer.
By Sue HarperMarch/April 2008
I’m often asked to describe the difference between Oracle SQL Developer and Oracle SQL*Plus. Their feature lists are indeed similar: both let you query the database objects you have access to; insert, update, and delete data by using data manipulation language (DML); add, alter, and delete database constructs by using data definition language (DDL); write and run reports; and create, edit, and compile PL/SQL. Oracle SQL Developer, however, also has a range of GUI features for building and executing SQL queries visually. Visual query building can accelerate query construction to enhance developer productivity, and it can help newcomers to SQL learn how to build queries.
Oracle SQL Developer provides the SQL worksheet, a code-editor window where you can enter and run statements that include SQL*Plus commands, SQL, and PL/SQL codeeither single statements or multiple-statement scripts. Oracle SQL Developer also facilitates common query tasks with GUI tools. Using point-and-click actions in the Connections Navigator display, you can quickly view the same data that certain manually entered queries retrieve. Drag-and-drop capabilities and the query builder both help you build complex queries more quickly than you can with manual coding. This column takes you through examples of the point-and-click, drag-and-drop, and query builder approaches, to illustrate their advantages over manual query construction. The following examples use the sample HR schema, which is available in the default database installation.
To prepare for this column’s examples, start Oracle SQL Developer with an Oracle database running. Then create a new connection in Oracle SQL Developer for the HR schema and name it HR_ORCL. (For detailed information on creating a connection, see “Creating a Database Connection.”)
Point-and-Click QueriesYou can click items in the Connections Navigator display to browse and manipulate database objects. The results you see are equivalent toand in some cases more informative thanthe results retrieved by manually entered SQL*Plus DESCRIBE commands and SQL SELECT commands. I’ll take you through two point-and-click examples. For each example, you’ll first enter and execute a query manually and then perform the corresponding point-and-click action.
Example 1. Open the SQL worksheet ( Tools -> SQL Worksheet ) for HR_ORCL. (It opens automatically when you first invoke the new connection.) Type this SQL*Plus command in the Enter SQL Statement text box:
describe employees
Press F9 (or click Execute Statement ) to execute the command. The result displays the structure of the EMPLOYEES table in the Script Output window.
Now select and expand the HR_ORCL node in the Connections Navigator display. Expand the Tables node, and select EMPLOYEES . The EMPLOYEES table appears, with the Columns tab selected. The Columns tab describes the table, providing all the detail your DESCRIBE EMPLOYEES SQL*Plus command generated, along with additional detail such as comments.
Example 2. Return to the SQL worksheet for HR_ORCL, and click the Clear button (eraser) above the Enter SQL Statement text box. In the text box, enter the following SQL query:
select * from employees;
Press F9 (or click Execute Statement ) to run the query. This query retrieves all columns from all rows of the EMPLOYEES table and presents them in the Results display.
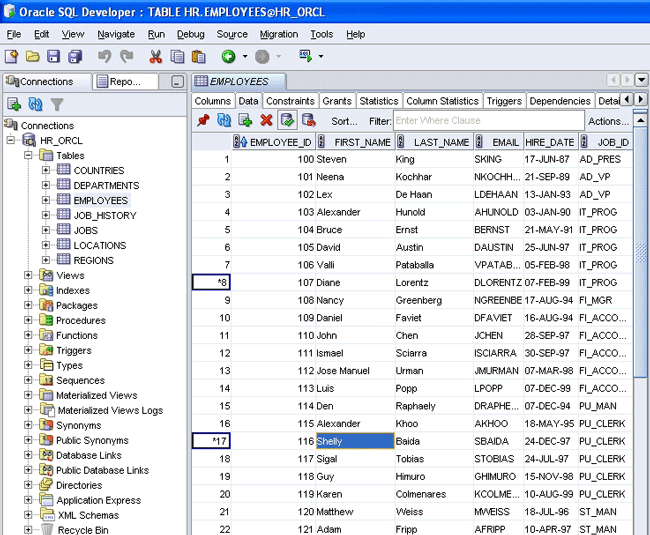
Now switch back to the EMPLOYEES table view (click the EMPLOYEES tab). Click the Data tab to see the full data for the table. Not only do you see the same data that your SELECT * FROM EMPLOYEES; statement retrieved but you can also
- Sort the data by any column by double-clicking in the column’s header. If you want to sort on more than one column, you can use the Sort… option, which enables you to choose the sort order.
- Edit data in this data grid; double-click in any field and update the data. All records you modify are automatically flagged with a change asterisk (*). You can then choose to commit or roll back your changes.
Figure 1 shows the Data tab for the EMPLOYEES table, with two modified records flagged with *.
More Query-Based TabsThe additional tabs for the EMPLOYEES table shown in Figure 1 Constraints, Grants, Triggers , and so onare all based on queries run against data dictionary tables. Again, you needn’t write the queries that generate these results; just click a tab to display the details.
The SQL tab provides the full DDL for re-creating the table. You can control the code this tab displays by setting preferences. For example, if you don’t want to show the storage or schema detail in the DDL, select Tools -> Preferences . In the Preferences dialog box, open the Database node and select ObjectViewer Parameters ; then deselect the Show Storage and Show Schema check boxes and click OK . (If you change preferences with the SQL tab already selected, click Refresh to update the displayed DDL.)
Oracle SQL Developer is extensible, so you can add new query-based tabs to the current selection of tabs if you want to display additional detail. (For detailed information on extending Oracle SQL Developer, see “Extending Oracle SQL Developer“).
Drag and Drop into the SQL WorksheetIn addition to accepting manual code entry, the SQL worksheet supports drag-and-drop operations. Dragging a table name from the Connections Navigator display to the SQL worksheet creates a SELECT statement for that table automatically. You can drag other entities, such as column names, from the Connections Navigator display to add them verbatim to a query.
Because SQL queries sometimes include aggregate, numeric, character, date/time, or conversion functions whose syntax can be easy to forget, Oracle SQL Developer provides a Snippets window with a selection of functions and other frequently used code that you can drag and drop into your SQL worksheet. You can also add your own categories and snippets to the Snippets collection, by clicking the Snippet window’s Add Snippet button and populating the Save Snippet dialog box.
When you start Oracle SQL Developer, you can see a Snippets tab on one side of the screen. Hold your mouse pointer over this tab to open a temporary Snippets window. Sometimes it’s easier to float the window permanently: move the mouse pointer to the Snippets window bar, and then click and drag the window from the edge onto the main screen. You can now drag code from the modeless Snippets window to your SQL worksheet.
I’ll take you through two drag-and-drop examples.
Example 1. Return to the HR_ORCL SQL worksheet tab if it’s still open (and clear the Enter SQL Statement text box), or open a new worksheet. In the Connections Navigator, expand the Tables node and select all seven tables by holding the Shift key down as you click the first and last table names. Click the HR_ORCL SQL worksheet tab again, and drag all the selected tables onto the worksheet. Individual SELECT statements for each of the dragged tables appear in the worksheet. (In the releases following Oracle SQL Developer 1.2.1, you can choose whether these are individual statements or statements that should be joined by a WHERE clause.)
To format the code’s layout, right-click in the SQL worksheet and select Format SQL from the context menu. To execute all the statements, press F5 or click Run Script.
Example 2. Consider the following query:
SELECT LEVEL, LPAD(' ',2*(
          LEVEL-1)) || last_name org,
           employee_id, manager_id, job_id
FROM employees
START WITH job_id = 'AD_VP'
CONNECT BY PRIOR
employee_id = manager_id;
Although you can create this query by typing itand in some cases, typing a query is faster than dragging components from various placesI’ll use it to illustrate how you might use drag-and-drop if you’re working with long column names or complex code snippets. Follow these steps to build the query visually:
1. Select the HR_ORCL SQL worksheet, and click Clear to start with a blank sheet.
2. Drag the EMPLOYEES table from the Connections Navigator display onto the SQL worksheet.
3. Delete FIRST_NAME, EMAIL, HIRE_DATE, PHONE_NUMBER , and COMMISSION_PCT from the SQL worksheet.
4. Select Pseudocolumns from the Snippets window’s categories list (see Figure 2). Then drag LEVEL from the Pseudocolumns list into the query after SELECT . Type a space before and a comma after LEVEL.
5. Select Character Functions in the Snippets window’s categories list. Drag the LPAD function to the left of LAST_NAME.
6. In the SQL worksheet, replace expr1 with ' ' and replace n with 2*(LEVEL-1).
7. Delete ,expr2 . Concatenate (| |) the expression to LAST_NAME , and provide the alias org for the expression (see Figure 2).
8. Format the query in the SQL worksheet, using the context menu’s Format SQL command.
9. Delete the ; after FROM hr.employees, and complete the query by typing in the remaining code. (If you want, you can drag the column names you need from the Connections Navigator display onto the SQL worksheet instead of typing them. In the releases following Oracle SQL Developer 1.2.1, Code Insight lets you select column names from a list as you type.)
Press F5 or click Run Script to execute the query. Your Script Output display should match the output shown in Figure 2.
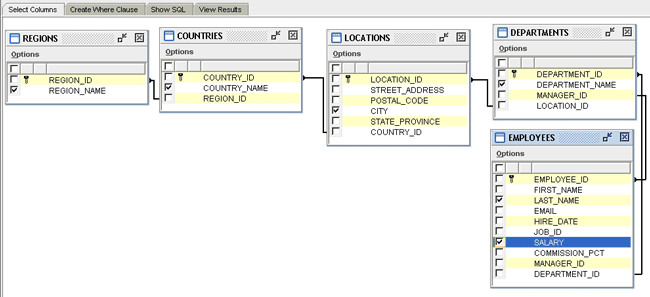
Query BuilderOracle SQL Developer provides further visual query building support through the query builder, which enables you to create a SELECT statement by dragging and dropping table and view names and by graphically specifying columns and other query elements. The SELECT statement you build is inserted into the SQL worksheet.
To work through a query builder example, open the HR_ORCL connection and open or select the SQL worksheet. Right-click in the Enter SQL statement text box, and select Query Builder from the context menu.
Drag the EMPLOYEES, DEPARTMENTS, REGIONS, COUNTRIES , and LOCATIONS tables from the tables list on the left side of the query builder onto the blank canvas. You can move and resize the tables as desired. You can sort any table’s columns by double-clicking the column header. Click the check boxes to select REGION_NAME, COUNTRY_NAME, CITY, DEPARTMENT_NAME, LAST_NAME , and SALARY (see Figure 3).
The order in which you select the columns is the order in which they appear in the resulting SELECT statement. Click the Show SQL tab to see that the join clause has been created for you.
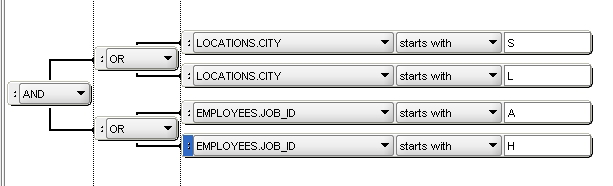
Now click the Create Where Clause tab to add more restrictions:
1. Starting from the left, select LOCATIONS.CITY from the first list, select starts with from the second list, and type S (this value is case-sensitive) into the blank area on the right.
2. Right-click the blue button on LOCATIONS.CITY , and select Insert OR . Using the new set of lists that appears, add LOCATIONS.CITY starts with L.
3. Right-click the blue button on OR , select Insert AND , and add EMPLOYEES.JOB_ID starts with A.
4. Right-click the blue button on EMPLOYEES.JOB_ID , select Insert OR , and add EMPLOYEES.JOB_ID starts with H.
Your Create Where Clause structure should look just like Figure 4.
Click the View Results tab, and click Run Report. The output should appear on the screen.
 |
| Figure 1: Data tab with modified records |
 |
| Figure 2: Drag-and-drop query |
 |
| Figure 3: Query builder table positioning and column selection |
 |
| Figure 4: WHERE restrictions |
Click Apply to write the query to the SQL Worksheet. Right-click in the Enter SQL Statement box, and select Format SQL . Then press F9 or click Execute Statement to run the query. The results should match the output you generated in the Query Builder’s View Results tab.
ConclusionIn Oracle SQL Developer, you can
- Create SELECT statements by dragging tables from the Connections Navigator display onto the SQL worksheet.
- Click a node in the Connections Navigator display to describe a table, retrieve data from it, or modify its records.
- Drag frequently used code from the Snippets window to the SQL worksheet.
- Use the query builder feature to create SELECT statements and other query elements graphically.
The visual query building capabilities in Oracle SQL Developer make it a productive tool for any database developer.
Next Steps
READ more SQL Developer
LEARN more about
Oracle SQL Developer
“Creating a Database Connection”
“Extending Oracle SQL Developer”
PARTICIPATE in the Oracle SQL Developer Exchange
DISCUSS Oracle SQL Developer
Photography by Joshua Hoehne, Unsplash