Use Oracle Application Express with Oracle Cloud Infrastructure REST APIs to upload, download, and manage big files in Oracle Cloud.
By Adrian Png
November 27, 2019
Oracle Cloud Infrastructure provides a comprehensive suite of REST APIs for accessing and managing cloud resources. For example, administrators can use REST APIs to create and manage autonomous databases and initiate backups.
Oracle Application Express (Oracle APEX) makes working with REST easy. The APEX_WEB_SERVICE package, available since Oracle APEX 4.0, provides developers with a function for consuming REST APIs. Oracle APEX 5.0 introduced the APEX_JSON package, allowing easy parsing of JSON responses. Oracle APEX 18.1 introduced the Web Source Module (WSM), which enables developers to access REST services and use the data in APEX components such as reports, interactive reports, and interactive grids.
These features, when used together with Oracle Cloud Infrastructure REST APIs, enable APEX developers to create some very compelling solutions. This article addresses a common web developer question: Where should I store large file attachments?
The most common and straightforward solution is to store each file as a LOB (large object) data type in the database. This is easy and supported by the APEX File Browse page item type. But that approach introduces database management complexities such as storage space management issues and longer data migration, backup, and recovery times.
An alternative in the cloud era is to use object-based storage systems, and most cloud service providers offer this solution. Oracle Cloud Infrastructure offers Oracle Cloud Object Storage Service. With the release of Oracle APEX 19.2, there is now built-in support for Oracle Cloud Infrastructure Web Credentials, which provides a fast and easy way to work with Oracle Cloud Object Storage Service. This article demonstrates how easy it is to authenticate and interact with the Oracle Cloud Object Storage Service REST APIs in APEX.
Tools Required
Access to Oracle Cloud is required to complete the tasks in this article. Request Oracle Cloud Infrastructure’s Free Tier account if you have not already done so. Each account comes with various resources, including two Oracle Autonomous Database instances and access to Oracle Cloud Object Storage Service, which is needed to complete the tasks outlined in this article. Although every Oracle Autonomous Database instance comes with APEX, the APEX-based applications can reside on an on-premise database instance or even on apex.oracle.com. The most important consideration is that the instance is running Oracle APEX 19.2 or later.
OpenSSL software is also required to generate the API keys needed to access the Oracle Cloud Infrastructure REST APIs. For Linux and MacOS users, the application should already be installed. Windows users should install the free Git client that comes with a bash command-line interface and OpenSSL.
Identity Setup
In Oracle Cloud Infrastructure Object Storage, a bucket is a container for storing objects. To access a bucket through the Oracle Cloud Infrastructure REST APIs, complete the following identity management tasks, using the Oracle Cloud Infrastructure console and an account that has administrative rights within the tenancy (the root compartment).
-
Create the PROD compartment:
- Click the hamburger icon (≡), at the top left corner of the page.
- Hover over Identity, and click the Compartment submenu item.
- Click Create Compartment.
- Enter the following information in the corresponding fields:
- Name:
PROD - Description:
Compartment for PROD assets
- Name:
-
Create the ProdObjectManagers group:
- Click the hamburger icon (≡), select Identity, and click Groups.
- Click Create Group.
- Enter the following information in the corresponding fields:
- Name:
ProdObjectManagers - Description:
Users who can manage objects in compartment PROD
- Name:
- Click Create to complete the process.
-
Create the ProdObjectManagementPolicies policy in the root compartment:
- Click the hamburger icon (≡), select Identity, and click Policies.
- Click Create Policy.
- Enter the following information in the corresponding fields:
- Name:
ProdObjectManagementPolicies - Description:
Policies for users to manage objects in compartment PROD - Policy Versioning:
Keep Policy Current - The members of the ProdObjectManagers group will require the ability to list the buckets in the compartment and manage any objects in these buckets. Add the following statements to allow the respective policy actions:
a. Allow group ProdObjectManagers to
read buckets in compartment PROD
b. Allow group ProdObjectManagers to
manage objects in compartment PROD
- Name:
- Click Create to complete the process.
-
Create the
prod_object_agentuser, whose API keys will be used for managing storage objects through APEX:- Click the hamburger icon (≡), select Identity, and click Users.
- Click Create User.
- Enter the following information in the corresponding fields:
- Name:
prod_object_agent - Description:
User performing object management on behalf of APEX application user - Email: Leave the field blank.
- Name:
- Click Create to complete the process.
- On the Users page, click to edit the user details.
- Click Edit User Capabilities, uncheck all items except API Keys, and click Save.
-
On the user’s details page, set up the user’s API keys to be used with the Oracle Cloud Infrastructure REST APIs. (Complete details for preparing the user can be found here.) The following are the key steps involved:
- Generate a private key with no pass phrase:
mkdir -p ~/.oci && \
openssl genrsa -out ~/.oci/poa_oci_api_key.pem 2048
- Generate the public key:
openssl rsa -pubout -in ~/.oci/poa_oci_api_key.pem \
-out ~/.oci/poa_oci_api_key_public.pem
- Copy the contents of the file to the clipboard:
~/.oci/poa_oci_api_key_public.pem
- Scroll down, and if the API Keys section is not visible, click the corresponding link under the Resources menu at the left of the page.
- Click Add Public Key.
- Paste the contents of the
~/.oci/poa_oci_api_key_public.pemfile into the text box, and click Add to complete the process. - Copy the private key’s fingerprint from the Oracle Cloud Infrastructure console, or execute following command:
openssl rsa -pubout -outform DER \
-in ~/.oci/poa_oci_api_key.pem | openssl md5 –c
- Generate a private key with no pass phrase:
-
Finally add the prod_object_agent user to the ProdObjectManagers group.
- Click the hamburger icon (≡), select Identity, and click Groups.
- Click the ProdObjectManagers group.
- Click Add User to Group.
- Select the prod_object_agent user.
- Click Add to complete the process.
Bucket Setup
Create a bucket to contain the files that will be uploaded through the new APEX application.
-
Log in to the Oracle Cloud Infrastructure console as an administrator.
-
Click the hamburger icon (≡), select Object Storage, and click Object Storage.
-
Ensure that the PROD compartment is selected.
-
Click Create Bucket, and provide the following information in the corresponding fields:
- Bucket Name: Enter
apex_file_storage, for example. - Storage Tier: Select Standard.
- Emit Object Events: Uncheck this option.
- Encryption: Select Encrypt Using Oracle Managed Keys.
- Bucket Name: Enter
-
Click Create Bucket to complete the process.
To prepare for the successful creation and discovery of the WSM data profile later, upload a dummy file to the apex_file_storage bucket now, using the Oracle Cloud Infrastructure console.
The Oracle APEX Application
The next part of this article involves creating the APEX application for listing, uploading, downloading, and deleting objects from buckets in the Oracle Cloud Infrastructure compartment. The application will include the following pages:
- Page 1 – Home
- Page 2 – File Upload
- Page 3 – Download Object
The application will also include the following APEX components:
Begin by creating an application in your APEX workspace:
-
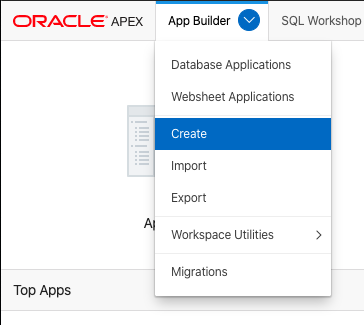
Log in to the APEX workspace, click the arrow next to the App Builder menu item, and click Create.
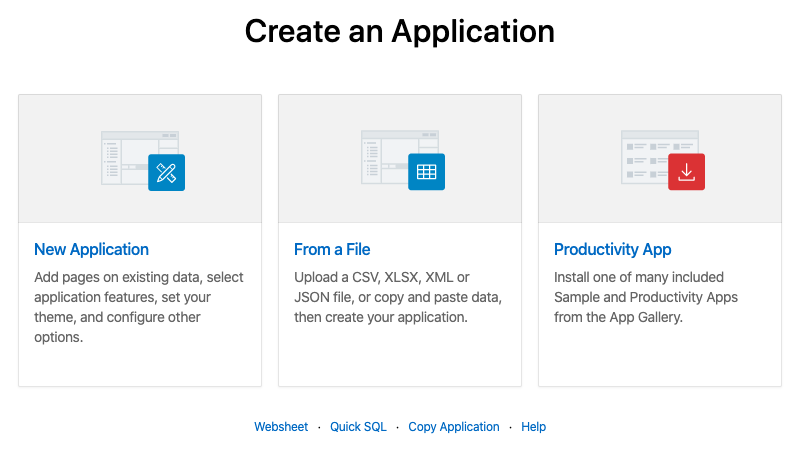
- Click New Application.
- Enter an application name such as
Object Storage Management, and click the Create Application button, near the bottom of the page.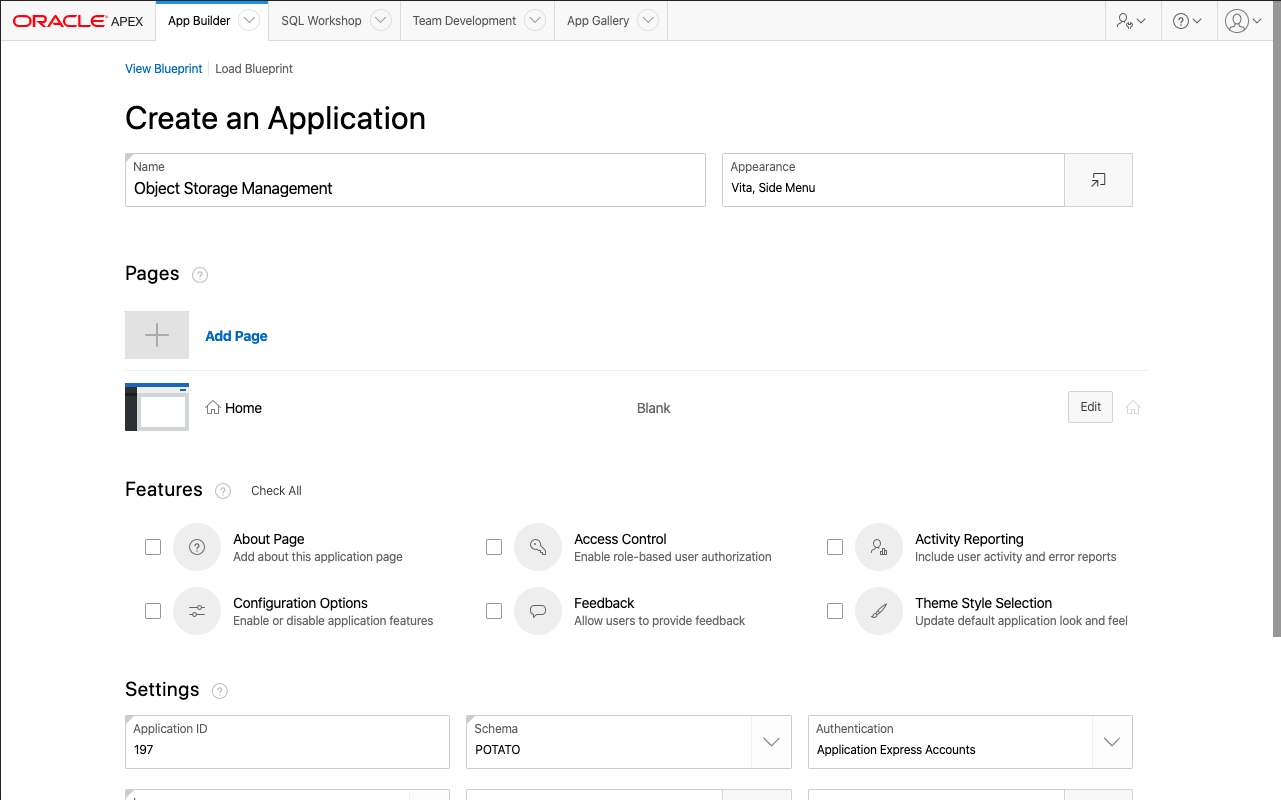
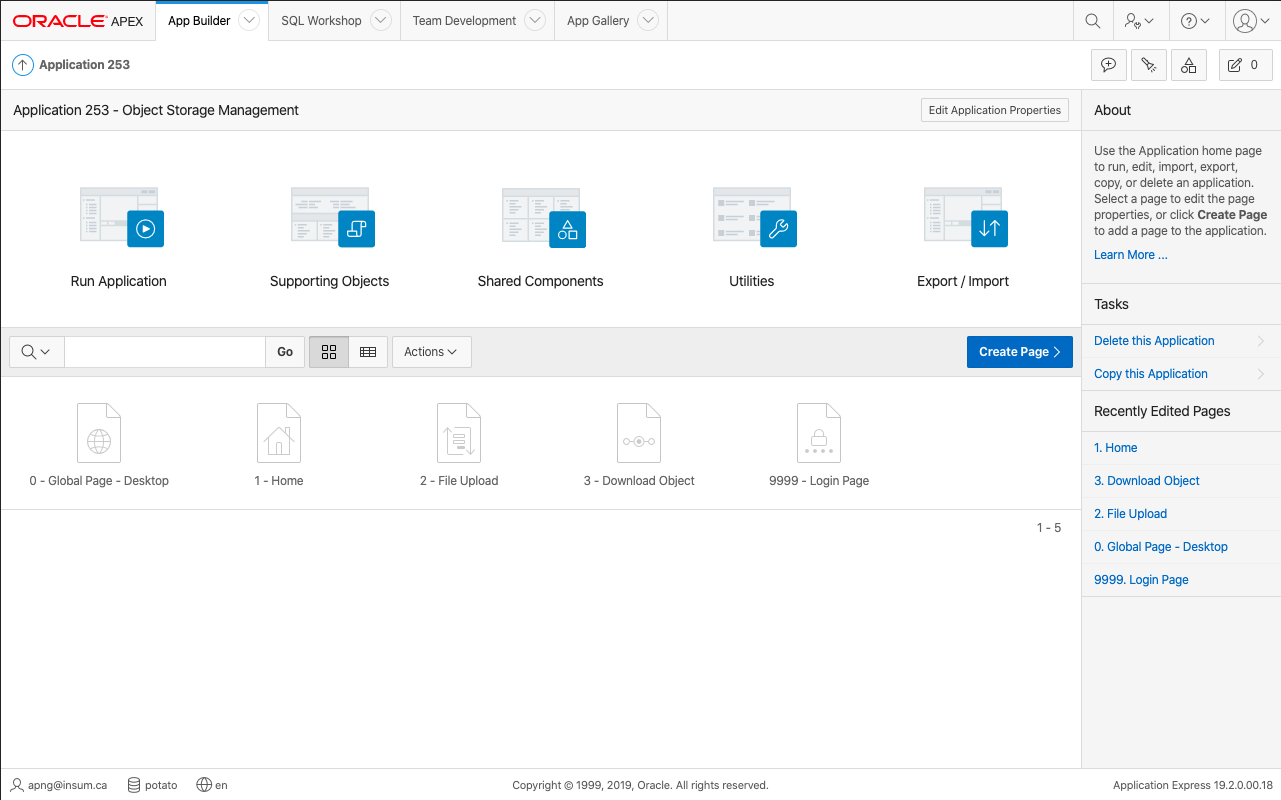
- When the application has been created, you will be redirected to the Application home page. From here, you can run the application, create and edit pages, or access the application’s shared components.
Web Credentials for Oracle Cloud Infrastructure
Use APEX web credentials to connect to REST services and securely store the credentials.
Before creating the web credentials in the APEX workspace, obtain the required information from the Oracle Cloud Infrastructure console:
- OCI User ID
- Click the hamburger icon (≡), select Identity, and click Users.
- Find and click the Show link to expose the full Oracle Cloud Identifier (OCID) value.
- Click Copy.

- Click Copy.
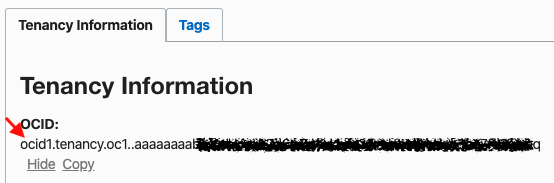
- OCI Tenancy ID
- Click the hamburger icon (≡), select Administration, and click Tenancy Details.
- Find and click the Show link to expose the full OCID value.
- Click Copy.
- OCI Private Key
- Edit the contents of the
poa_oci_api_key.pemfile, using a text editor. - The contents of the file should start with the text
-----BEGIN RSA PRIVATE KEY-----
And end with-----END RSA PRIVATE KEY-----
Remove both lines. - For the remaining contents, remove the line breaks from every row. The result should be a very long string of characters in a single line. Copy this text, but do not save the file.
- Edit the contents of the
- OCI Public Key Fingerprint
- Use the fingerprint value obtained in the “Identity Setup” section, step 5(g).
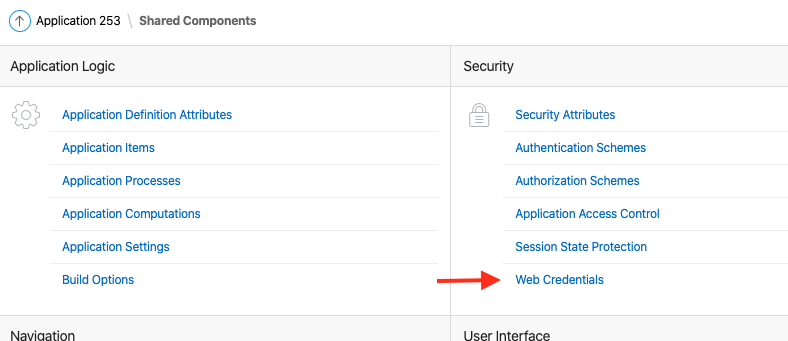
Next create the web credential:
- In the APEX application’s Shared Components, click Web Credentials (in the Security section).
-
Click Create.
- Fill in the required fields, using the information gathered earlier in this section.
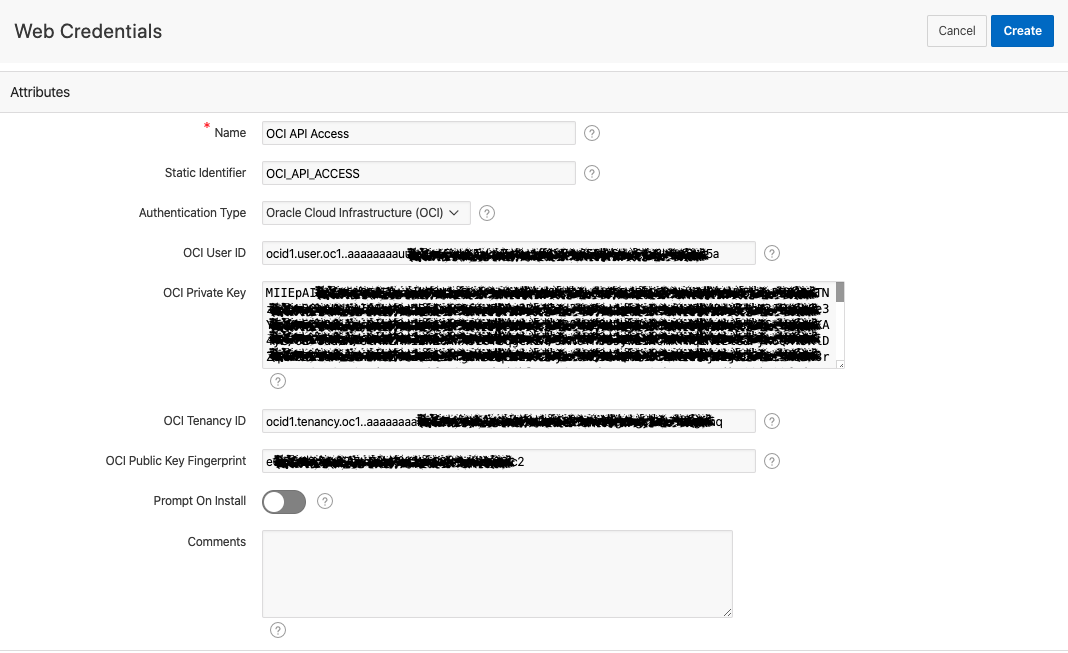
- Name:
OCI API Access - Static Identifier:
OCI_API_ACCESS - Authentication Type: Oracle Cloud Infrastructure (OCI)
- OCI User ID: See above.
- OCI Private Key: See above.
- OCI Tenancy ID: See above.
- OCI Public Key Fingerprint: See above.
- Name:
-
Click Create.
Web Source Module for Oracle Cloud Infrastructure Object Storage
In this section, you’ll create two web source modules:
list_bucketslist_objects_in_bucket
As the names imply, the first WSM will list the buckets within a specified compartment, such as PROD. The second will list the objects found in a named bucket, such as apex_file_storage.
The following additional information about your tenancy will be required:
- API endpoints – Depending on the region where the bucket is located, choose the endpoint from the list available here.
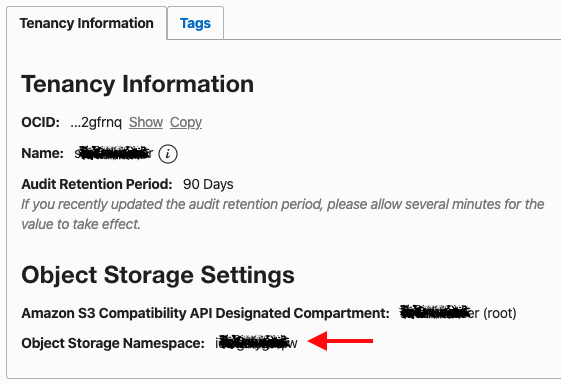
- Object storage namespace
- Click the hamburger icon (≡), select Administration, and click Tenancy Details.
- The required namespace value is in the Object Storage Settings section.
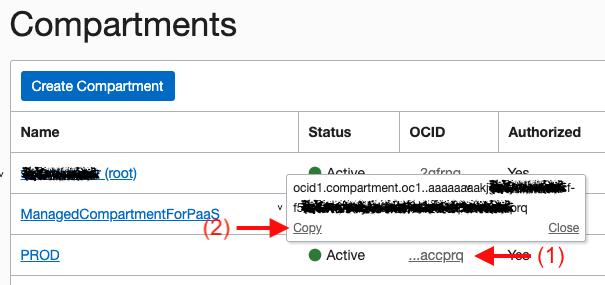
- Compartment ID
- Click the hamburger icon (≡), select Identity, and click Compartments.
- Copy the OCID value from the Compartments page.
Create the list_bucket WSM. Take the following steps:
-
In the APEX application, go to Shared Components and click Web Sources Modules in the Data Sources section.
-
Click the Create > button.
-
Select the From scratch option on the first wizard page, and click Next >.
-
Provide the required information, and click Next >.
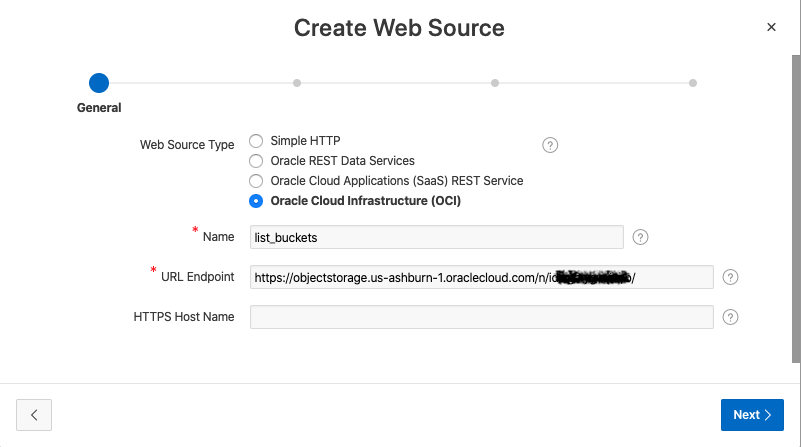
- Web Source Type: Oracle Cloud Infrastructure (OCI)
- Name:
list_buckets - URL Endpoint: Use the format
https://objectstorage.<REGION>.oraclecloud.com/n/
<NAMESPACE>/,
and substitute the placeholders with the information obtained earlier in this section.
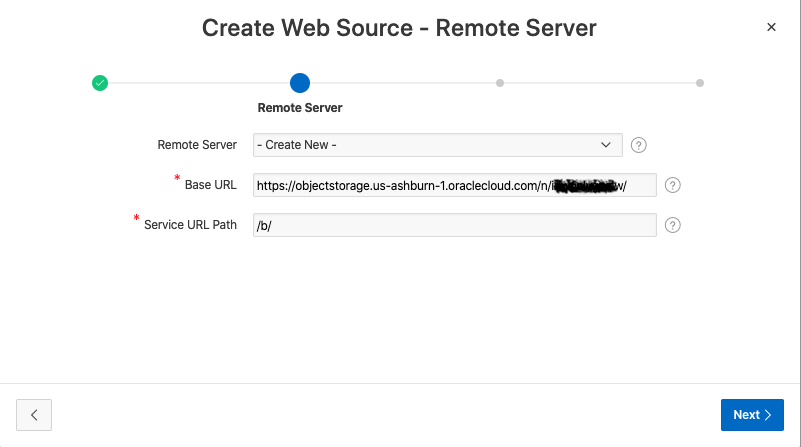
-
APEX will parse the endpoint and suggest what to enter for Base URL and Service URL Path. Because you will be working within a single tenancy, include the namespace information in Base URL.
-
Select Authentication Required and the appropriate choice for Credentials. Click Advanced >.

-
Create a Query String variable parameter. Enter the required information, and click Discover >.
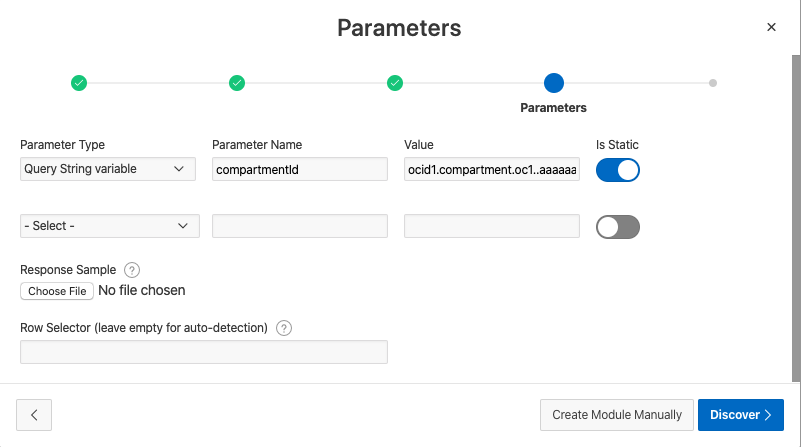
- Parameter Type: Query String variable
- Parameter Name:
compartmentId - Value: Use the value you obtained earlier in this section.
- Is Static: Select Is Static.
-
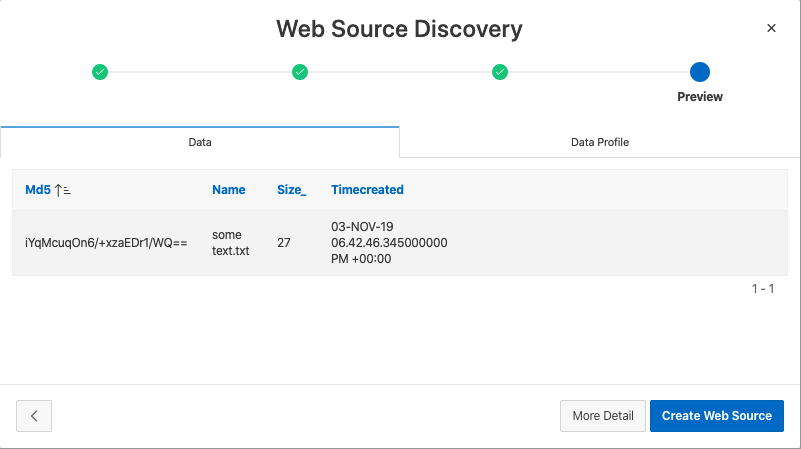
WSM automatically discovers the REST service’s response and creates a data profile. Check that the information is correct, and click Create Web Source to complete the process.
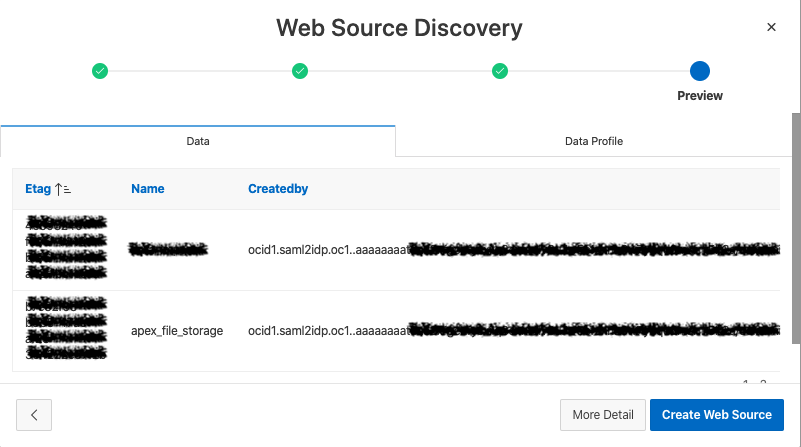
Create the list_objects_in_bucket WSM. IMPORTANT: Ensure that at least one file has been uploaded to the target bucket with the Oracle Cloud Infrastructure console. If the bucket is empty, the WSM data profile discovery phase will fail!
-
In the APEX application, go to Shared Components and click Web Sources Modules in the Data Sources section.
-
Click Create >.
-
Select the From scratch option on the first wizard page, and click Next >.
-
Provide the required information, and click Next >.
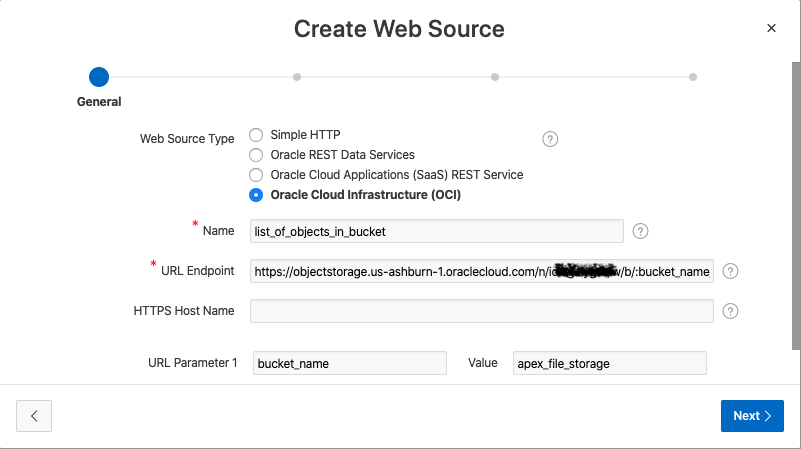
- Web Source Type: Oracle Cloud Infrastructure (OCI)
- Name:
list_objects_in_bucket - URL Endpoint: Use the format
https://objectstorage.<REGION>.oraclecloud.com/n/
<NAMESPACE>/b/:bucket_name/o/,
and substitute the placeholders with the information obtained earlier in this section. - URL Parameter 1:
bucket_name(This parameter was created automatically by APEX.) - Value:
apex_file_storage
-
APEX will parse the endpoint and suggest what to enter for Base URL and Service URL Path.
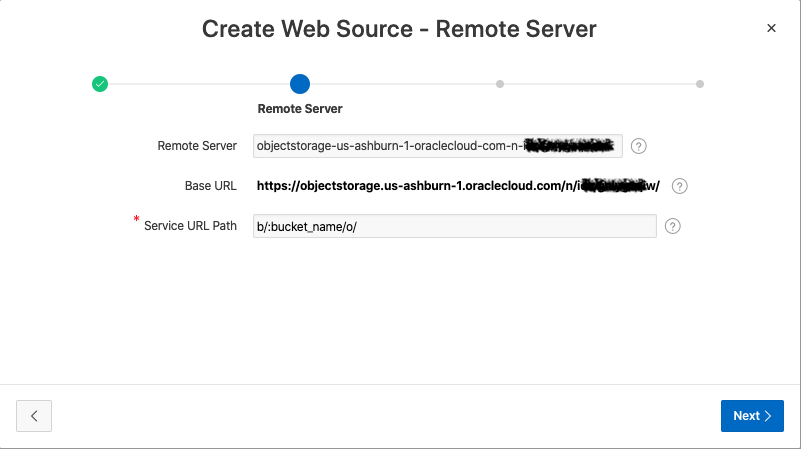
-
Select Authentication Required and the appropriate choice for Credentials. Click Advanced >.
-
The first parameter, Parameter Name =
bucket_name, is created automatically by APEX. Leave the defaults. Create another parameter, provide the required information, and click Discover >.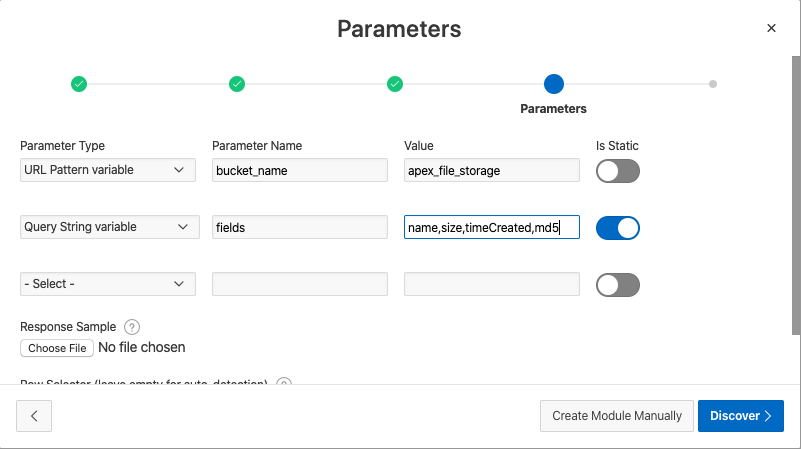
- Parameter Type: Query String variable
- Parameter Name:
fields - Value:
name,size,timeCreated,md5 - Is Static: Select Is Static.
-
Check that the information is correct, and click Create Web Source to complete the process.
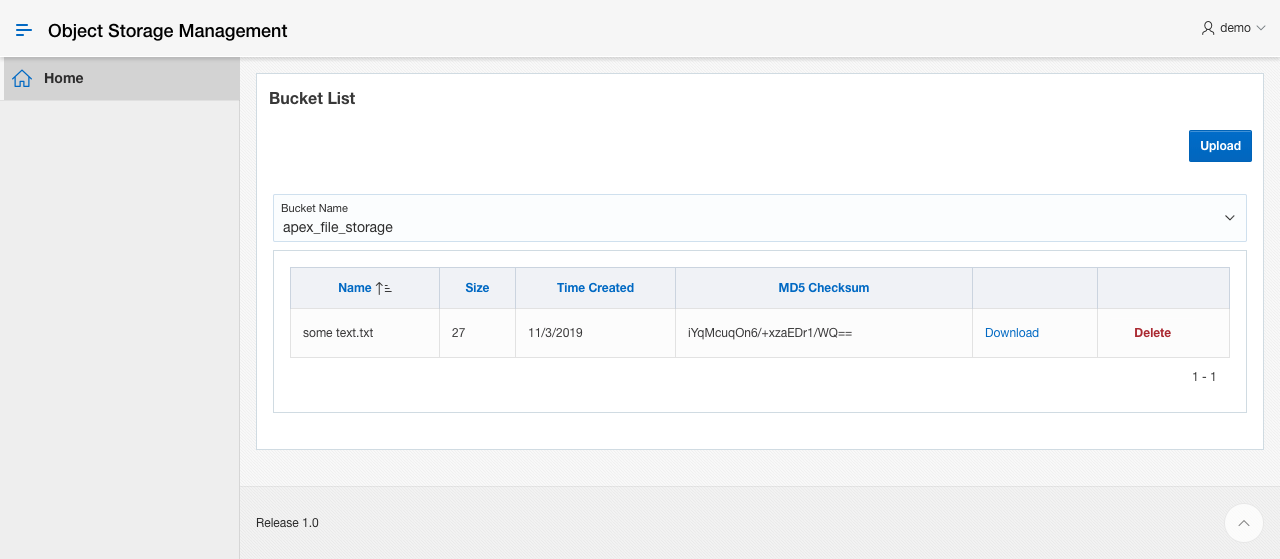
The Bucket List Home Page
The Home page (page 1) of the APEX application will contain (1) a Select List page item for selecting the bucket to view and (2) a “classic report” that will list the objects contained in the selected bucket. They are backed by the WSM’s list_buckets and list_objects_in_bucket.
Select list with an improved list of values. Prior to Oracle APEX 19.2, a list of values (LOV) supported only two types of datasources: static and dynamic. The latter relies on a SQL query that returns a display and a return value. In Oracle APEX 19.2, the dynamic type is now the default and supports different source types, including WSM (REST). Take advantage of this enhancement to create a simple drop-down list with the list_buckets WSM as a datasource.
-
In the APEX application, go to Shared Components and click List of Values in the Other Components section.
-
Click Create >.
-
Select the From scratch option on the first wizard page, and click Next >.
-
Enter a name such as
BUCKET_LIST, select Dynamic, and click Next >. -
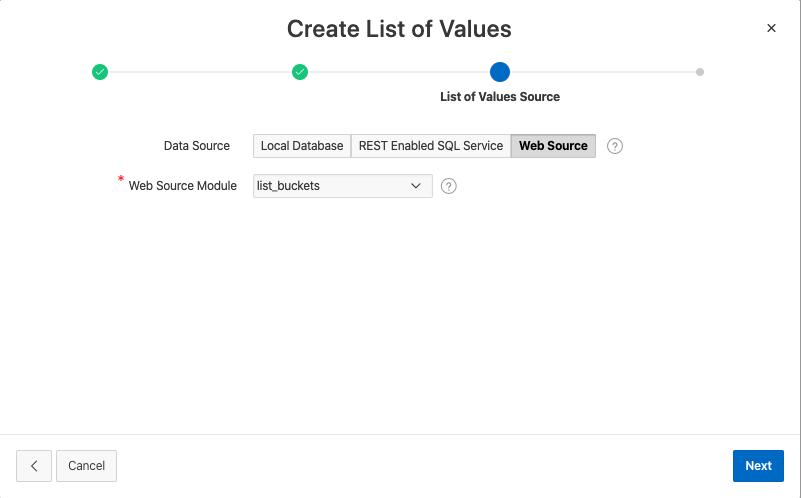
Under Data Source, click Web Source and select the web source module list_buckets. Click Next.
-
Select NAME for both Return Column and Display Column, and click Create to complete the process.
Classic report to list bucket contents. To create the classic report, edit page 1 from the Application home page.
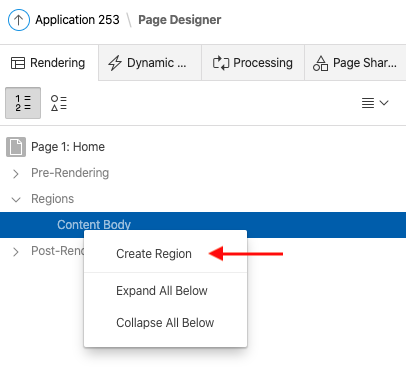
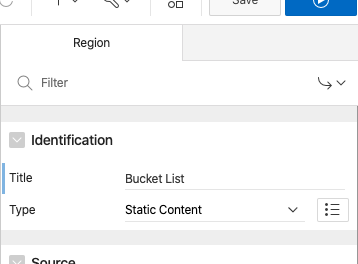
- In Page Designer, right-click Content Body and click Create Region. This creates a Static Content region.
- On the rightmost panel, set Title to Bucket List.
- Right-click New Region, and click Create Page Item.
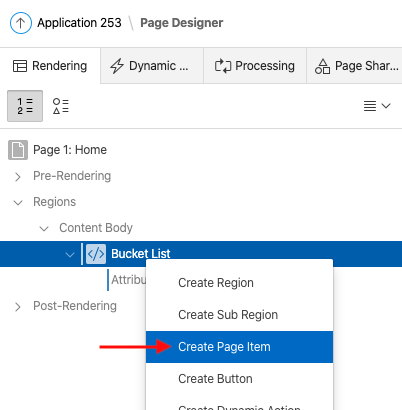
- Set the following attributes for the new page item:
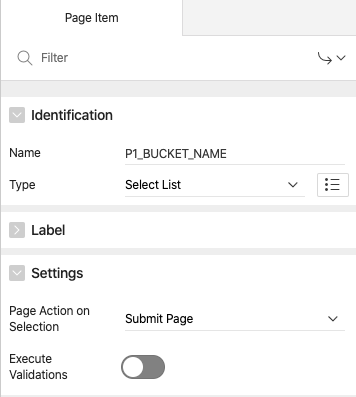
- Name: P1_BUCKET_NAME
- Type: Select List
- Page Action on Selection: Submit Page
- Type: Shared Component
- List of Values: BUCKET_LIST
- Display Extra Values: off
- Display Null Value: on
- Null Display Value: — Select a bucket —
-
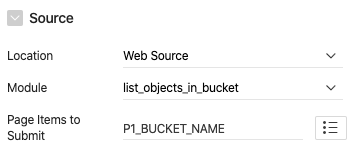
Create another region and the following options for a classic report:
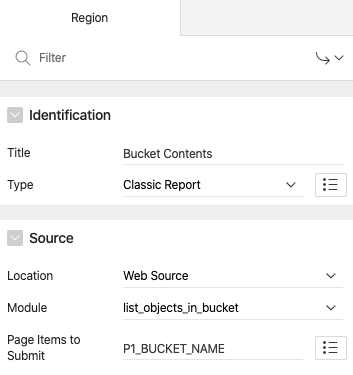
- Title: Bucket Contents
- Type: Classic Report
- Location: Web Source
- Module: list_objects_in_bucket
- Page Items to Submit: P1_BUCKET_NAME
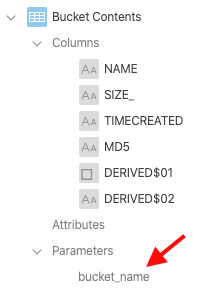
-
Expand the Parameters node in the Classic Report region, and select bucket_name.
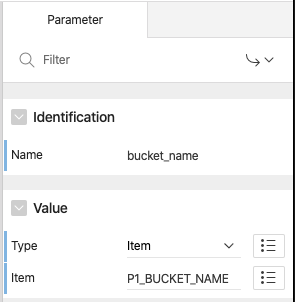
-
Under Value, select the following values:
- Type: Item
- Item: P1_BUCKET_NAME
File Upload Modal Page
Create a new modal page (page 2) to enable users to upload files to the selected bucket, triggered by the Upload button on page 1, which also sets the target bucket name.
-
From the Application home page, click Create Page > to create a blank page. Set Page Mode to Normal. When asked, do not associate the page with a navigation menu entry. When the blank page is created, you will be redirected to Page Designer for page 2.
-
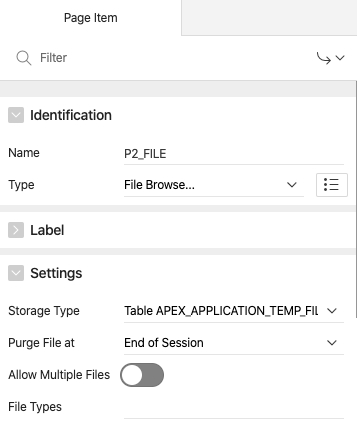
Create two page items:
P2_BUCKET_NAME, a Hidden page itemP2_FILE, a File Browse page item that is configured to useAPEX_APPLICATION_TEMP_FILESas the storage type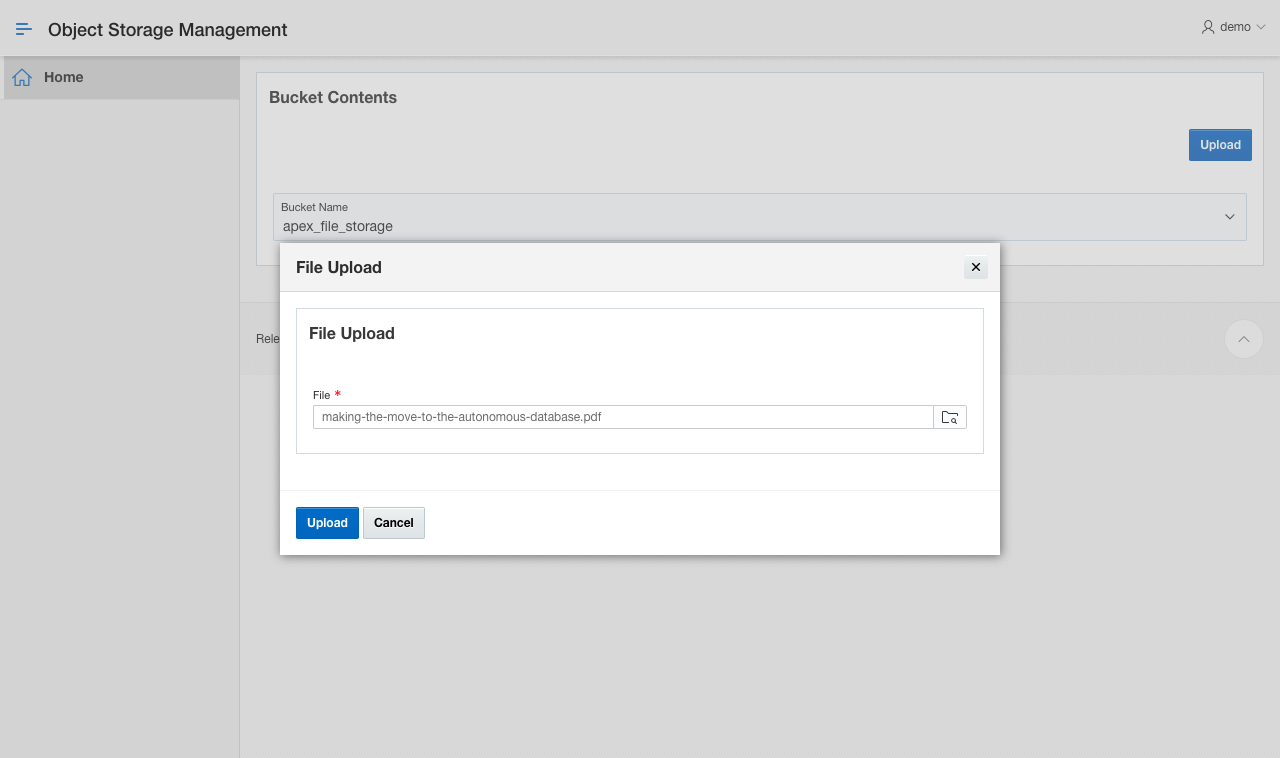
-
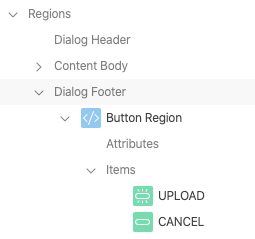
Create a region for buttons under Dialog Footer, and add two page buttons:
- UPLOAD, to initiate the file upload process. Set the button’s Action to Submit Page.
- CANCEL, to close the dialog box without doing anything. Set the button’s Action to Defined by Dynamic Action.
-
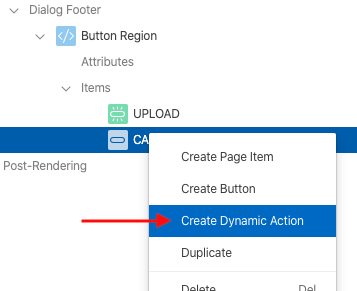
Right-click the CANCEL button, and click Create Dynamic Action.
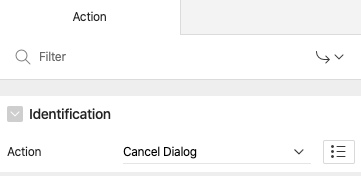
- Set a meaningful name for the dynamic action, and then select the action under True. For Action, specify Cancel Dialog.
- Create an
uploadFilepage submission process that executes the following PL/SQL code:declare l_request_url varchar2(32767); l_content_length number; l_response clob; upload_failed_exception exception; begin for file in ( select * from apex_application_temp_files where name = :P2_FILE ) loop l_request_url := :G_BASE_URL || 'b/' || :P2_BUCKET_NAME || '/o/' || apex_util.url_encode(file.filename); apex_web_service.g_request_headers(1).name := 'Content-Type'; apex_web_service.g_request_headers(1).value := file.mime_type; l_response := apex_web_service.make_rest_request( p_url => l_request_url , p_http_method => 'PUT' , p_body_blob => file.blob_content , p_credential_static_id => :G_OCI_WEB_CREDENTIAL ); if apex_web_service.g_status_code != 200 then raise upload_failed_exception; end if; end loop; end; - Create a
closeDialogprocess to close the modal page that returns the user to page 1.
The uploadFile process code refers to two static substitutions; add them to the application with the corresponding values:
G_BASE_URL:https://objectstorage
.<REGION>.oraclecloud.com/n/NAMESPACE/G_OCI_WEB_CREDENTIAL:OCI_API_ACCESS(the static identifier for the web credential)
Now return to edit page 1:
-
Create a button named UPLOAD in the Bucket List static content region. Set the following attributes:
- Button Position: Next
- Action: Redirect to Page in this Application
-
When the button’s action has been set, click the No Link Defined button in the Target attribute and set the following values:
- Page: 2
- Set Items
- Name: P2_BUCKET_NAME
- Value: &P1_BUCKET_NAME
- Clear Cache: 2
-
Create a dynamic action for the UPLOAD button. Set the attributes for the action:
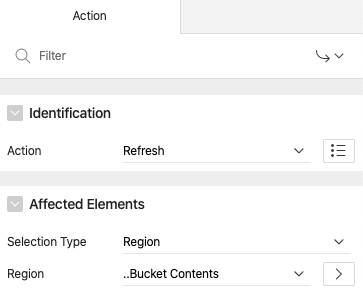
- Action: Refresh
- Selection Type: Region
- Region: Bucket Contents (the classic report listing the selected bucket’s contents)
File Downloads
To facilitate file downloads, create page 3 from the Application home page, with the following components:
- A Static Content region for placing the page items below
- Hidden page items that will be set by the calling page:
- P3_BUCKET_NAME
- P3_OBJECT_NAME
- A prerendering process at the Before Header processing point.
In the process attributes, add the following PL/SQL code: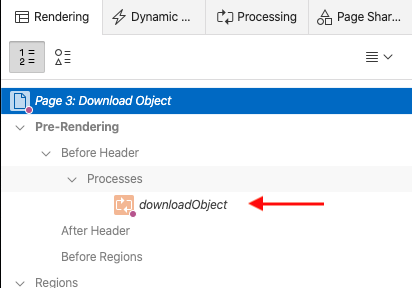
declare
  l_request_url varchar2(32767);
  l_content_type varchar2(32767);
  l_content_length varchar2(32767);

  l_response blob;

  download_failed_exception exception;
begin
  l_request_url := :G_BASE_URL || 'b/'
    || :P3_BUCKET_NAME || '/o/'
    || apex_util.url_encode(:P3_OBJECT_NAME);

  l_response := apex_web_service.make_rest_request_b(
    p_url => l_request_url
    , p_http_method => 'GET'
    , p_credential_static_id => :G_OCI_WEB_CREDENTIAL
  );

  if apex_web_service.g_status_code != 200 then
    raise download_failed_exception;
  end if;

  for i in 1..apex_web_service.g_headers.count
  loop
    if apex_web_service.g_headers(i).name =
      'Content-Length'
    then
      l_content_length :=
        apex_web_service.g_headers(i).value;
    end if;

    if apex_web_service.g_headers(i).name =
      'Content-Type'
    then
      l_content_type :=
        apex_web_service.g_headers(i).value;
    end if;
  end loop;

  sys.htp.init;
  if l_content_type is not null then
    sys.owa_util.mime_header(trim(l_content_type), false);
  end if;
  sys.htp.p('Content-length: ' || l_content_length);
  sys.htp.p('Content-Disposition: attachment; filename="'
    || :P3_OBJECT_NAME || '"' );
  sys.htp.p('Cache-Control: max-age=3600'); -- if desired
  sys.owa_util.http_header_close;
  sys.wpg_docload.download_file(l_response);

  apex_application.stop_apex_engine;
end;
Back on page 1, add a virtual column to the classic report. Set the type to Link, and reference the target to the download page, setting the values for both P3_BUCKET_NAME and P3_OBJECT_NAME.
Delete Objects
The object deletion function will be implemented on the home page with a DELETE_OBJECT Ajax callback.
- Add a second virtual column, and set the type to Plain Text. Enter the following HTML expression:
<button type="button="
  class=="delete-object-button t-Button w80p
  t-Button--danger t-Button--link="
  data-object-name=="#NAME#=">Delete</button>
- In Function and Global Variable Declaration, add the following JavaScript code:
var oss = { deleteObject: function(bucketName, objectName, report) { if(confirm('Are you sure?')) { var result = apex.server.process('DELETE_OBJECT', { x01: bucketName, x02: objectName }); result.done(function(data) { apex.message.showPageSuccess( 'Object deleted successfully.'); apex.event.trigger(report, 'apexrefresh'); }).fail(function (jqXHR, textStatus, errorThrown) { apex.message.alert('Failed to delete object.'); }); } } }; - Create a dynamic action that is triggered by clicks of the button connected to the
button.delete-object-buttonclass. Ensure that the event scope is dynamic, and then add an action to execute the following JavaScript code with the classic report as the affected element:oss.deleteObject( apex.item('P1_BUCKET_NAME').getValue(), $(this.triggeringElement).data('object-name'), this.affectedElements ); - Create an Ajax callback named
DELETE_OBJECTwith the following PL/SQL code:declare c_bucket_name apex_application.g_x01%type := apex_application.g_x01; c_object_name apex_application.g_x02%type := apex_application.g_x02; l_request_url varchar2(32767); l_response clob; begin l_request_url := :G_BASE_URL || 'b/' || c_bucket_name || '/o/' || apex_util.url_encode(c_object_name); l_response := apex_web_service.make_rest_request( p_url => l_request_url , p_http_method => 'DELETE' , p_credential_static_id => :G_OCI_WEB_CREDENTIAL ); if apex_web_service.g_status_code != 200 then owa_util.status_line( nstatus => apex_web_service.g_status_code ); sys.htp.p('{ "message": "Failed" }'); else sys.htp.p('{ "message": "Success" }'); end if; end;
Conclusion
AcknowledgementsI am grateful to Christoph Ruepprich and Carsten Czarski for our conversations on Oracle Cloud Infrastructure REST API support in Oracle APEX 19.2. They helped me figure out how powerful this new feature is to an APEX developer. Thank you! |
Next Steps
TRY Oracle Cloud Infrastructure Always Free Tier.
LEARN more about Oracle APEX 19.2.
Illustration by Wes Rowell