Take advantage of the compact, easily deployable Oracle Data Provider for .NET, Managed Driver.
By Christian ShayMarch/April 2014
Oracle Data Provider for .NET (ODP.NET) is Oracle’s free, high-performance ADO.NET-compliant data access provider that gives .NET developers access to all the features of Oracle Database with .NET languages such as C# or VB.NET. At the same time, ODP.NET supports all the features of ADO.NET and the .NET Framework, such as the Entity Framework object-relational mapper.
ODP.NET is now available in two flavors. The first, ODP.NET, Unmanaged Driver, contains unmanaged code, meaning that some of the libraries it relies on have been compiled directly to machine code rather than to .NET bytecode. ODP.NET 12.1 introduces the second flavor, ODP.NET, Managed Driver, which is fully managed, meaning that the entire driver and supporting client and networking libraries have been compiled to .NET bytecode and run entirely inside the Common Language Runtime, the .NET virtual machine. For those who have a Java background, it may be useful to compare ODP.NET, Unmanaged Driver, to “thick” JDBC and ODP.NET, Managed Driver, to “thin” JDBC.
One of the most compelling features of ODP.NET, Managed Driver, is its size: it consists of no more than two dynamic link libraries (DLLs), consuming less than 10 MB of total disk space. Because this includes everything necessary—no other Oracle client or networking libraries are required—deployment can be very simple and can easily utilize Microsoft deployment technologies such as ClickOnce deployment or Web Deploy. Side-by-side deployment of different versions of ODP.NET is simplified, and in many cases, there is no longer any need to consider whether a deployment target is 32-bit or 64-bit.
In this article, I’ll demonstrate how to download and install ODP.NET, Managed Driver; show how to configure networking; walk through an unmanaged-to-managed migration example; and explain what is required to enable distributed transactions. Along the way, I’ll alert you to a few “gotchas” that can catch first-time users.
RequirementsI’ll be using Microsoft Visual Studio 2012 in this walk-through, and to follow the steps, you will need access to Visual Studio 2010 or later. Note that you will also be installing Oracle Developer Tools for Visual Studio (sometimes referred to as ODT), which does not support Visual Studio Express. If you are using Visual Studio Express, you won’t be able to perform the portion of this walk-through that involves connecting in Server Explorer (the server management console for Visual Studio) and generating a TableAdapter and a dataset.
You will also need access to Oracle Database 10g Release 2 (10.2) or later, with access to the HR sample schema. You can download Oracle Database. (The HR schema is included with the basic installation option, but you can create it manually by installing the Oracle Database examples and running the HR create script.) Finally, ODP.NET, Managed Driver, requires .NET Framework 4 or later.
Download ODP.NET, Managed DriverODP.NET, Managed Driver, is included with several free downloads available on the Oracle Technology Network website. It is part of Oracle Data Access Components 12.1 and later, where it is listed as Oracle Data Provider for .NET, including both the unmanaged and managed ODP.NET. Oracle Data Access Components (referred to in the user interface as ODAC) is packaged with Oracle Universal Installer and as an xcopy install, which is a zipped set of files and some batch files used to copy and configure them. (ODP.NET, Managed Driver, is also distributed by itself as a very small xcopy install.)
To do design-time work with Visual Studio—such as to use ADO.NET Entity Data Model Designer (Entity Designer) or to create TableAdapters and datasets—you will also need Oracle Developer Tools for Visual Studio.
Start by downloading Oracle Developer Tools for Visual Studio with Oracle Data Access Components, a software bundle that includes the 32-bit Oracle Data Access Components along with Oracle Developer Tools for Visual Studio (Visual Studio is a 32-bit application). Visit the Oracle .NET Developer Center, and click the Download tab at the top of the page. Click 32-bit ODAC with ODT Downloads, and then select the newest version of ODTwithODAC…zip available (Release 12.1 or later). Unzip this file into a temporary directory, and then run setup.exe at this location.
Installing ODP.NET, Managed DriverThe ODT with ODAC installation package uses Oracle Universal Installer. When the installer’s Welcome screen appears, click Next, and on the next screen, enter the Oracle home name in the Name field and the Oracle home path in the Path field and click Next. By default, the installer will populate these fields with a proposed new Oracle home name and path. (Generally, you should install new versions of Oracle software into a new Oracle home.)
The next screen shows a list of product components available for installation. Deselect everything except Oracle Data Provider for .NET, Oracle Developer Tools for Visual Studio, Oracle Data Access Components Documentation for Visual Studio, and Oracle Instant Client, and click Next. Depending on your environment, you may see a Database Connection Configuration screen. If so, optionally enter the connection details for your database and click Next. You may also be prompted to select which version(s) of Visual Studio you would like to integrate with. If so, select the version(s) and click Next. Finally, on the Installation Summary screen, click Install to start the installation. After several minutes, it will complete and you can close the installer.
Creating an Application That Uses ODP.NET, Unmanaged DriverFor those who have experience with unmanaged ODP.NET, perhaps the best way to understand the differences between the unmanaged and managed drivers is to perform a migration between the two. Before you can do that, you need a working application that uses ODP.NET, Unmanaged Driver.
Download the download.zip example code file. Extract the files into a temporary directory.
Next, create a new Winform project in Visual Studio: Launch Visual Studio, and choose File -> New -> Project -> Windows Form Application. Drag a button from the Common Controls section of the Toolbox onto the form. Double-click the button to access the code behind it. In the button_Click() handler, add the code from the button_click.txt file, part of the extracted download.zip file. (For reference, the code is also shown in Listing 1.) Modify the code so that datasource in the connection string has the correct host name, port, and service_name for your database. You can find this information in any TNSNAMES.ORA file you have used to connect to this database.
Code Listing 1: The button_Click() handler code
string conString = "User Id=hr; password=hr;" +
//EZ Connect Format is [hostname]:[port]/[service_name]
//Examine working TNSNAMES.ORA entries to find these values
"Data Source=localhost:1521/pdborcl; Pooling=false;";
//Create a connection to Oracle
OracleConnection con = new OracleConnection();
con.ConnectionString = conString;
con.Open();
//Create a command within the context of the connection
//Use the command to display employee names and salary from Employees table
OracleCommand cmd = con.CreateCommand();
cmd.CommandText = "select first_name from employees where department_id = 60";
//Execute the command and use datareader to display the data
OracleDataReader reader = cmd.ExecuteReader();
while (reader.Read())
{
     MessageBox.Show("Employee Name: " + reader.GetString(0));
}
In Solution Explorer, under your project, right-click References and choose Add Reference. In the dialog box, click Assemblies and then find the Oracle.DataAccess assembly (Version 4.x). If there are multiple references, hover over a selection to view the path and confirm that it is located in the Oracle home where you just installed ODP.NET and Oracle Developer Tools for Visual Studio. Select Oracle.DataAccess, and click OK. Go back to the code window containing the button_Click() handler, and add the following using clauses at the top:
using Oracle.DataAccess.Client;
using Oracle.DataAccess.Types;
Build and run the application (press F5 or select Debug -> Start), and then click the application button to verify that the data the button handler code is retrieving from the EMPLOYEES table in the Oracle Database sample HR schema is displayed.
Next you will automatically generate a TableAdapter and a dataset to display data inside a DataGridView. Automatic code generation (using a TableAdapter or Entity Framework, for example) relies on database connections set in Server Explorer. (If you want your application to use unmanaged ODP.NET in the autogenerated code, connect in Server Explorer by using ODP.NET, Unmanaged Driver. Conversely, if you want your application to use managed ODP .NET, you need to connect in Server Explorer by using ODP.NET, Managed Driver.)
Now create a connection to Oracle Database in Server Explorer. Select View -> Server Explorer, right-click Data Connections, and choose Add Connection. In the Add Connection dialog box, click Change for the Data source field. In the Change Data Source dialog box, choose Oracle Database for Data source and choose ODP.NET, Unmanaged Driver for Data provider , as shown in Figure 1.
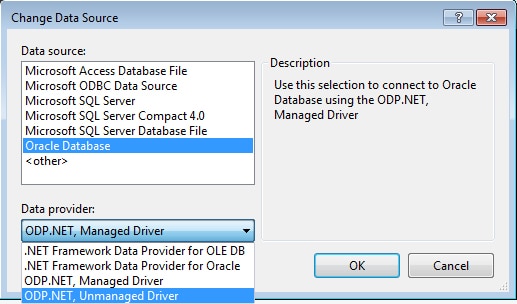
Figure 1: Changing the datasource in the Server Explorer Add Connection dialog box
Click OK. In the Add Connection dialog box, enter the User name and Password; select EZ Connect for Connection Type; and then enter the database host name, port number, and database service name , as shown in Figure 2. Click Test Connection to test the connection, and when the connection is successful, click OK.

Figure 2: The Add Connection dialog box
Next, go back to the Toolbox, and in the Data section, drag DataGridView onto the form design surface. In the DataGridView Tasks menu, click Choose Data Source, and then click the Add Project Data Source link. In the dialog boxes that follow, for Data Source Type, choose Database; for Database Model, choose DataSet; and for Choose Your Data Connection, select the Server Explorer connection you just created. Choose Yes to include the password in the connection string and Yes to save the connection string in the application configuration file. In the Database Objects dialog box, drill down into Tables and select the EMPLOYEES table.
Build and run the application, and the EMPLOYEES table data should display in the DataGridView.
Migrating from Unmanaged to Managed ODP.NETMigrating code based on ODP.NET, Unmanaged Driver, to the managed driver is relatively straightforward. The main tasks are as follows:
-
Modify the using clauses in your code.
-
Replace the references in your project to use ODP.NET, Managed Driver.
-
Edit your TableAdapters and Entity Models to use the managed driver.
-
Confirm that the Oracle Database features used by your application are supported by the managed driver.
To migrate the sample Winform application you created based on ODP.NET, Unmanaged Driver, to use ODP.NET, Managed Driver, instead, click Oracle.DataAccess in Solution Explorer under your project references and press the Delete key to delete it.
Then right-click References and choose Add Reference. In the dialog box, click Assemblies and then find the Oracle.ManagedDataAccess assembly (Version 4.x). If there are multiple references, hover over a selection to view the path and confirm that it is where you just installed ODP.NET and Oracle Developer Tools for Visual Studio. Select Oracle.ManagedDataAccess, and click OK. In the code window containing the button_Click() handler code you edited earlier, replace the two using clauses referencing Oracle.DataAccess.Client and Oracle.DataAccess.Types with the following:
using Oracle.ManagedDataAccess.Client;
using Oracle.ManagedDataAccess.Types;
Figure 3 shows the updated using directives and project references.
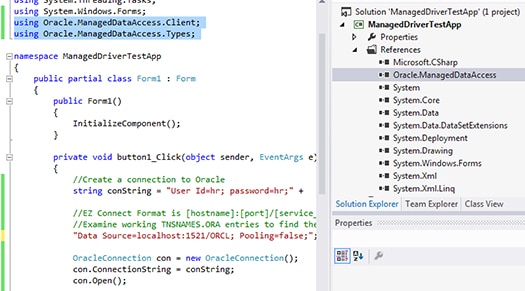
Figure 3: Setting the using directives in the code (left) and in the project references (right) to use ODP.NET, Managed Driver
Next, edit the TableAdapter to use the managed driver. In Solution Explorer, right-click DataSet and choose View Designer. In the Dataset Designer, right-click EMPLOYEESTableAdapter and choose Properties. In the properties pane for TableAdapter, expand the Connection group and modify the Provider property to use Oracle.ManagedDataAccess.Client. Rebuild and run the application, and verify that it now works with the managed driver.
In addition to making these modifications, verify that the application features being used are supported in ODP.NET, Managed Driver. Oracle Data Provider for .NET Developer’s Guide, specifies whether each ODP.NET class is supported with the managed driver. At the time of this writing, feature areas with no managed driver support or very limited support include user-defined types, XMLDB features and datatypes, Oracle Advanced Queuing, the client result cache, bulk copy, and the Transaction Guard feature of Oracle Database 12c. Check “Differences between the ODP.NET Managed Driver and Unmanaged Driver” in Oracle Data Provider for .NET Developer’s Guide, because additional features will be supported over time.
When you are performing a migration, be aware that there is a difference between how the managed and unmanaged drivers parse connection strings. The managed driver takes any difference between two connection strings, including extra spaces between connection string attributes, to mean that the strings are different, and this will result in the creation of an additional connection pool. With the unmanaged driver, only the connection string attributes are compared for differences in determining if a new connection pool is needed. If you discover during unmanaged-to-managed migration testing that unwanted additional connection pools are being created, this difference is the likely culprit.
Networking Configuration with ODP.NET, Managed DriverConfiguring ODP.NET, Managed Driver, for networking (or other settings) is a bit different from configuring the unmanaged driver, because the managed driver does not look at the Windows registry or at most environment variables and is therefore not associated with a specific Oracle home location. As a result, configuration usually takes place inside .NET config files (such as machine .config, app.config, or web.config). Some of these .NET config file entries can optionally point to a directory where SQL*Net configuration files such as TNSNAMES.ORA can be loaded. If you want to omit .NET config file entries altogether, you can include SQL*NET configuration files in the working directory of the application or use the SQL*Net EZConnect connection string format.
During ODP.NET installation, a TNS_ADMIN entry is added to machine.config, and this entry points to the directory where TNSNAMES.ORA, SQLNET.ORA, and LDAP .ORA files can be used by the application. Note that by default during installation, machine.config for the 32-bit or the 64-bit .NET Framework—but not both—is updated. Depending on which package you downloaded, you may need to manually run the appropriate configure.bat file in the ODP.NET\managed directory in the Oracle home if you want to configure both 32-bit .NET Framework and 64-bit .NET Framework.
To view this TNS_ADMIN entry, open the machine.config file for the 32-bit .NET Framework on your machine (because you installed 32-bit ODP.NET), and search for TNS_ADMIN. You should see an entry similar to Figure 4.

Figure 4: Modification of machine.config during ODP.NET installation to add a TNS_ADMIN entry
In addition to or instead of using SQL*Net connection aliases inside the TNSNAMES.ORA pointed to by the TNS_ADMIN machine.config value, you may also include definitions for aliases inside .NET config files. To add a connection alias to the app.config file used by your application, double-click App.config in Solution Explorer to open it in the editor. Add the contents of the appconfig.txt file, part of the extracted download.zip file. (Listing 2 includes the contents of a sample App.config file with a similar appconfigalias connection alias.) Open the application code you edited earlier, and modify the connection string variable value conString such that Data Source=appconfigalias. Rebuild the application, and run it again. Click the button on the form, and verify that you are able to connect and return data with the App.config datasource you created.
Code Listing 2: Example App.config content with parameters for ODP.NET, Managed Driver
<?xml version="1.0" encoding="utf-8" ?>
<configuration>
    <configSections>
    </configSections>
    <startup>
        <supportedRuntime version="v4.0" sku=".NETFramework,Version=v4.5" />
    </startup>
  <oracle.manageddataaccess.client>
    <version number="*">
      <dataSources>
        <dataSource alias="appconfigalias" descriptor="
                           (DESCRIPTION=(ADDRESS=(PROTOCOL=tcp)
                           (HOST=localhost)(PORT=1521))
                           (CONNECT_DATA=(SERVICE_NAME=ORCL))) " />
      </dataSources>
      <settings>
        <setting name="TNS_ADMIN" value="C:\tnsfiles"/>
      </settings>
      <distributedTransaction>
        <setting name="OMTSRECO_IP_ADDRESS" value="mydtc" />
        <setting name="OMTSRECO_PORT" value="2040" />
        <setting name="ORAMTS_SESS_TXNTIMETOLIVE" value="240" />
      </distributedTransaction>
    </version>
  </oracle.manageddataaccess.client>
</configuration>
The order of precedence for resolving TNS aliases is as follows: at application startup, ODP.NET, Managed Driver, looks for a dataSources section in the <oracle.manageddataaccess.client> section in one of the .NET config files and caches any aliases found there. Next the driver looks for a TNS_ADMIN setting in one of the config files and caches the entries in any TNSNAMES.ORA file found in the directory that TNS_ADMIN points to. If there is neither a dataSources section nor a TNS_ADMIN setting in a config file, it will load a TNSNAMES.ORA file found in the working directory of the application.
Many other parameter values can be set in the .NET config files. For information on additional ODP.NET, Managed Driver, configuration settings, see “Oracle Data Provider for .NET, Managed Driver Configuration” in Oracle Data Provider for .NET Developer’s Guide.
Distributed TransactionsMany .NET applications use distributed transactions. A distributed transaction is a transaction that affects several resources, such as an Oracle Database table and a MySQL database table. For a distributed transaction to commit, all participants must guarantee that any change to data will be permanent. If a single participant fails to make this guarantee, any changes to data within the transaction must be rolled back. In .NET programming, distributed transactions are made possible via System.Transactions, which utilizes the Microsoft Distributed Transaction Coordinator (MSDTC), a service installed with Windows.
To enable distributed transactions with ODP.NET, Managed Driver, the Oracle.ManagedDataAccessDTC.dll assembly must be deployed, along with Oracle.ManagedDataAccess.dll. You can find this DLL in the ODP.NET\managed\x86 and ODP.NET\managed\x64 directories in your Oracle home. As indicated by the directory names, there is one assembly for 32-bit Windows and one for 64-bit Windows. The DLL should not be added to the references in your project; it will be implicitly loaded when it is needed.
In addition to deploying the assembly, you will need to provide access to an OraMTS recovery service to resolve in-doubt transactions. Otherwise, you will receive error messages such as “ORA-1591: lock held by in-doubt distributed transaction.” OraMTS is part of the Oracle Data Access Components and Oracle Database on Windows installations, and the service can be installed on the same machine as your application or on a remote machine that has a properly configured MSDTC service. If your recovery service is on a remote machine, you can set the OMTSRECO_IP_ADDRESS and OMTSRECO_PORT values in the <distributedtransaction> section of your .NET config file to tell ODP.NET where the recovery service is located, as shown in Listing 2.
Conclusion and RequestI’ve just walked you through the installation, migration, and configuration of ODP.NET, Managed Driver. Please download it, give it a try, and let me know what you think on the ODP.NET forum.
Next StepsDOWNLOAD
![]() ODP.NET, Managed Driver
ODP.NET, Managed Driver
![]() source code for this article
source code for this article
VISIT
![]() the Oracle .NET Developer Center
the Oracle .NET Developer Center
![]() the ODP.NET forum
the ODP.NET forum
![]() LEARN more about ODP.NET, Managed Driver applications
LEARN more about ODP.NET, Managed Driver applications
![]() FOLLOW OracleDOTNET on Twitter
FOLLOW OracleDOTNET on Twitter
Photography by rawpixel.com, Unsplash