A picture is worth 1,000 words. Almost any discussion about cloud architecture warrants a detailed drawing that all involved parties can see, approve, improve over time, and use as documentation. While many choices of tools exist, Draw.io provides some fantastic features that make your life much easier. One feature, layering, is an approach in which we stack groups of elements like a cake. The results make several tasks easier than ever. As the complexity of the diagram increases, this approach shines.
In this article, we cover some basic that this approach can help with and some tips on how to best organize your drawing. The steps assume that you already have some experience with Draw.io and have imported the Oracle Cloud Infrastructure (OCI) icon set into your product.
Basic setup
This article doesn’t provide a basic how-to for Draw.io, but to get started, you can use either the downloadable full Draw.io client (available on PC or Mac) or app.diagrams. Download the OCI icon set, and under File, select Open Library As and open the xml file. The OCI icons load on the toolbar and are available for use in a drawing.
For this post, we used the desktop Draw.io client. Some nuances exist between the browser client and the native client. For example, the browser client has the folder of “Device” where the xml file exists after “Open Library As.” The functionality should be the same.
To see and manipulate layers, enable the Layers widget from the View menu.
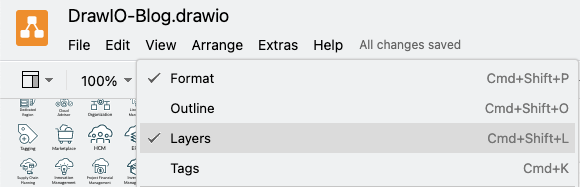
Before playing with layers, let’s understand what they can do for us.
Layers explained
Think of a layered cake, looking from above. Adding an empty layer on top of the topmost layer has no effect until something is added to or moved into it. When an object is there, it appears on top of anything in a lower level. This analogy works for many OCI architectural concepts, such as the file path, Region > Availability Domain > VCN > Subnet > Workload.
Many architects find that if everything is in a single layer, such as the background, they struggle to reliably display what’s needed, make edits, and export the diagram. This challenge increases as the diagram increases in complexity. In a living architecture that you want to keep up to date as things change, it eventually becomes too cumbersome to continue to move things around within a single layer using “move to front,” “move backward,” and so on. Layers solves this problem by keeping everything grouped by purpose or level.
Layered drawings in Draw.io support both hidden and locked options. Hiding a layer simply makes it invisible without removing its contents. This option comes in handy when modeling new functionality or when exporting various levels of detail. Locking a layer has the effect of ensuring that nothing in that layer can be selected, moved, deleted, or otherwise manipulated. When you’re certain that the region, availability domains, and virtual cloud networks (VCNs) are ready, you can lock and think of them as a backdrop for what you’re modeling. By locking the layers, you can spend your time in new items on upper layers.
You can also move and duplicate layers. Moving a layer up or down can make it appear under another set of visual elements. Duplication is handy if you want to create an alternate view of an existing layer. Think of an application already designed that requires proposing architectural changes. Instead of modifying the original layer, duplicate it, hide the original, and rename the duplicate layer to describe the changes. We show examples of both functions later.
Layers shine when it comes to exporting the diagram in various formats. Some architects prefer to distribute a PDF, others want a PNG or JPG within a PowerPoint presentation. Understanding how layers help with these export formats makes everything clearer.
Starting points
You’re probably excited to start documenting your as-is or to-be architecture. Before you dive right in and build it from scratch, we recommend checking the resources that are available publicly. First, look at what’s out there already. It might be easier to start with a reference architecture where some of the work is done for you. Consider the following examples.
Oracle Architecture Center
Oracle provides many prebuilt architectures from which you can start. You can find what you want, import an existing diagram into Draw.io, add layers as necessary, and then continue to customize it to your specific needs. Many of the architectures are now available in the native Draw.io format without layers. You can easily layer them and then customize.
OCI icon set in Draw.io
The newest OCI icon set file includes some predefined templates. You can drag them to an empty canvas, layer them, and work with them much more easily. To find the templates, scroll through the OCI icons in Draw.io, and look toward the bottom for logical and physical examples to start from. For this article, I started with Physical Example .
Start from scratch (Not recommended initially)
I don’t recommend starting from scratch initially because of the abundance of foundational elements in the icon set. If you understand what grouping boxes you have access to, such as tier, region, and availability domain, go ahead. But spend some time looking at the icon set and familiarize yourself with what it has to offer. When you’re comfortable, it might be just as easy to start from scratch, define layers, and drag in the appropriate icons to each layer. Consider this method after running through these techniques.
Layering techniques
No guidance defines what constitutes a layer. If you have items that can be logically grouped, such as the VCN definition and gateways with subnets and their security lists, this selection warrants two distinct layers with the VCN on the bottom. Likewise, a database or application tier can start as a single layer, then morph into multiple layers as its complexity increases. Finally, things that aren’t necessarily part of the architecture but can benefit from being hidden independently, such as documentation, can exist on their own layer.
For the main content, we start with a default template from the icon set, but this method can work with any existing diagram that benefits from layers.
Onto a blank Draw.io canvas, drag the Physical Example 6 file. Ensure that the layer widget is enabled:
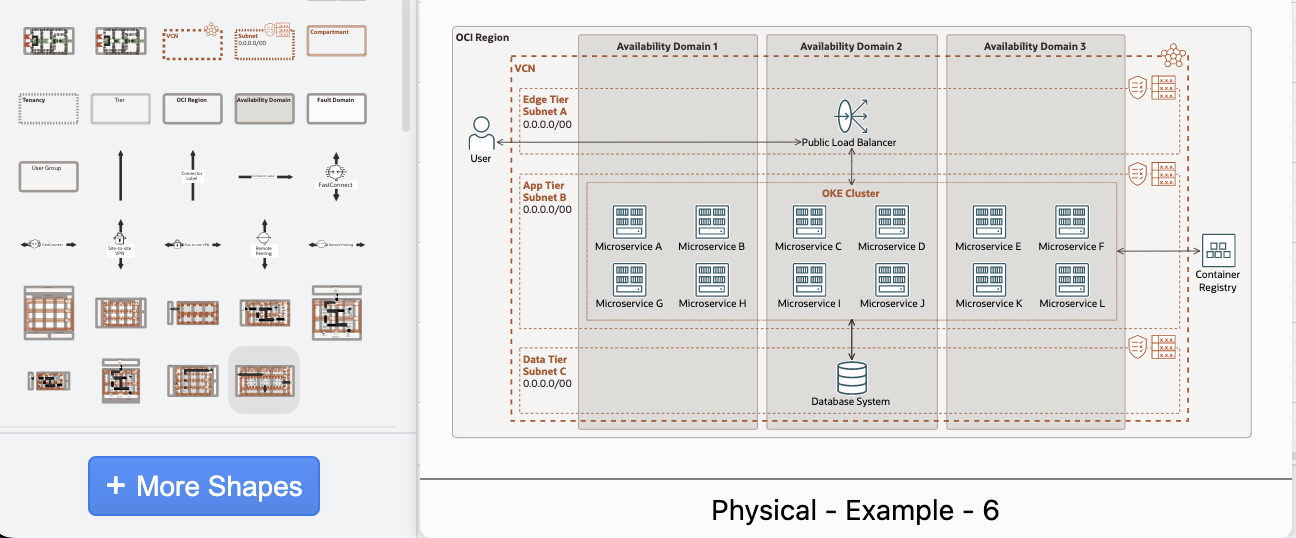
The result is a drawing with a single layer:
Now we’re ready to get started.
Adding layers
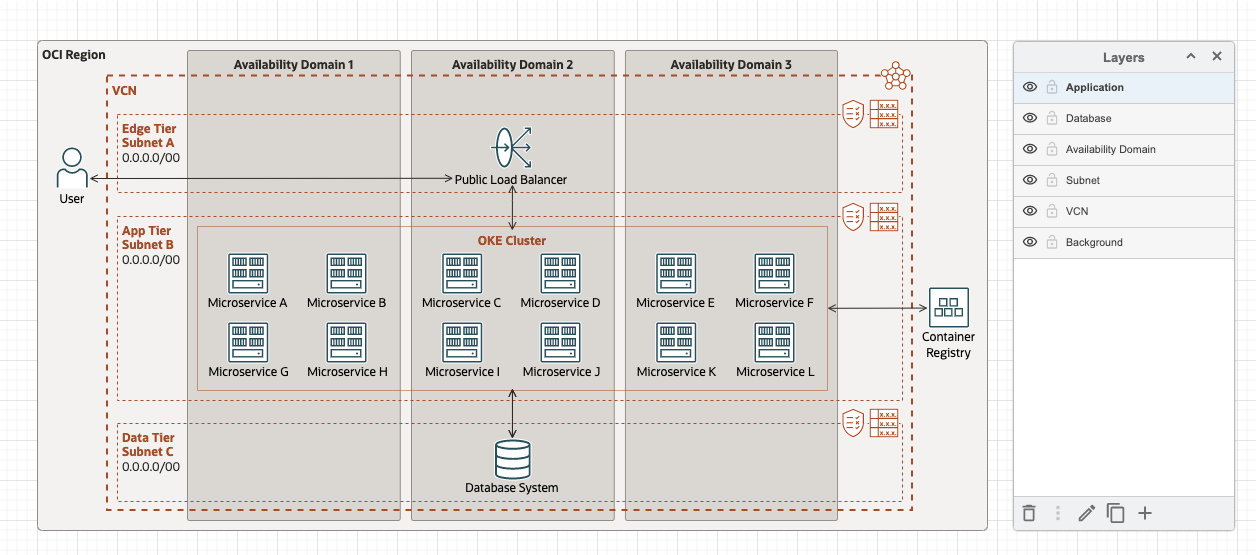
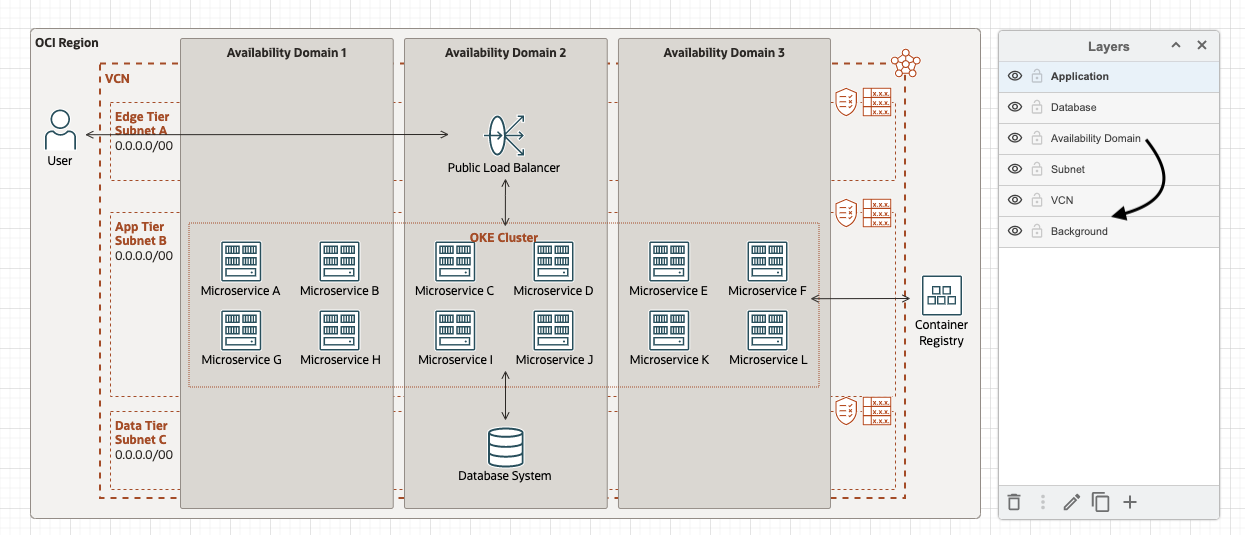
Think about the layers and add them in the correct order. You can drag them around later. In the layers widget, click the (+) icon to add an untitled layer. Next, use the pencil icon to give the new layer a name. The following image shows what it looks like after adding the layers, VCN, Subnet, Availability Domain, Database, and Application:
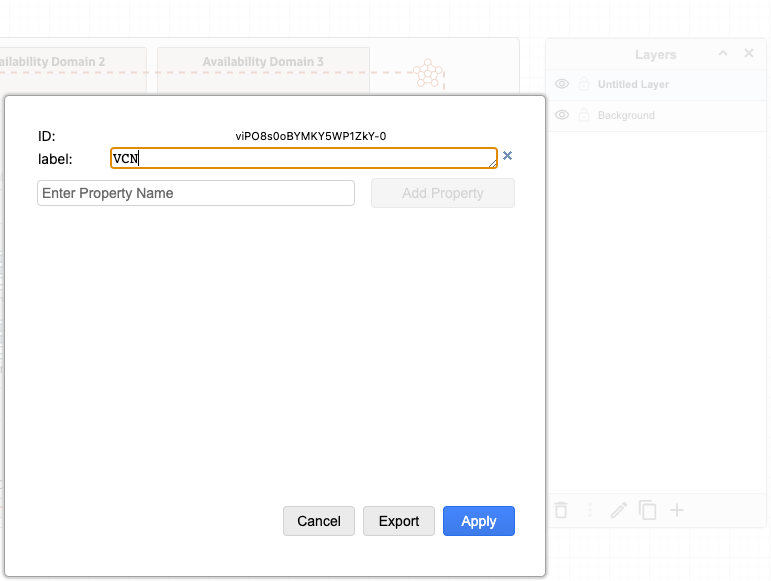
When complete, all layers are added to the Layer widget.
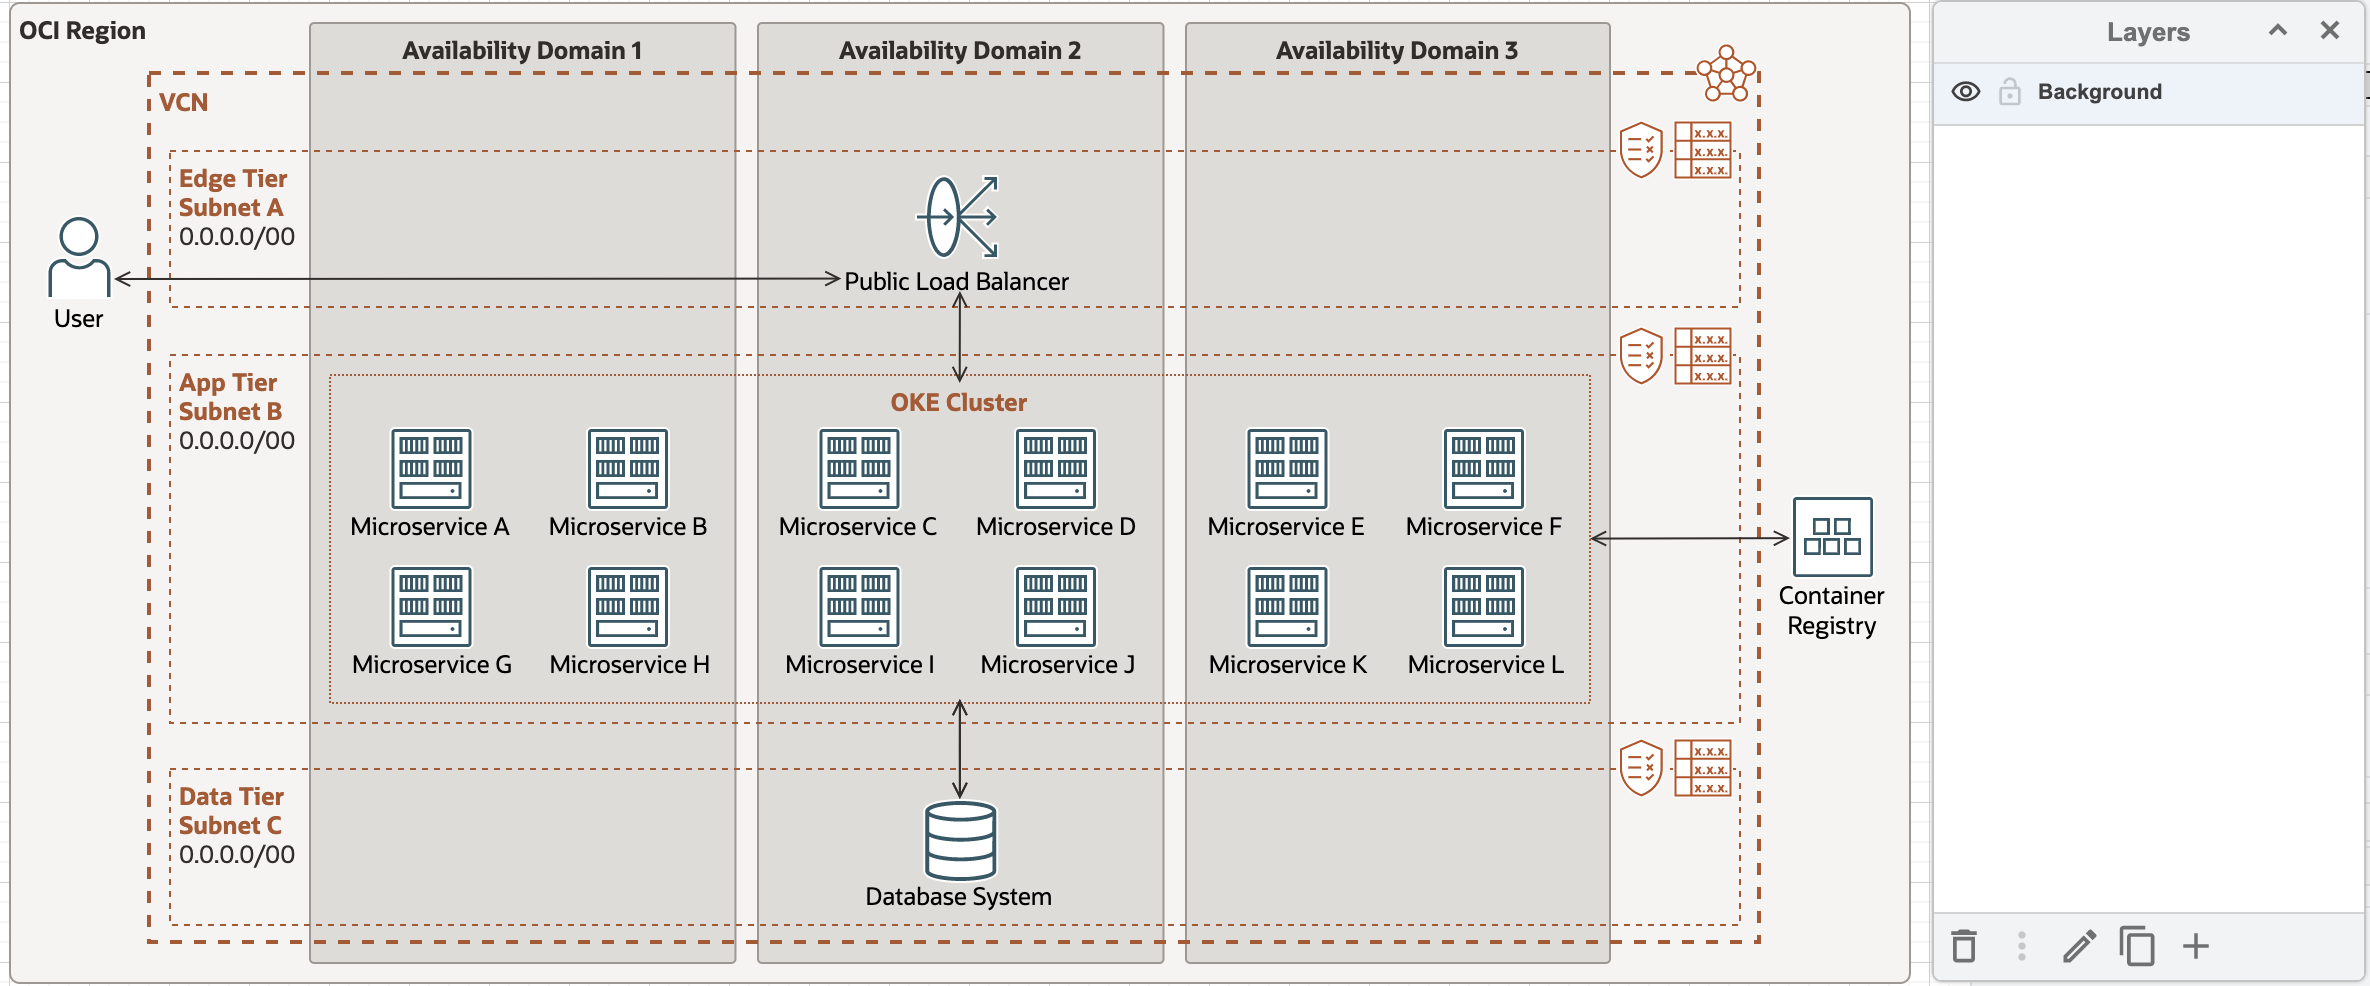
Just because we have layers doesn’t mean we’re done. Each box, icon, or grouping must be moved to the correct layer. All are currently part of the Background layer, evidenced by clicking on anything in the canvas. No matter what, you see a small black dot next to Background in the layers widget, indicating which layer associated with the object. Later, this tool is key in determining where something is. Use it in conjunction with the “triple dots” icon, which allows an object to be moved to a new layer.
Moving objects
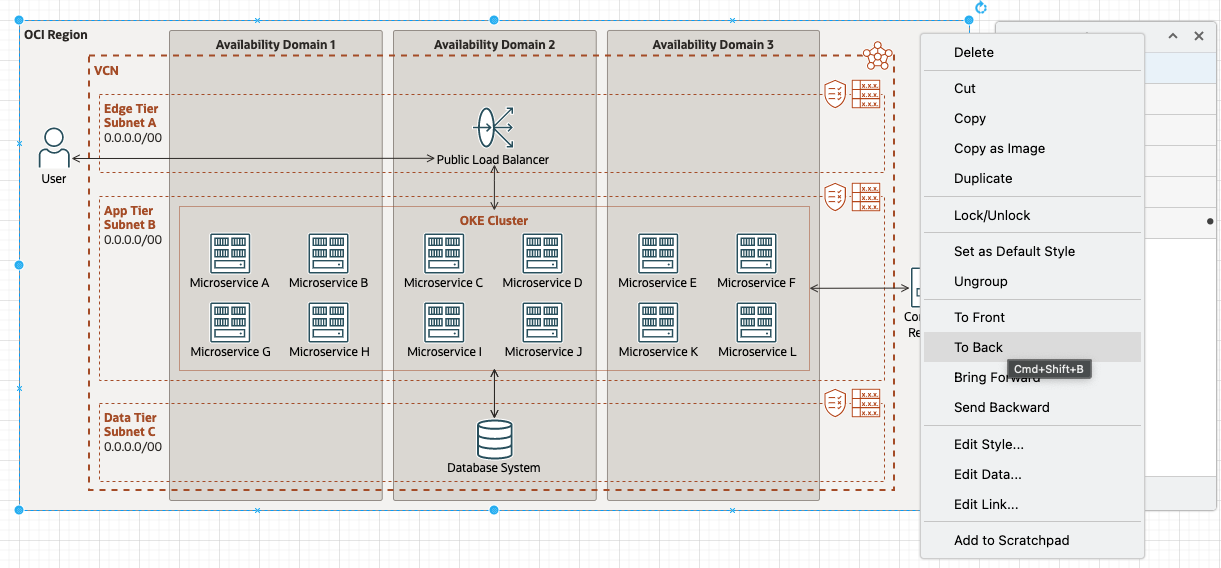
After the layers are created, we select objects and move them to the correct layer. If selecting individual objects is difficult, you can see the issue with a single layer already. You might need to double-click, triple-click, or move something backwards just to be able to click on another object. If you can only select the outermost frame, right-click on it and move it to the back.
The next set of steps involves selecting single or multiple objects with command-click and then using the “triple dots” icon. The following image shows how to select the database and move it to the correct layer:
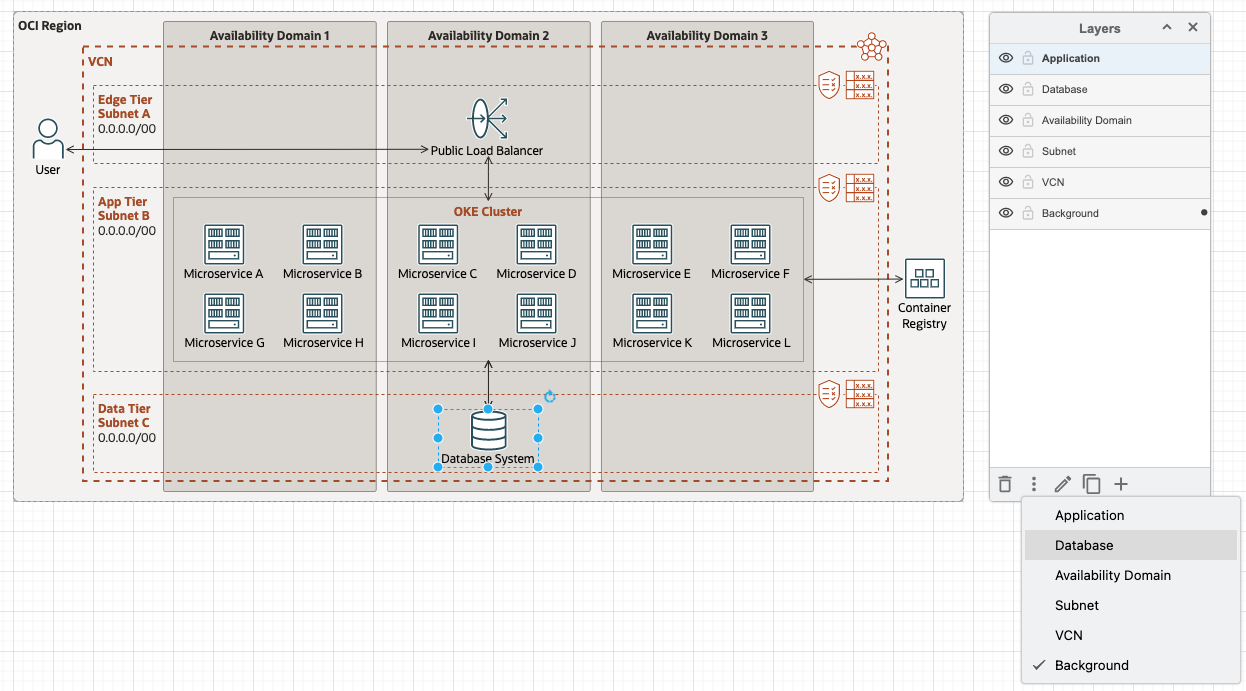
To see the results of this move, you can click on the Hide icon (shaped like an eye) for the Database layer. In the following screenshot, the database layer is now hidden, and we’re moving the application tier to the Application layer.
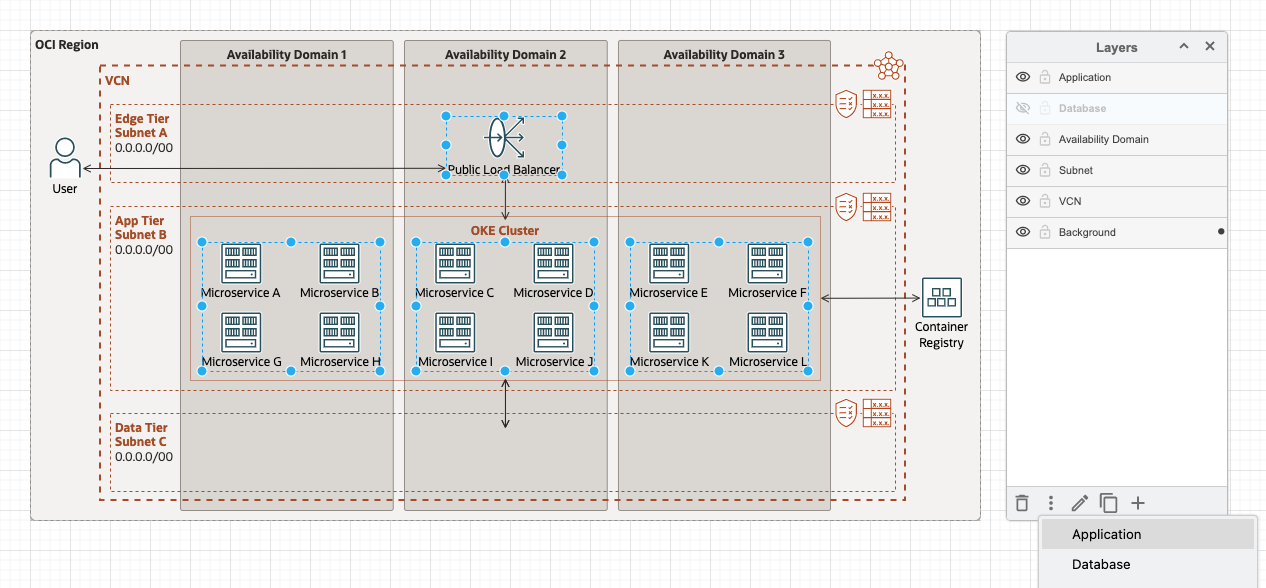
This process continues until everything except the region has been moved to the correct layer. By hiding and unhiding layers, you can quickly find what’s left to move and whether icons have been moved to the correct layers. The following image shows the result of these steps. With all layers except the background hidden, we can already see some value in organizing our diagram.

As you start to unhide the layers, the mistake that we’ve made becomes obvious.
Fixing mistakes
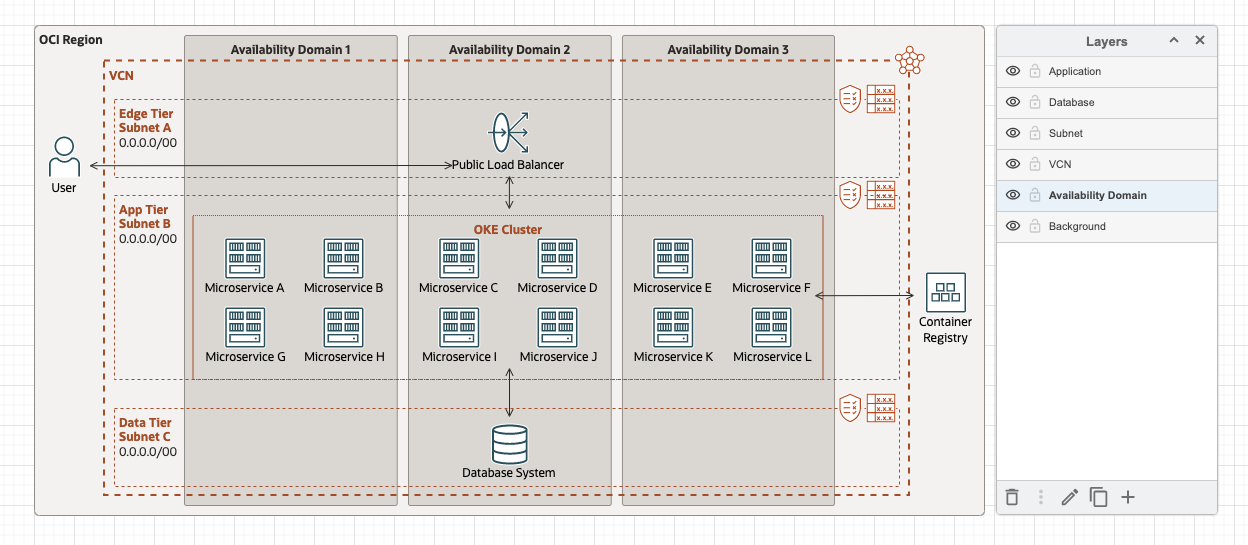
In the preceding sections, the availability domain layer is too high up in the stack. Some areas for the VCN and subnets aren’t visible. Correcting this issue is easy and exemplifies the power of layers. By moving this layer under the VCN, we can correct the diagram.
Drag the layer down to fix it. Now the diagram looks like the original, with all the layers as they should be.
Exporting a layered diagram
Now we can demonstrate some of the export features. Earlier, we discussed distributing PDF copies of the diagram. What if we needed to send more (or less) detailed copies around. Consider a top layer containing documentation, arrows, and annotations. Maybe this layer remains hidden unless required. Maybe where you’re modeling a new section and only want to export a few things from the diagram. Draw.io supports both use cases.
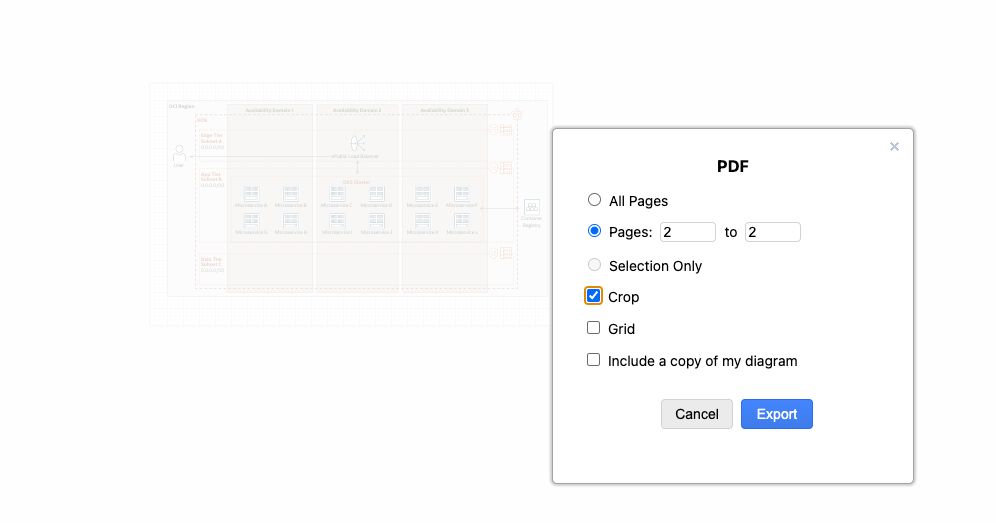
For the PDF case, the database layer is hidden before the export. For export options, we select PDF and then pick the current page (2 because I created a new tab at the beginning), then select the “Crop Image” option. This selection removes the white space from the edges:
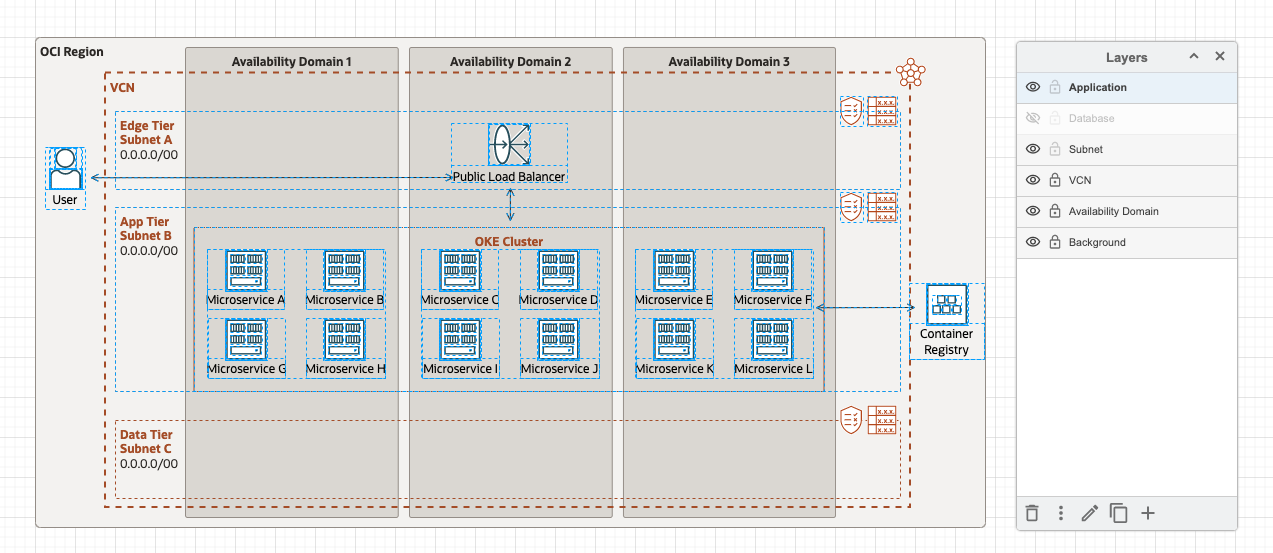
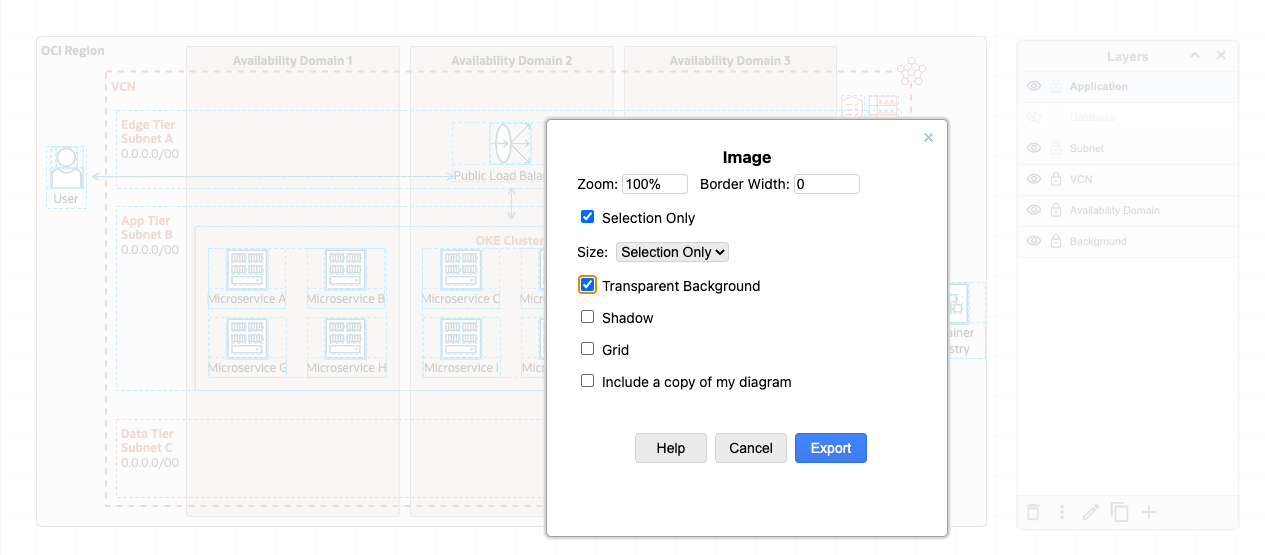
For PNG files, we have a few options worth noting. If the image is destined for something like a PowerPoint presentation or another document with a non-white background, the option for a transparent background is useful. The drawing (or selection) is exported with no background, which allows it to be place on a slide or other image cleanly. You can export the entire diagram, but the following image shows the export of a selection, namely the app tier. Locking unneeded layers prevents them from being selected.
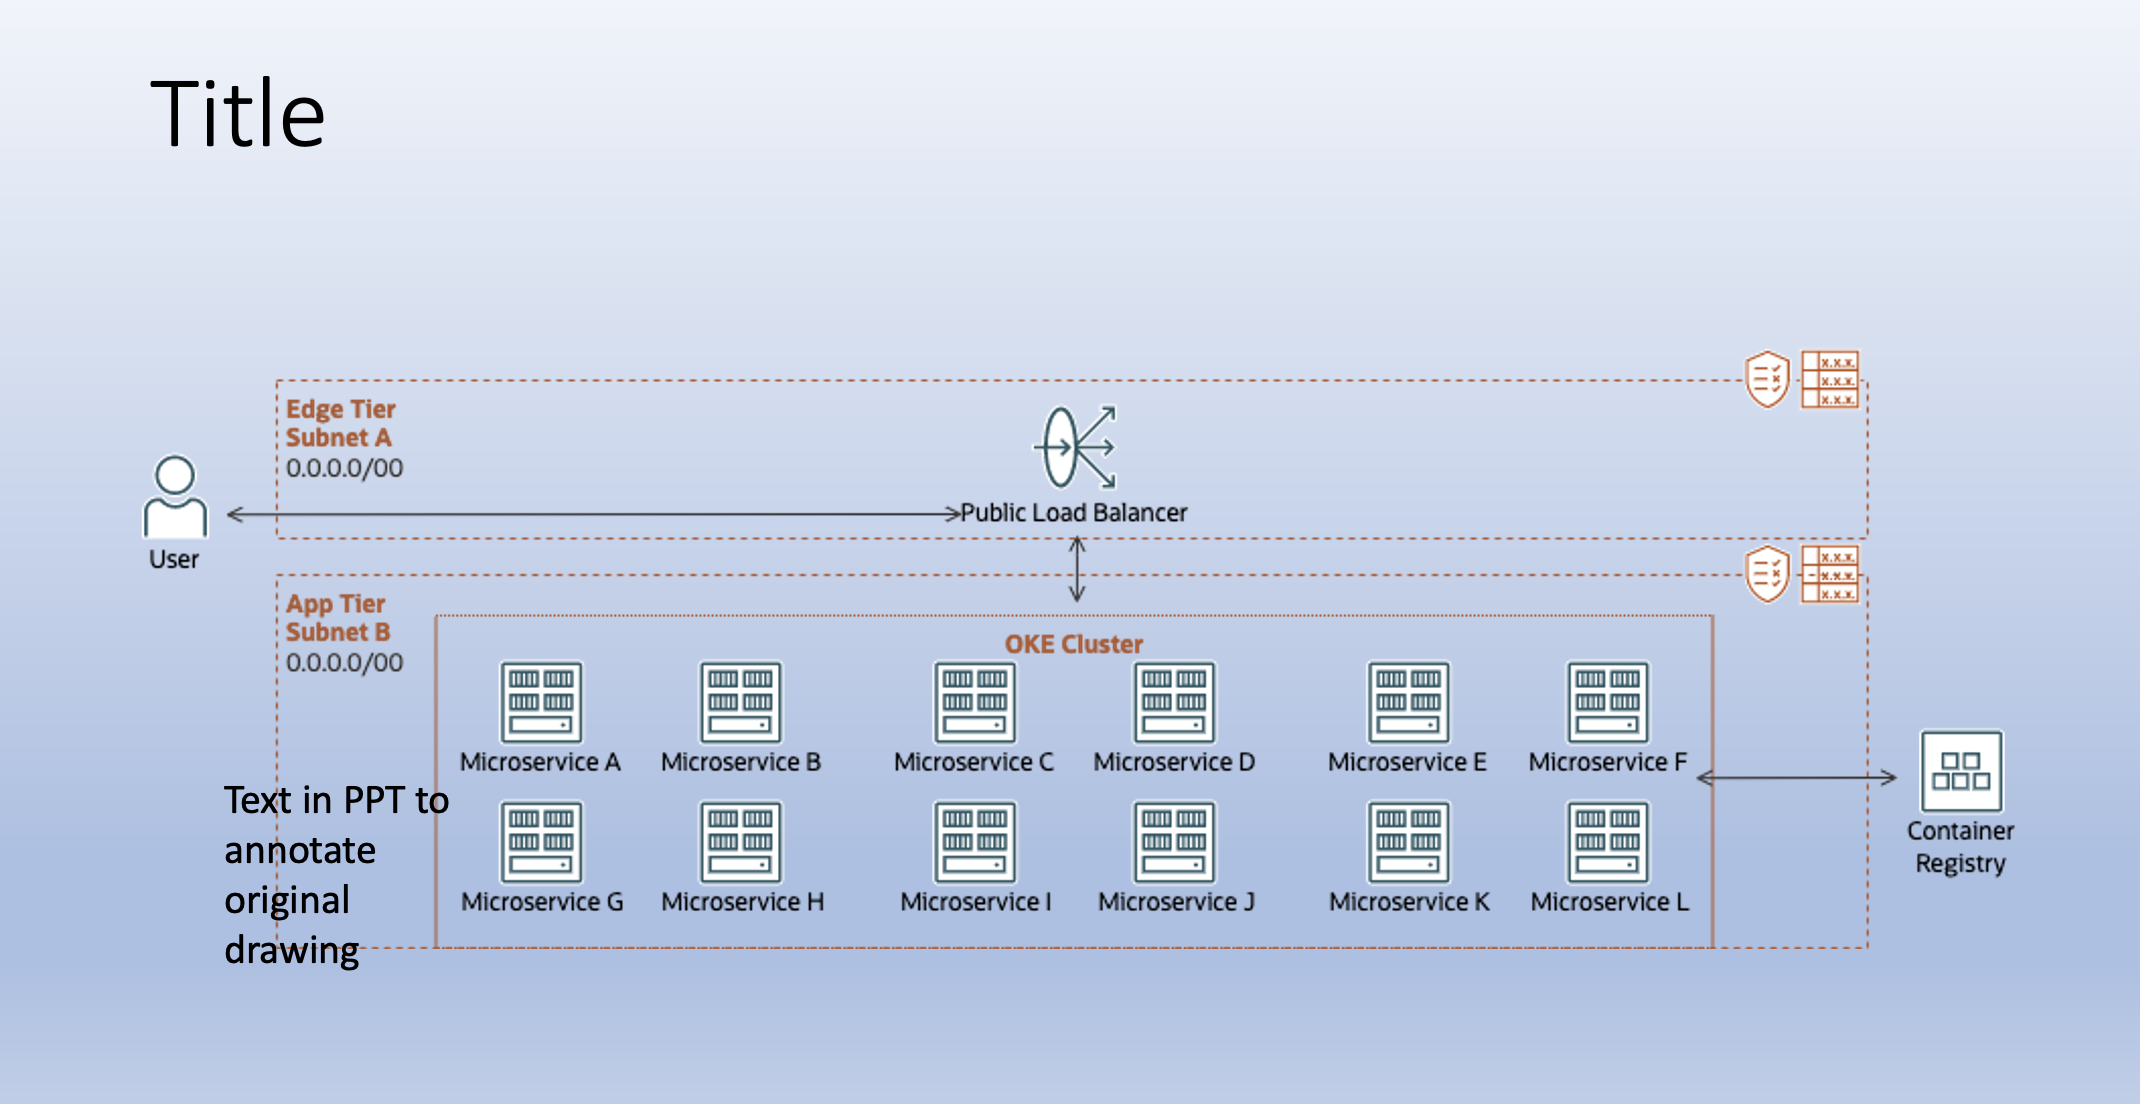
The following image shows the PowerPoint slide with the text providing the PNG is clear:
Locking
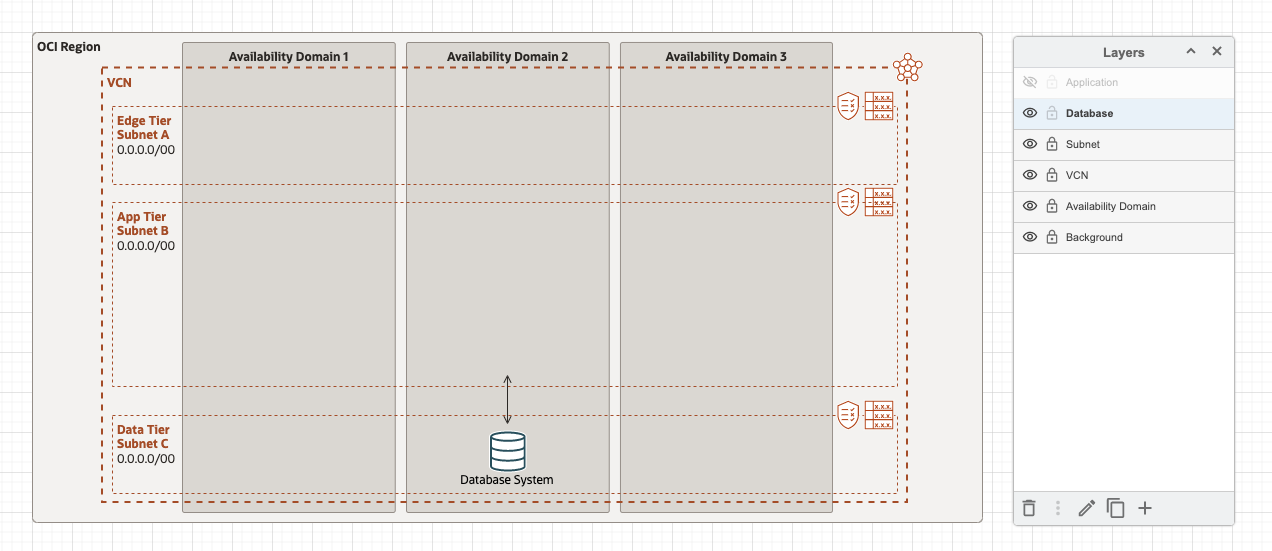
The following screenshot shows how you can use locked layers. The region, VCN, and subnets aren’t changing, but the upper stack of database and apps might still be a work in progress. In this case, lock the underlying layers so that any drag-to-select, movement, or deletes don’t affect these parts of the diagram. In a complex architecture, you might find it useful to keep most of the layers locked, except the ones you’re actively working on. In this scenario with a hidden application layer and all other layers locked, you can focus on designing the database layer without risking changes or being distracted.
More with layers
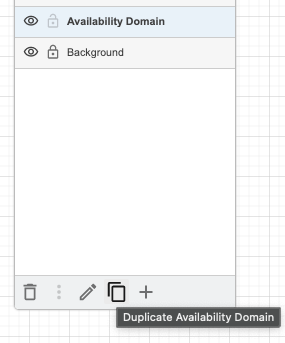
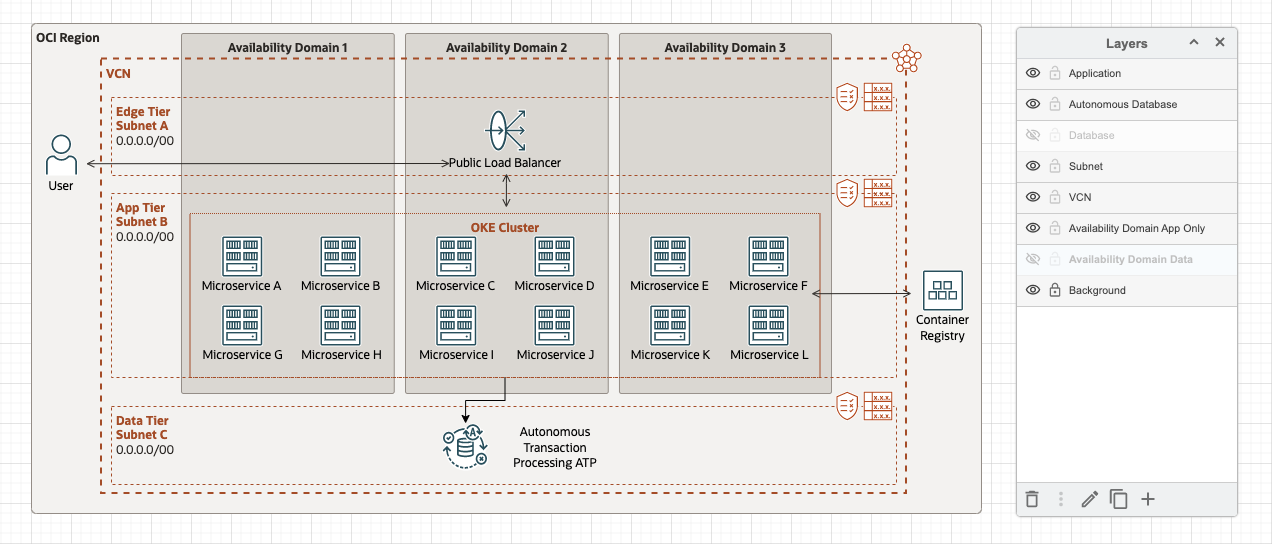
Suppose you want to model something new with the ability to show a side-by-side, two-column slide comparison. Without making multiple copies of the diagram, you can easily accomplish this goal with the duplication and show or hide functionality for the layers. In our template, we want to replace the database system with Autonomous Database, so the availability domain isn’t applicable to the database tier. We can add a new database layer, hiding the existing layer, and model the new Autonomous Transaction Processing instance in the new layer. I also duplicated the availability domain layer and shrunk the availability domains so that they don’t extend into the database subnet.
With the original layers for the database and availability domain hidden, the diagram now represents the proposed changes. You can export your project this way this way for discussion or comparison with the original.
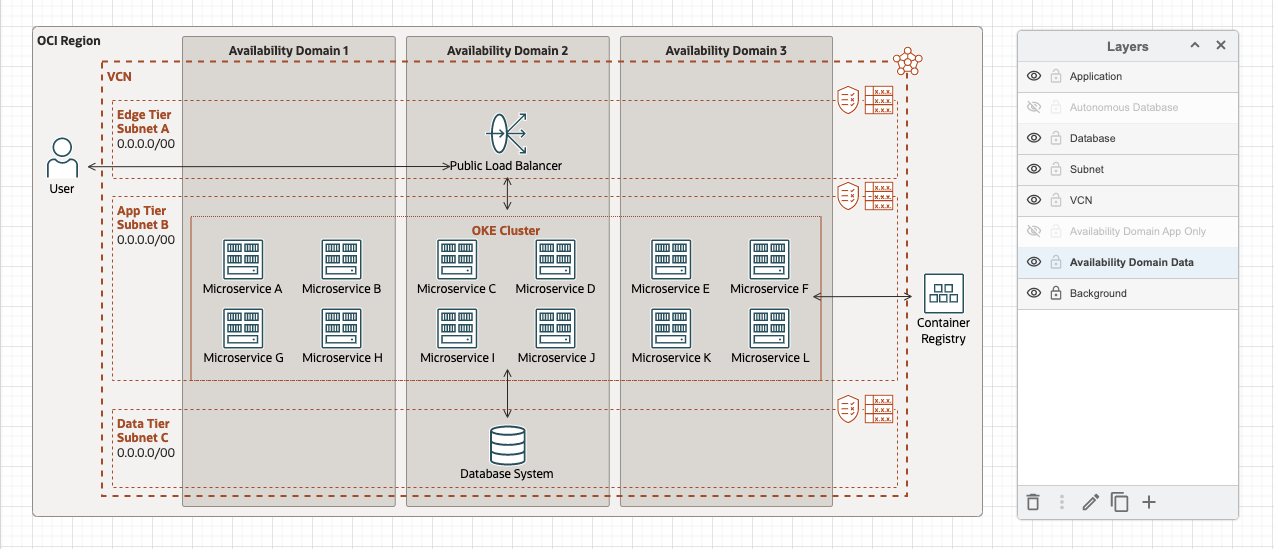
We can quickly switch back to the original by hiding the new layers and unhiding the original availability domain and database layers:
Conclusion
Now you can understand how useful the layering functionality can be. It can be a life saver when working with complex diagrams, where numerous permutations, diagram consumers, and ideas to model are present.
You can try out Draw.io directly online or download the full client. Happily, both work with the Oracle Cloud Infrastructure icons. Happy architecting!
For more information, see the following resources: