As a continuation to Part 1, where we ingested logs from Oracle Cloud Guard to the Logging Analytics service through the Streaming service. In part 2, we use Oracle Cloud Infrastructure (OCI) Functions service to ingest Oracle Cloud Guard logs to Logging Analytics.
The following graphic depicts the architecture for the solution:
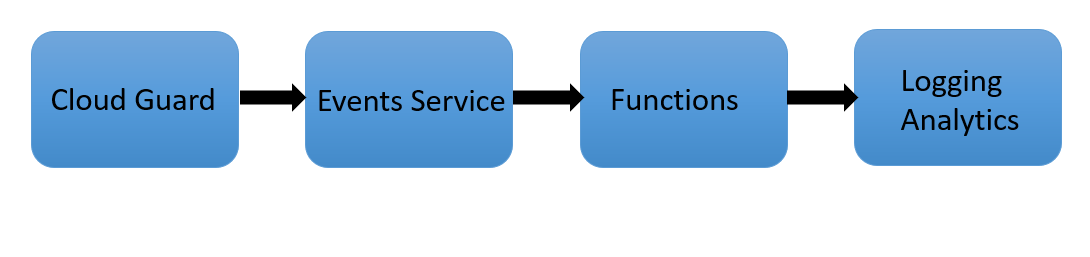
When Cloud Guard emits events that match with the defined rule conditions, the OCI Events service triggers the specified function. When invoked, the Functions code reads logs data from Events and sends them to the Logging Analytics upload API endpoint. We can then view the logs from Log Explorer dashboard and process them for any further visualizations and insights.
Overview steps
-
Enable a cloud event rule in responder recipe.
-
Create a log group under Logging Analytics to store logs.
-
Create a log parser and source under Logging Analytics.
-
Create an OCI function in Python or any supported language to send Cloud Guard logs to Logging Analytics.
-
Create a dynamic group and provide appropriate policies for the function to access Logging Analytics.
-
Create an Event rule to trigger the deployed function when the rule conditions for specified event types are met.
For the first three steps, follow the implementation in Part 1. Enable the cloud event rule in responder recipe. Create a log group under Logging Analytics. While provisioning, utilize OCI’s compartment structure to fine tune user access to Logging Analytics components. Create a log parser and source under Logging Analytics.
Step 4
To create the function, use the following steps:
-
In the Oracle Cloud Console menu, navigate to Developer services and select Functions.
-
Select an existing application or click Create Application. Create a function within your application.
-
I’m using OCI Cloud Shell to create my function. Cloud Shell is a recommended option as it does not require any setup prerequisites. If you’re new to OCI Functions, follow sections A, B, and C in the Functions Quick Start on Cloud Shell.
-
We recommend creating a sample Python function first. The following command generates a folder “cgtola” with three files :func.py, func.yaml, and requirements.txt.
fn init --runtime python cgtola - Then create a function with the following code:
func.py:
import io
			import json
			import logging
			import oci
			from fdk import response

			 #The below method will receive the list of log entries from OCI as input in the form of bytestream and is defined in func.yaml
			 def handler(ctx, data: io.BytesIO = None):
			     funDataStr = data.read().decode('utf-8')
			     funData =  json.loads(funDataStr)
			     logging.getLogger().info(funData)

			    #send the log data to a temporary json file. /tmp is the supported writable directory for OCI functions
			     with open('/tmp/test.json', 'w', encoding='utf-8') as f:
			         json.dump(funData, f, ensure_ascii=False, indent=4)
			     file_details=io.open("/tmp/test.json")
			     signer = oci.auth.signers.get_resource_principals_signer()
			     log_analytics_client = oci.log_analytics.LogAnalyticsClient({},signer = signer)

			 # Send the request to service, some parameters are not required, see API doc for more info

			     log_group_id="ocid1.loganalyticsloggroup.oc1.iad.amaaaaaas4n35viawkqpxtefipgoqemkc2n55b7hylaucb2vck6z4xxxxxxx"
			     upload_log_file_response=log_analytics_client.upload_log_file(namespace_name="orasenatdpltsecitom04", upload_name="CG_logs", log_source_name="Cloud Guard_functions_source", filename="test.json", opc_meta_loggrpid=log_group_id, upload_log_file_body=file_details)
func.yaml:
			 schema_version: 20180708
			 name: cgtola
			 version: 0.0.31
			 runtime: python
			 build_image: fnproject/python:3.9-dev
			 run_image: fnproject/python:3.9
			 entrypoint: /python/bin/fdk /function/func.py handler
			 memory: 256
requirements.txt:
fdk>=0.1.48 oci -
Deploy the function with the following command:
fn -v deploy --app CG-LA
When invoked by the Events service, the Functions code fetches log data from Events service and uploads it to the Logging Analytics API.
Step 5
-
For OCI Functions to access Logging Analytics, fetch,and upload logs, the function must be included in a dynamic group. Then create a policy to grant the dynamic group access to Logging Analytics resources, such as log groups and log sources. For more information, refer to Accessing Other Oracle Cloud Infrastructure Resources from Running Functions.
-
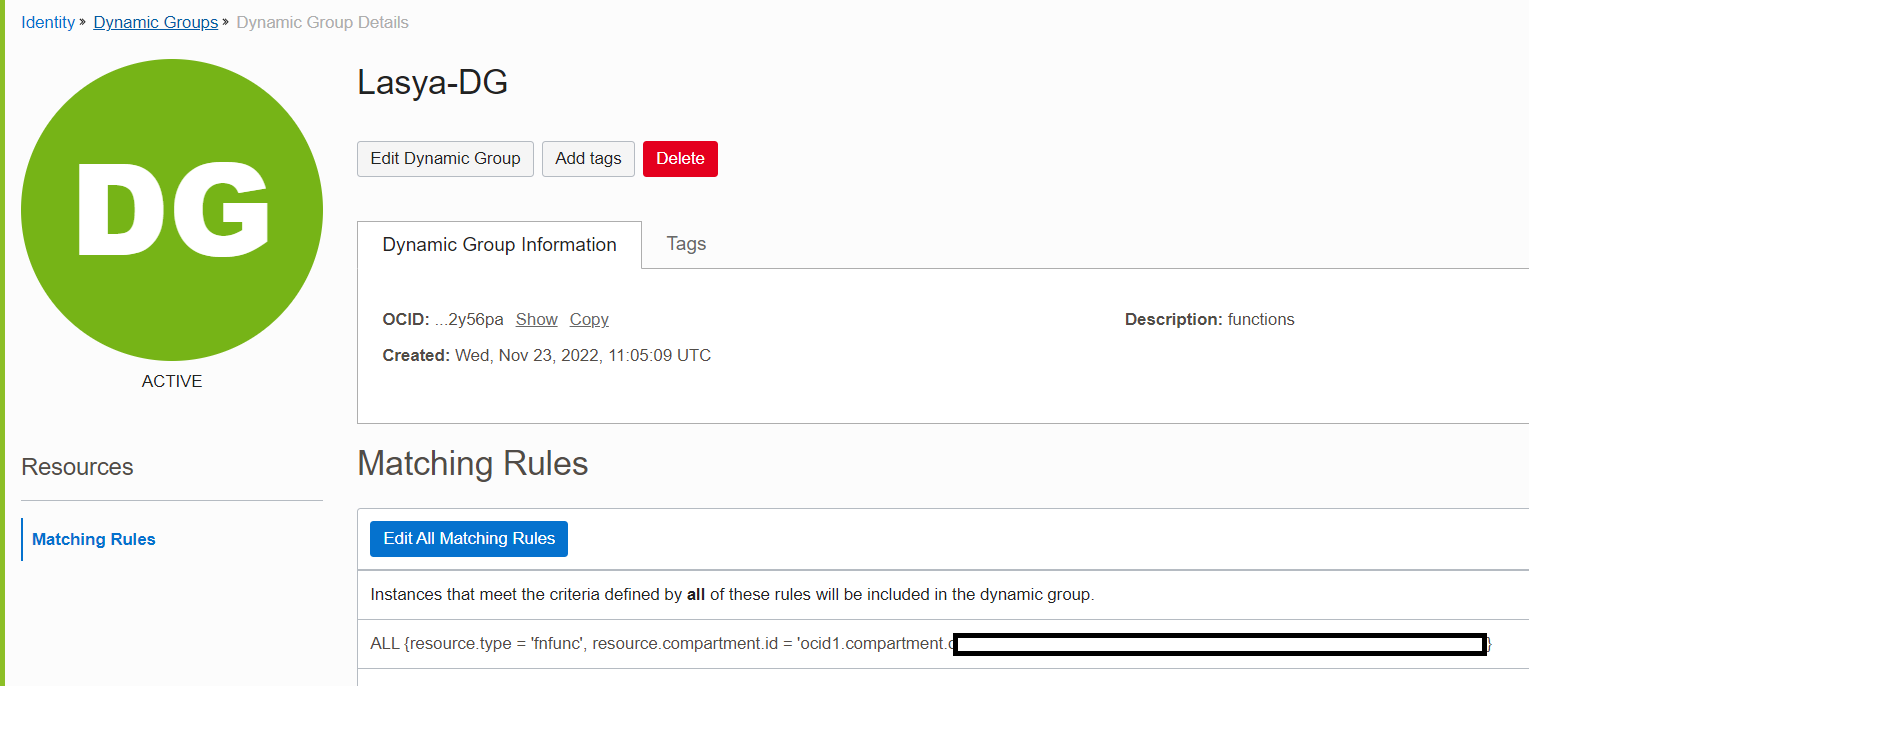
To create a dynamic group, under Menu, navigate to Identity and security, Identity, and selectDynamic Groups.
-
Keep the matching rule as ALL {resource.type = ‘fnfunc’, resource.compartment.id = <compartment id>}. This rule places all functions under the compartment into the dynamic group.
We now create policies to grant the created dynamic group access to Logging Analytics resources. For details, refer to Enable Access to Logging Analytics and its Resources.
-
In the menu, select Identity and Security, Identity, and Policies and click Create Policy. Give the following policy statements:
-
allow dynamic-group Lasya-DG to manage loganalytics-features-family in tenancy
-
allow dynamic-group Lasya-DG to manage loganalytics-resources-family in compartment Lasya
-
Give the first policy only at tenancy (root) level. The second policy can be either given at child compartment level or tenancy (root) level.
Step 6
Create an event to trigger our function when the specified Cloud Guard event types are matched.

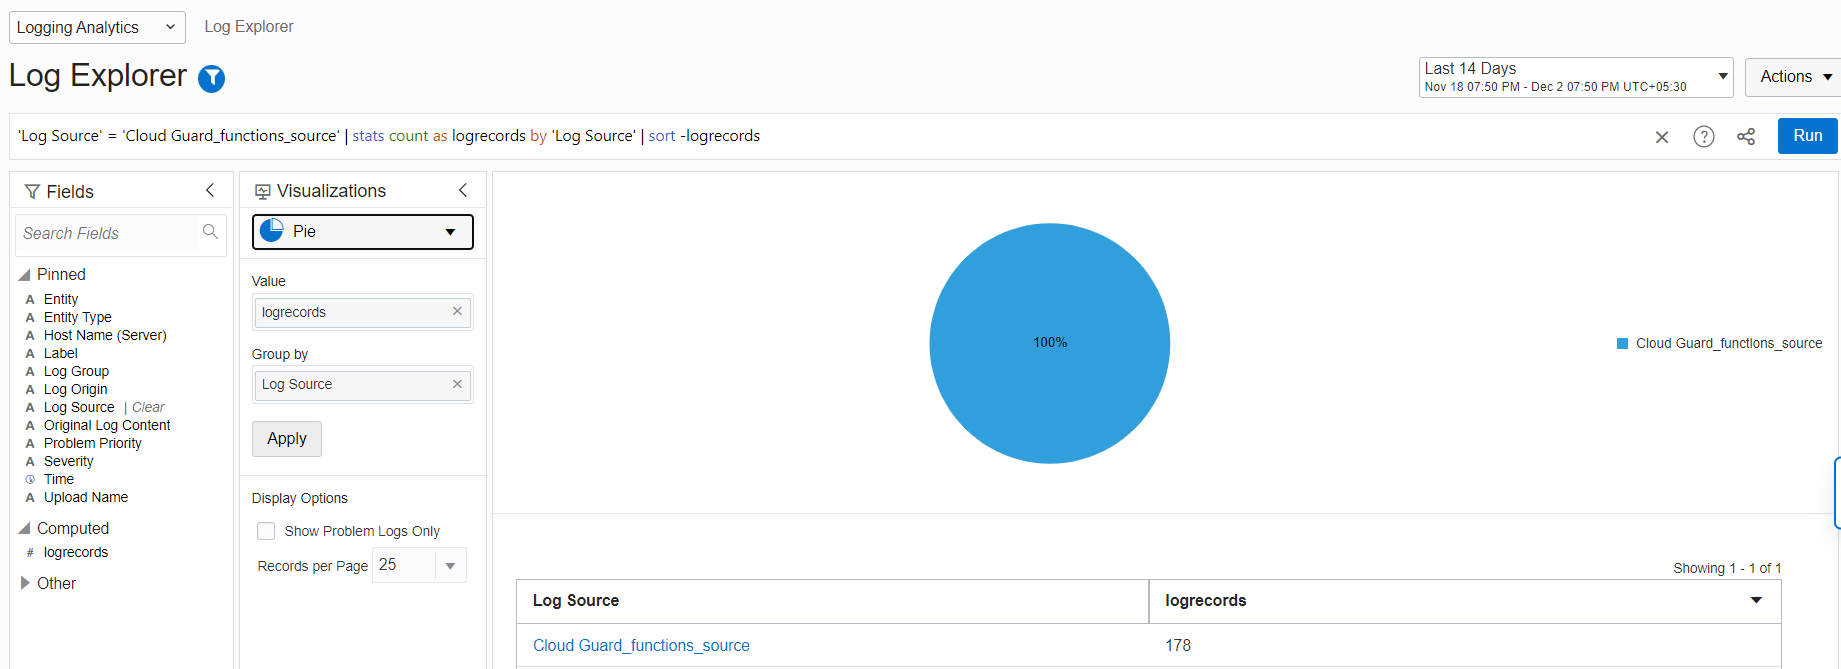
We can verify the uploaded Cloud Guard logs on the Log Explorer dashboard. In the menu, select Observability & Management, Logging Analytics, and Log Explorer.
Conclusion
In this blog, we covered how to ingest Cloud Guard events to Logging Analytics using OCI Functions. Logging Analytics makes it easy for you to unlock the value of log data for any source across Oracle Cloud Infrastructure, on-premises, and third-party clouds like Amazon Web Services (AWS) and Azure quickly without involving any data scientists.
For more use cases of Logging Analytics, see the Observability and Management blog.