One of the common dilemmas faced by Kubernetes users on Oracle Container Engine for Kubernetes (OKE) is whether to create multiple clusters for different environments (developer, test, production, or various customers) or to consolidate them within a single OKE cluster. While no one-size-fits-all answer exists, this blog post explores the advantages of using namespaces, role-based access control (RBAC), and network policies within a single OKE cluster to achieve efficient environment segregation. We also address the critical consideration of load balancers shared among applications.
Considerations for multiple environments in a single OKE cluster
Let’s delve into the scenario where you aim to deploy your development (dev), testing (test), and production (prod) environments, while ensuring they’re exposed with distinct A records in your public domain, such as myapp.org.
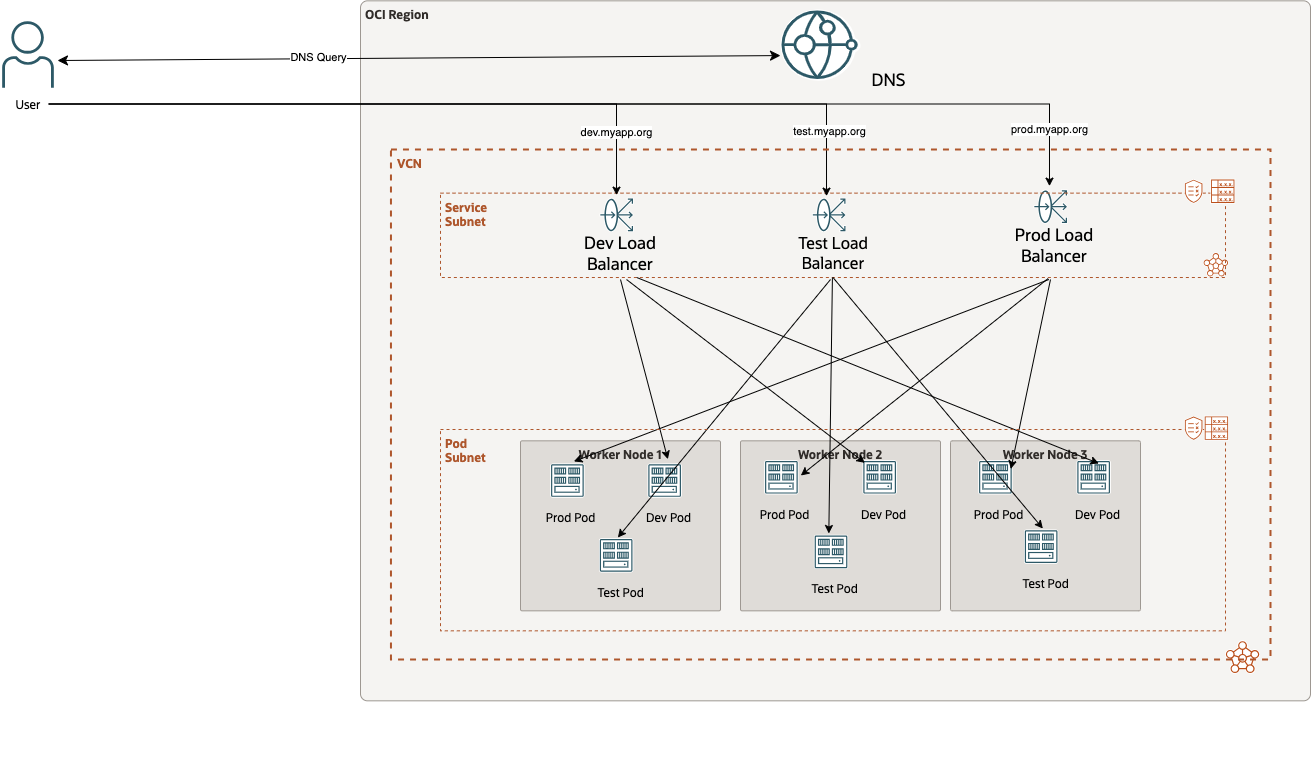
In this architectural overview from an Oracle Cloud Infrastructure (OCI) perspective, each environment has its dedicated load balancer. The dev, test, and prod deployments use different Kubernetes services, resulting in OKE deploying one load balancer for each declared service.
Grouping resources with namespaces
The next challenge to address is how to group your resources by environments. The answer is Kubernetes namespaces. Namespaces provide a powerful way to categorize and segregate various Kubernetes objects within the same cluster, such as pods, services, and replication controllers.
gferreyr-mac:~ gferreyr$ kubectl create namespace dev
namespace/dev created
gferreyr-mac:~ gferreyr$ kubectl create namespace test
namespace/test created
gferreyr-mac:~ gferreyr$ kubectl create namespace prod
namespace/prod created
Before we proceed with deploying applications and exposing them with services, let’s discuss how to automate the creation of DNS records to publish your applications in your DNS zone.
Securing your namespaces
In regards of security, let’s focus on two aspects: RBAC and network policy. You can use Kubernetes’ RBAC policies to secure administrative access to your namespaces. You can also bind these roles to users in the OCI Identity and Access Management (IAM) service to allow Kubernetes to interact directly with OCI services. Following our deployment example, you can have a role called “administrator” that creates the namespaces with corresponding ExternalDNS, and three different role binding configurations to grant access to the individual namespaces.
By default, pod communication between namespaces isn’t permitted, enhancing isolation and security. If cross-namespace communication is required, you can configure network policies to control it.
OCI DNS zones
We don’t delve too deep into DNS, but OCI’s DNS service empowers you to call manage zones, including your public domains. In this post, we created a public zone named myapp.org. To truly own the domain, more steps like delegating the zone to a registrar are necessary, but for the scope of this post, we work with this setup.
Now, how can we add A records that point to our different load balancers? The solution is ExternalDNS. To set it up in your OKE cluster, see Configuring ExternalDNS to use Oracle Cloud Infrastructure DNS. With this setup in place, we can proceed to deploy our applications with the appropriate annotations to generate the DNS records. In this example, we’ve deployed three services using the following syntax, adjusted for namespace and DNS annotations:
apiVersion: v1
kind: Service
metadata:
name: nginx
annotations:
external-dns.alpha.kubernetes.io/hostname: dev.myapp.org
namespace: dev
spec:
type: LoadBalancer
ports:
- port: 80
name: http
targetPort: 80
selector:
app: nginx
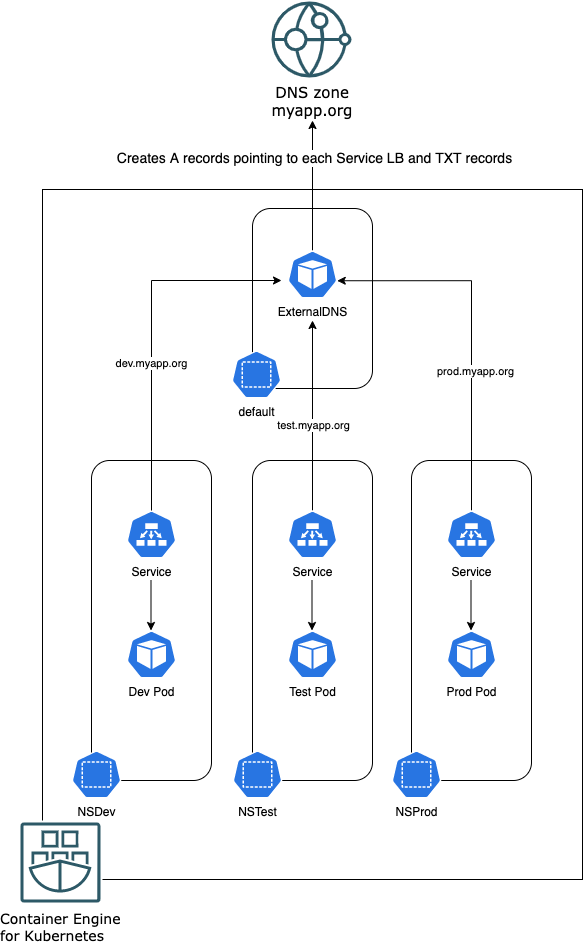
<<< truncated >>>After deploying the services, our Kubernetes cluster takes the form of the following diagram:
gferreyr-mac:~ gferreyr$ k get svc -A | grep -e nginx -e NAMESPACE
NAMESPACE NAME TYPE CLUSTER-IP EXTERNAL-IP PORT(S) AGE
dev nginx LoadBalancer 10.96.197.87 158.180.60.164 80:32195/TCP 10 m
prod nginx LoadBalancer 10.96.6.15 89.168.122.8 80:31873/TCP 9 m 38 s
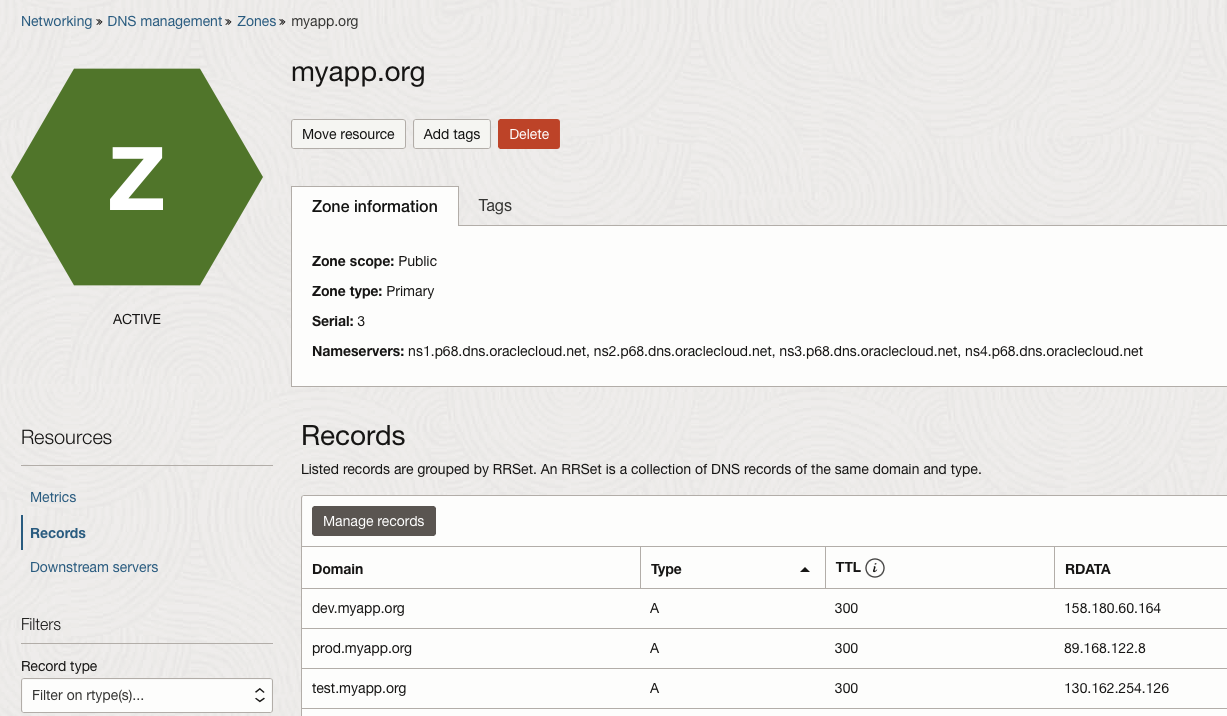
test nginx LoadBalancer 10.96.174.231 130.162.254.126 80:32523/TCP 1 0mOur DNS zone looks like the following example:
Now, we have a fully deployed OKE cluster with three environments in it, separated by namespaces, and on top of that, ExternalDNS is automatically updating our DNS zone!
Conclusion
In this blog post, we illustrated how to use Kubernetes namespaces for environment isolation and harnessed ExternalDNS to update your DNS zones seamlessly within Oracle Cloud Infrastructure. This approach not only enhances security but also streamlines the management of multiple environments within a single OKE cluster.
For more information, see the following resources: