Original publish Date : 4/3/2019
Below are the steps to configure SAML 2.0 SSO with Azure as Identity Provider (IDP) and Weblogic as Service Provider (SP).
Let’s have a look at the Azure Identity Provider configuration first :
Azure IDP Configuration
Step A-1 :
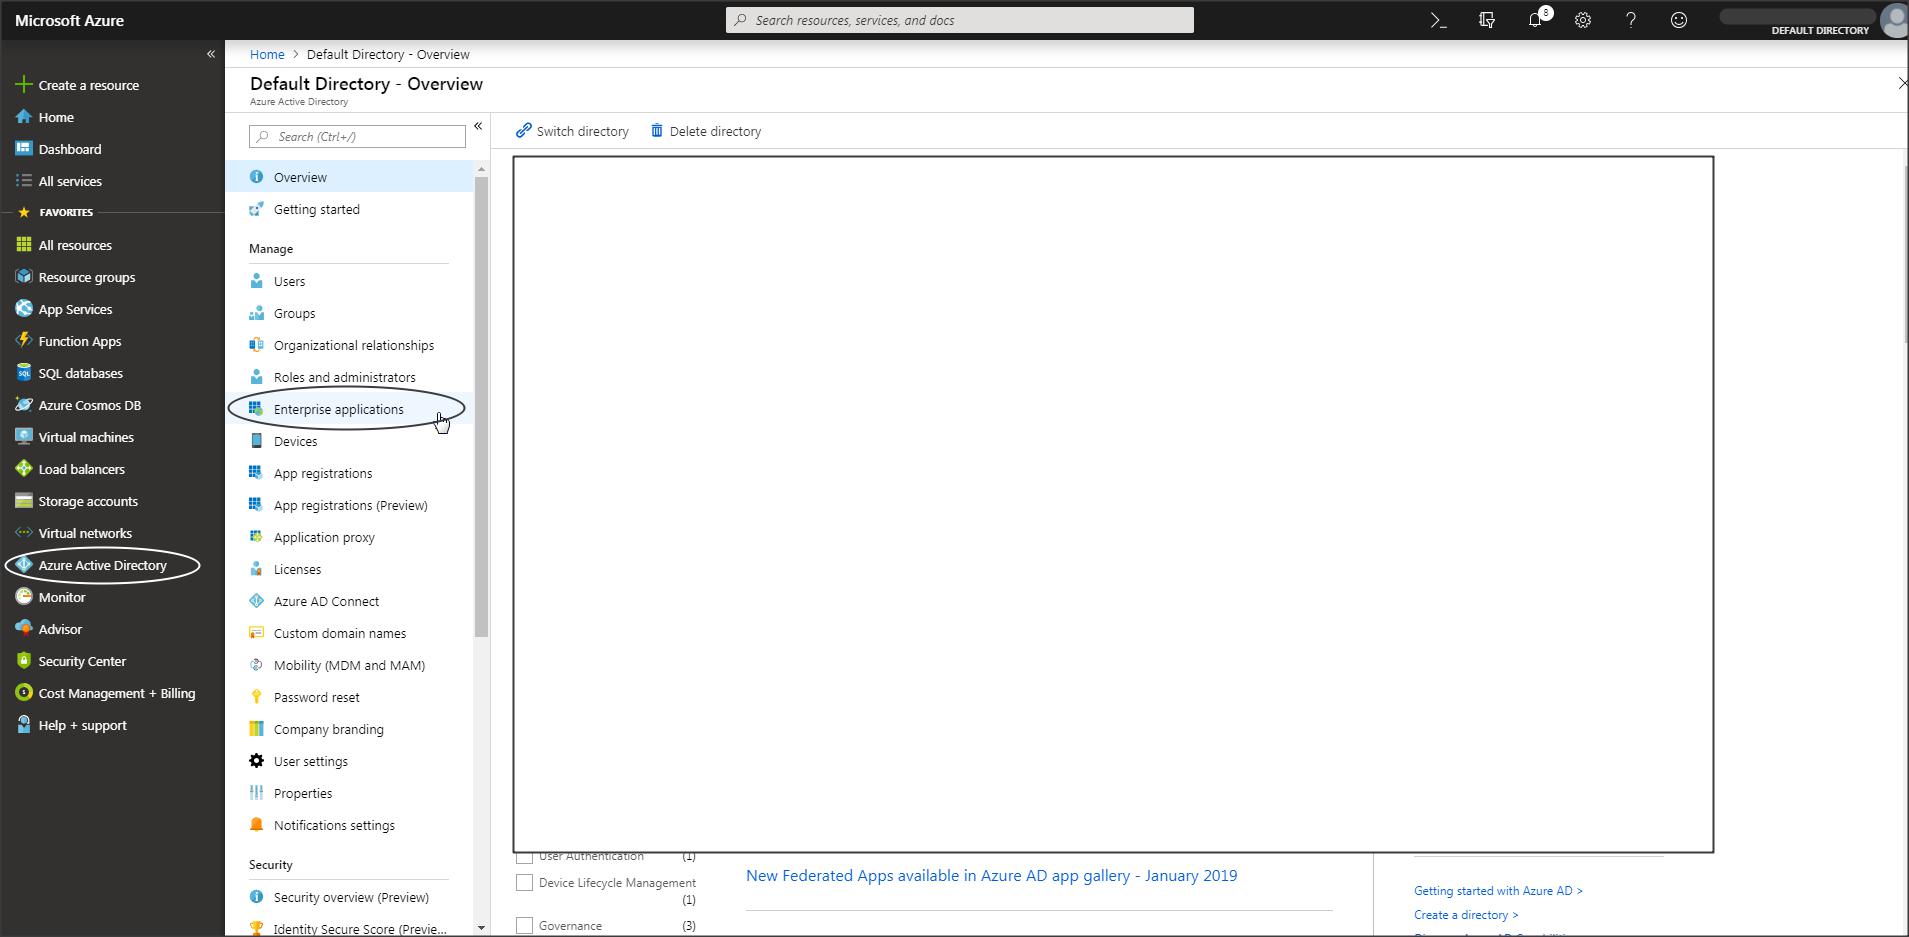
Login to Azure portal -> Azure Active Directory -> Enterprise Applications :
Step A-2 :
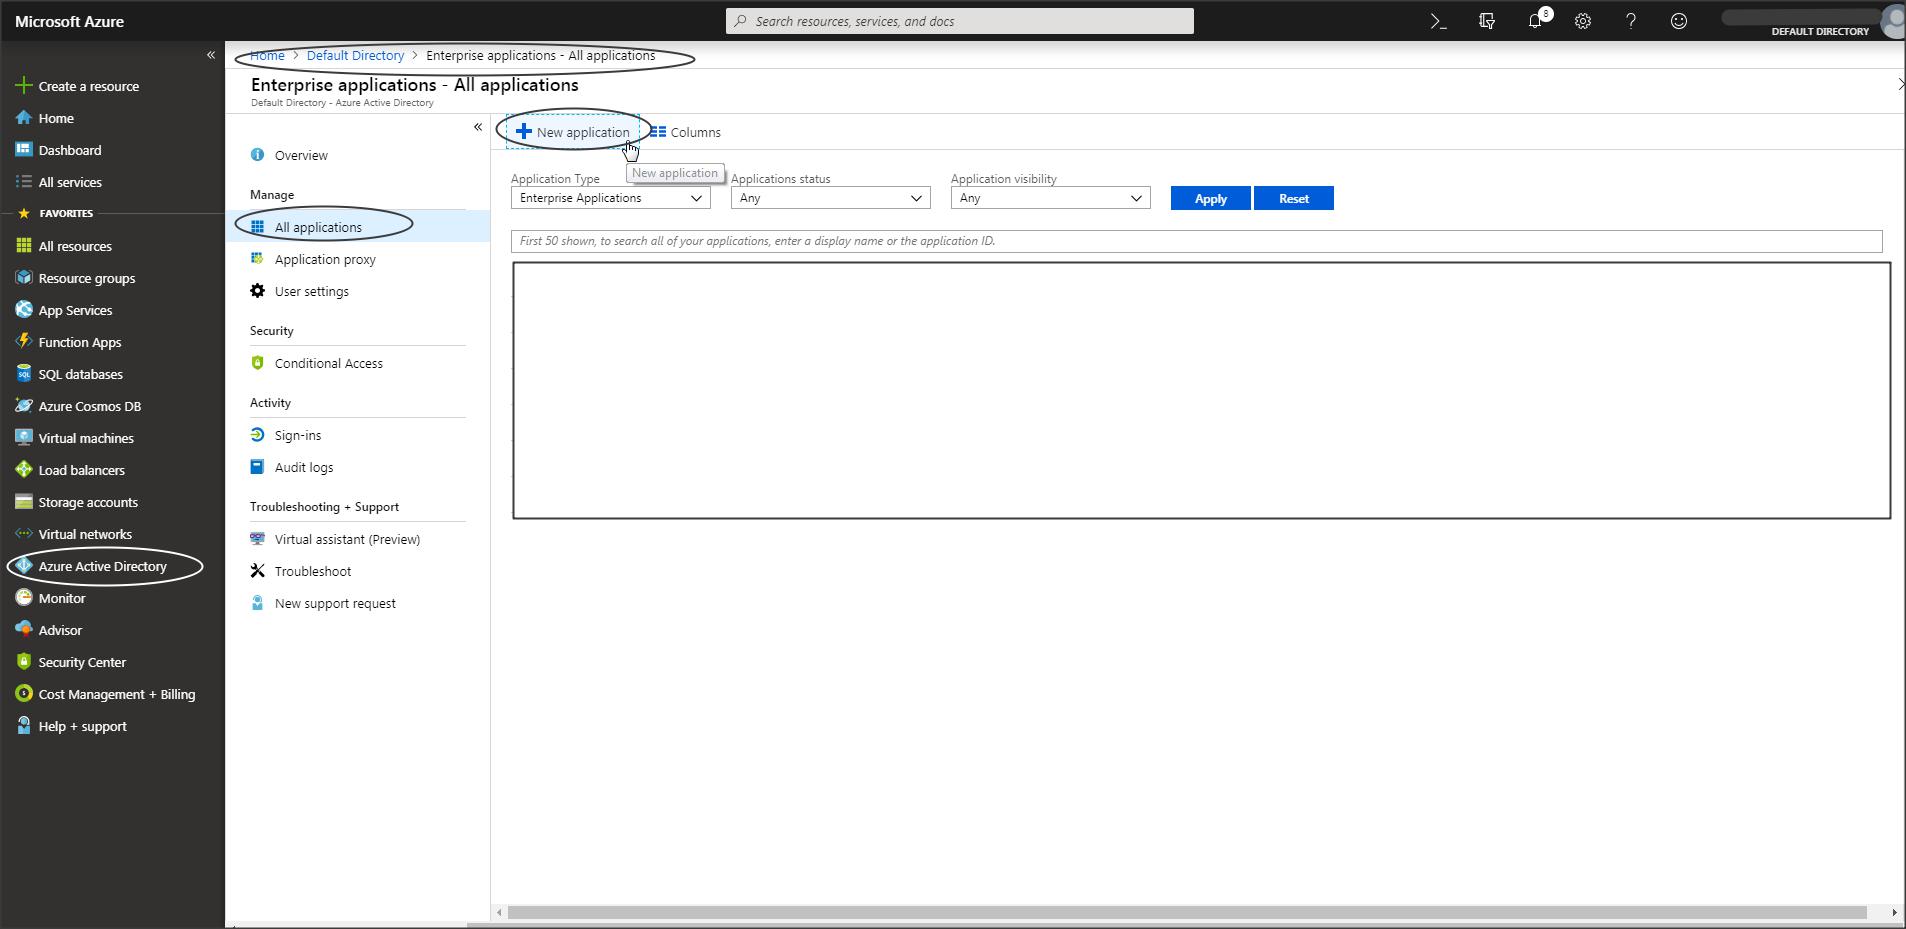
Create a new application :
Step A-3 :
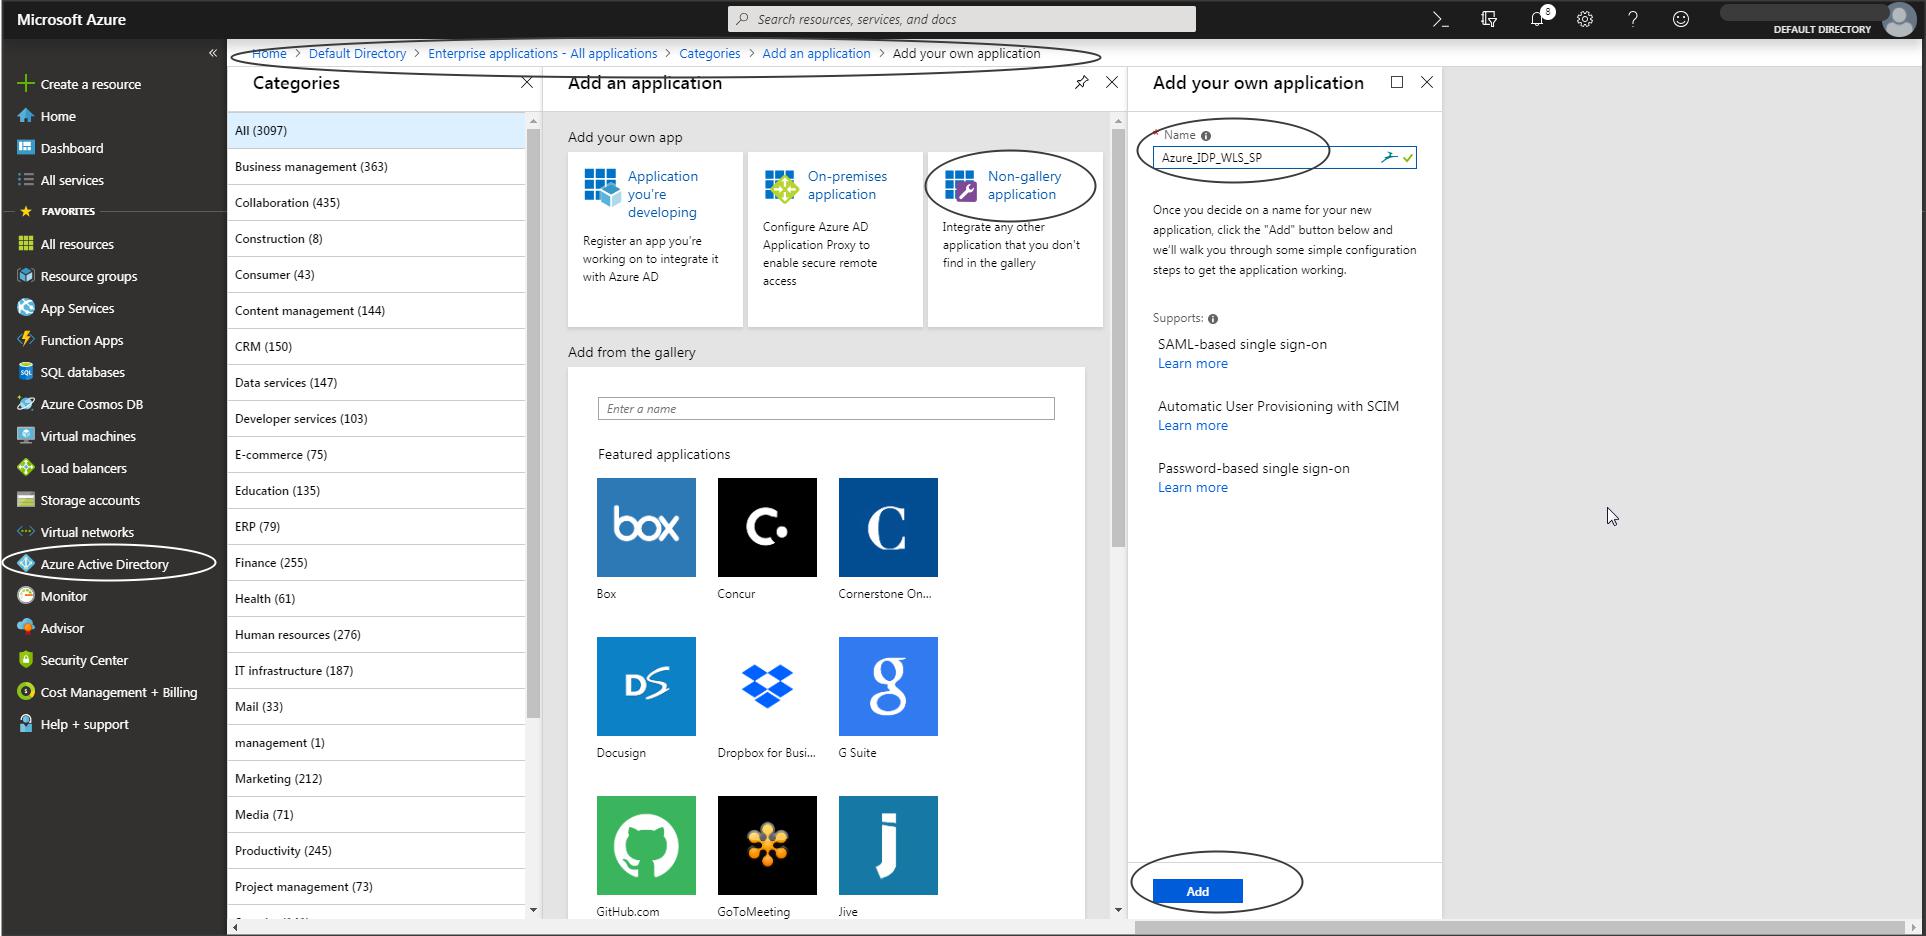
Select Non-gallery application -> add your own application
Step A-4 :
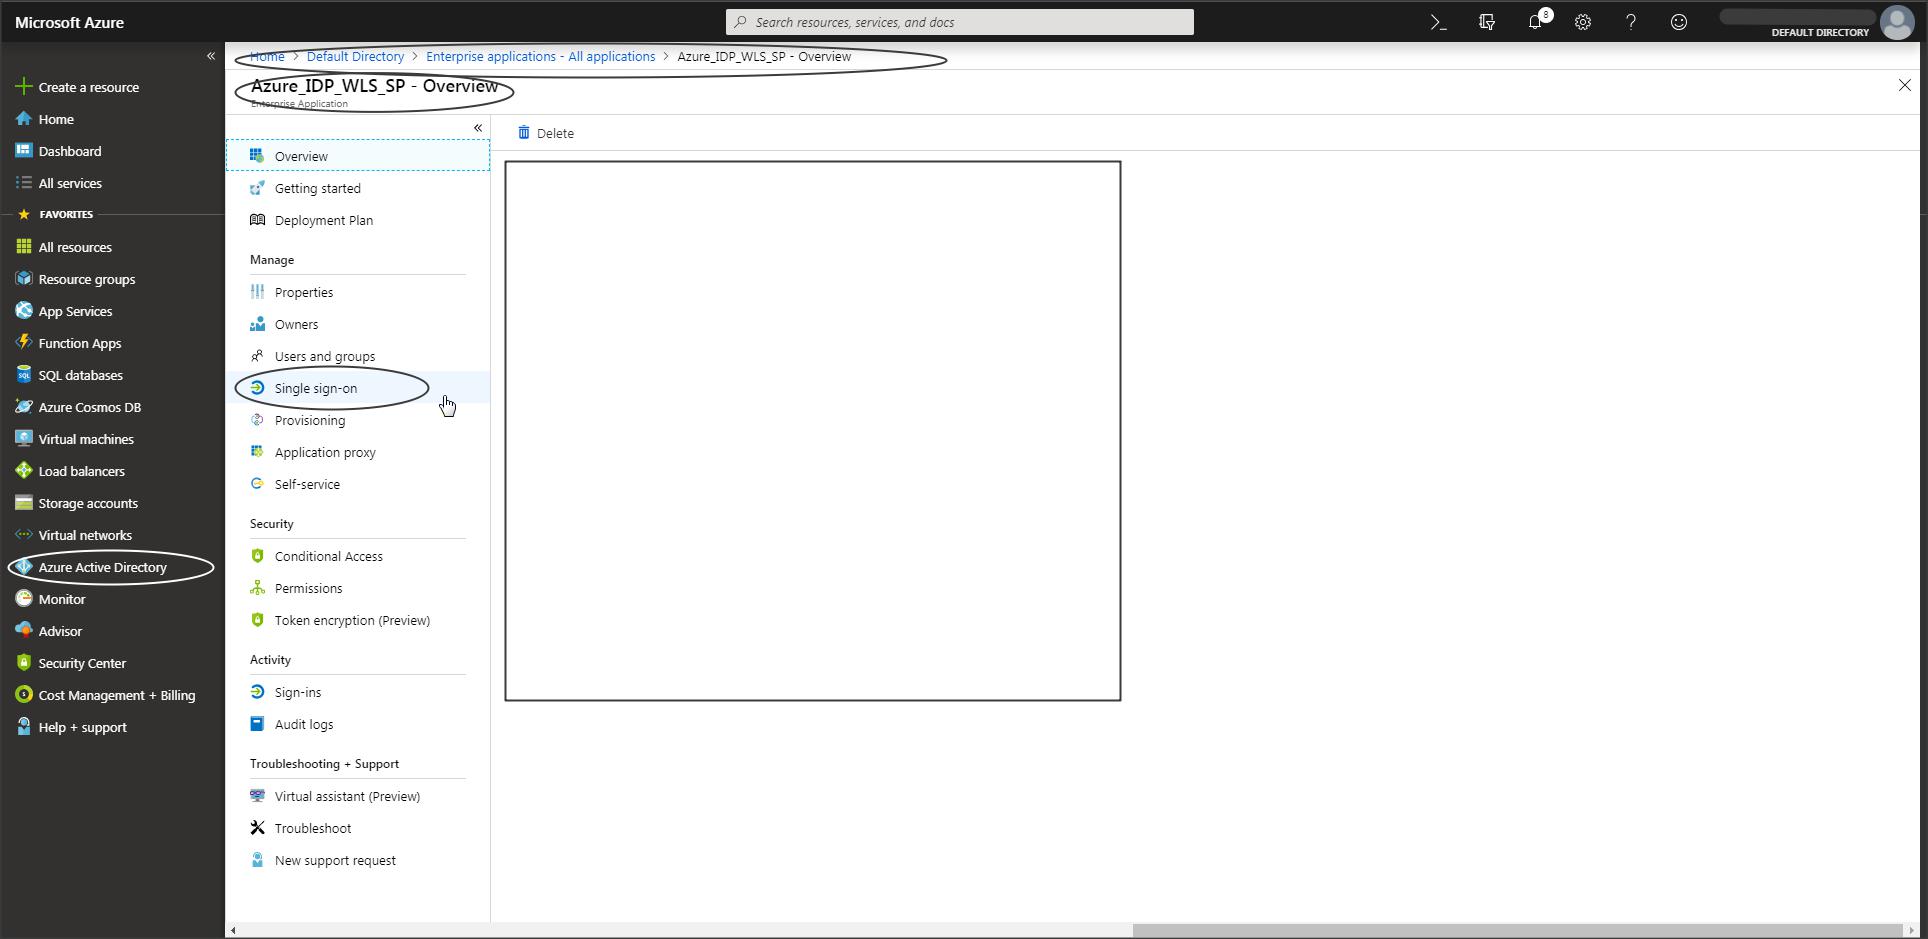
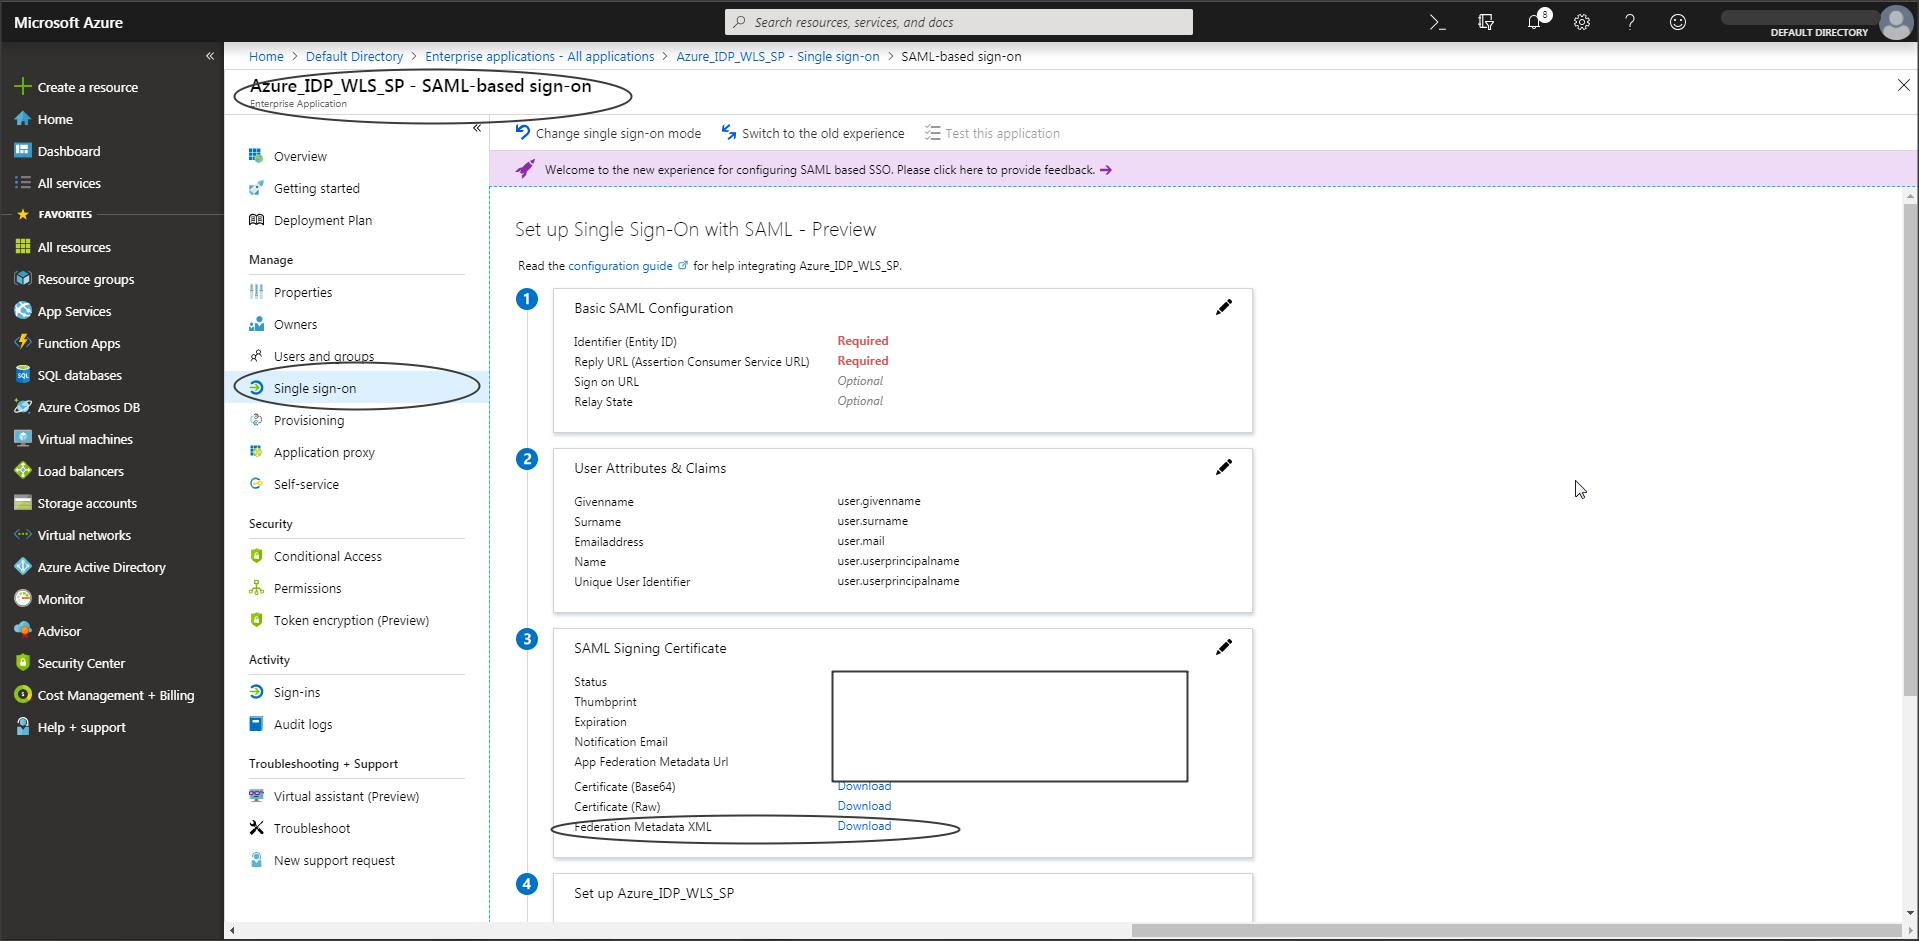
Select Single Sign-On -> SAML
Step A-5 :

Step A-6:
Download the IDP metadata.
NOTE:
– User attributes and claims that need to be part of the SAML Token sent to WLS can be edited from this screen.
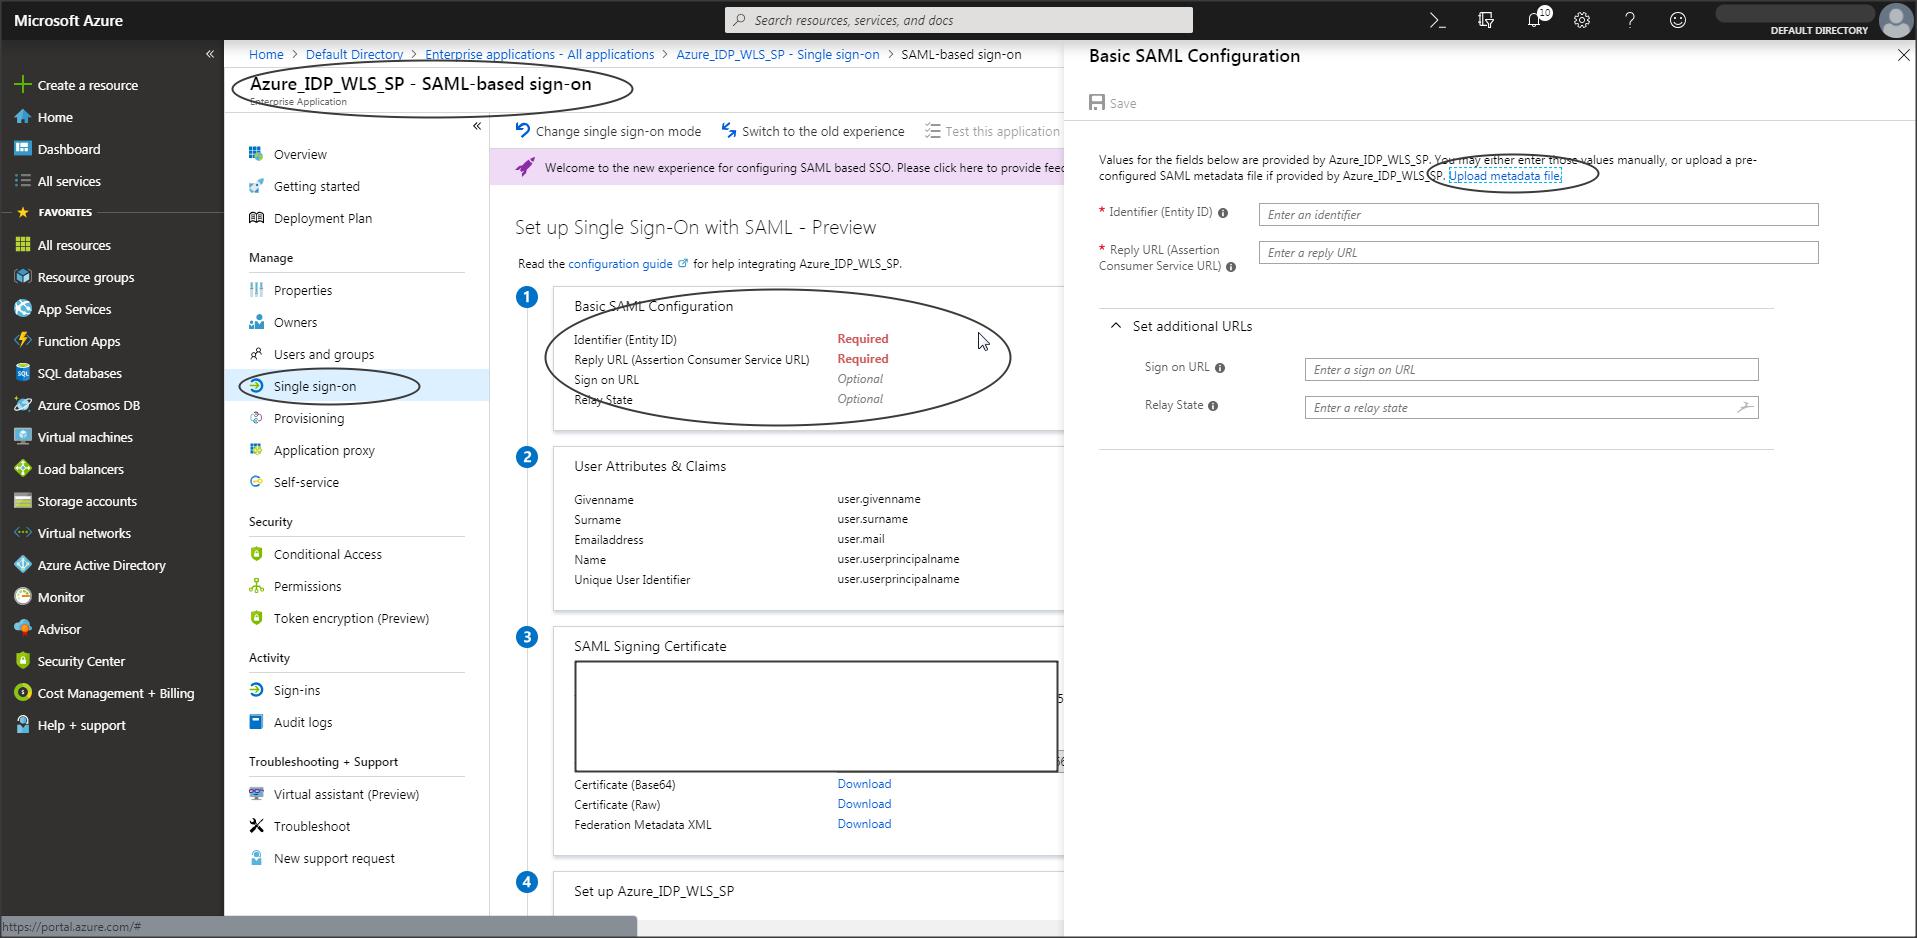
NOTE : (This is a recent change in Azure)
– If the “Download” option is greyed out in Azure console, then
Click on “Upload Metadata File” in Azure console and upload the “WLS-SP-Metadata.xml” file -> You should now be able to download the Azure IDP metadata.
– To get the WLS SP metadata follow the steps from “Step W-1” to “Step W-4” in this blog.
Step A-7 :
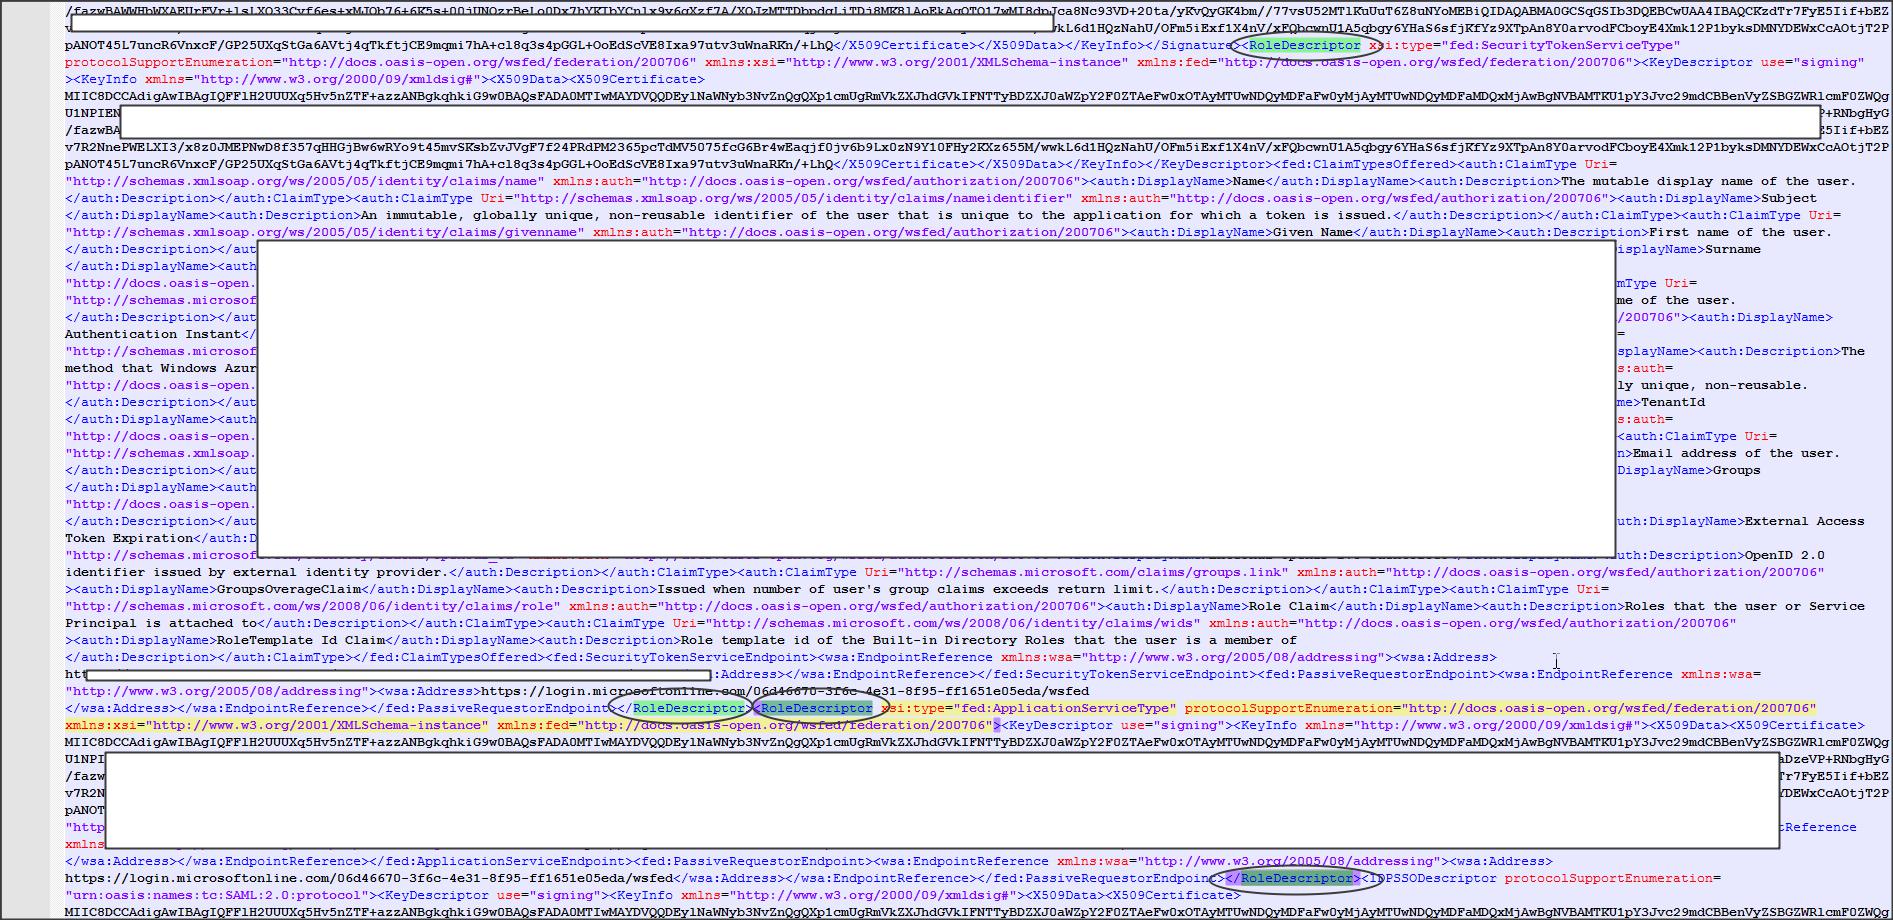
Azure IDP metadata cannot be used with Weblogic directly as it contains few tags that are not supported by Weblogic.
Edit the IDP metadata downloaded in Azure and remove the <RoleDescriptor> tag.
This tag should be present twice in the metadata. Save the metadata. This will be used to create a partner in Weblogic SP configuration.
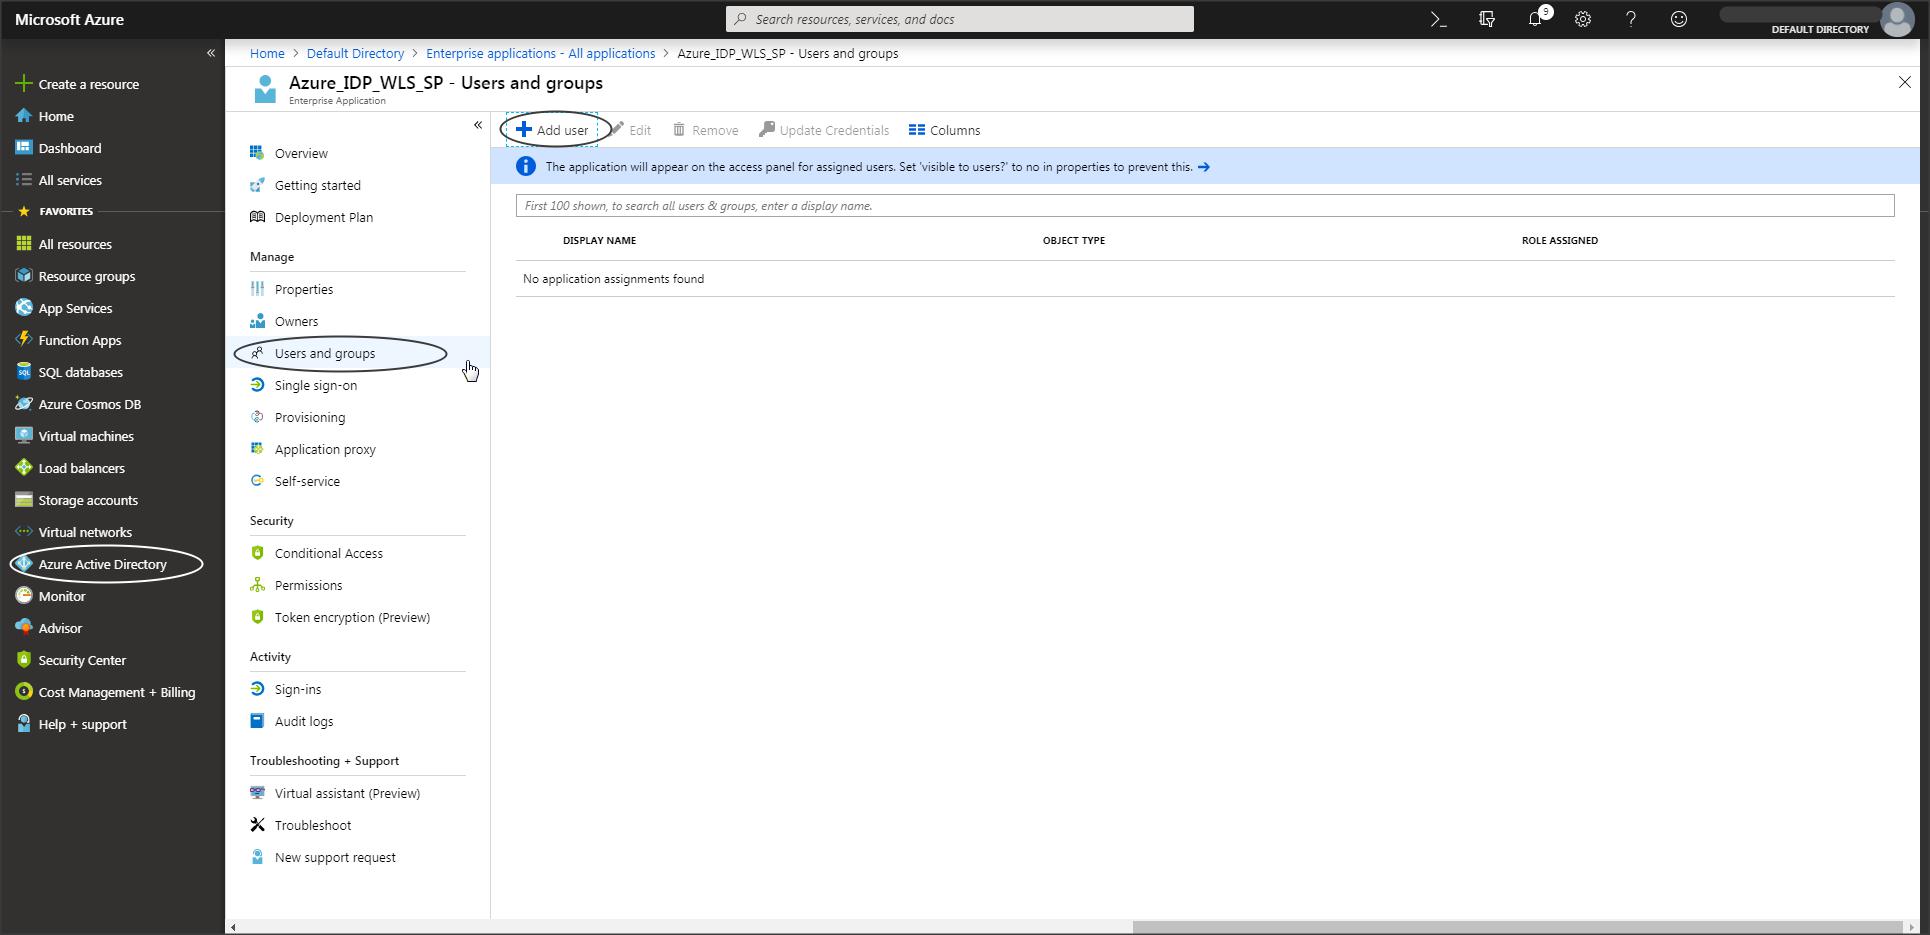
Step A-8 :
You can add users who need access to this application as required.
Weblogic SP Configuration :
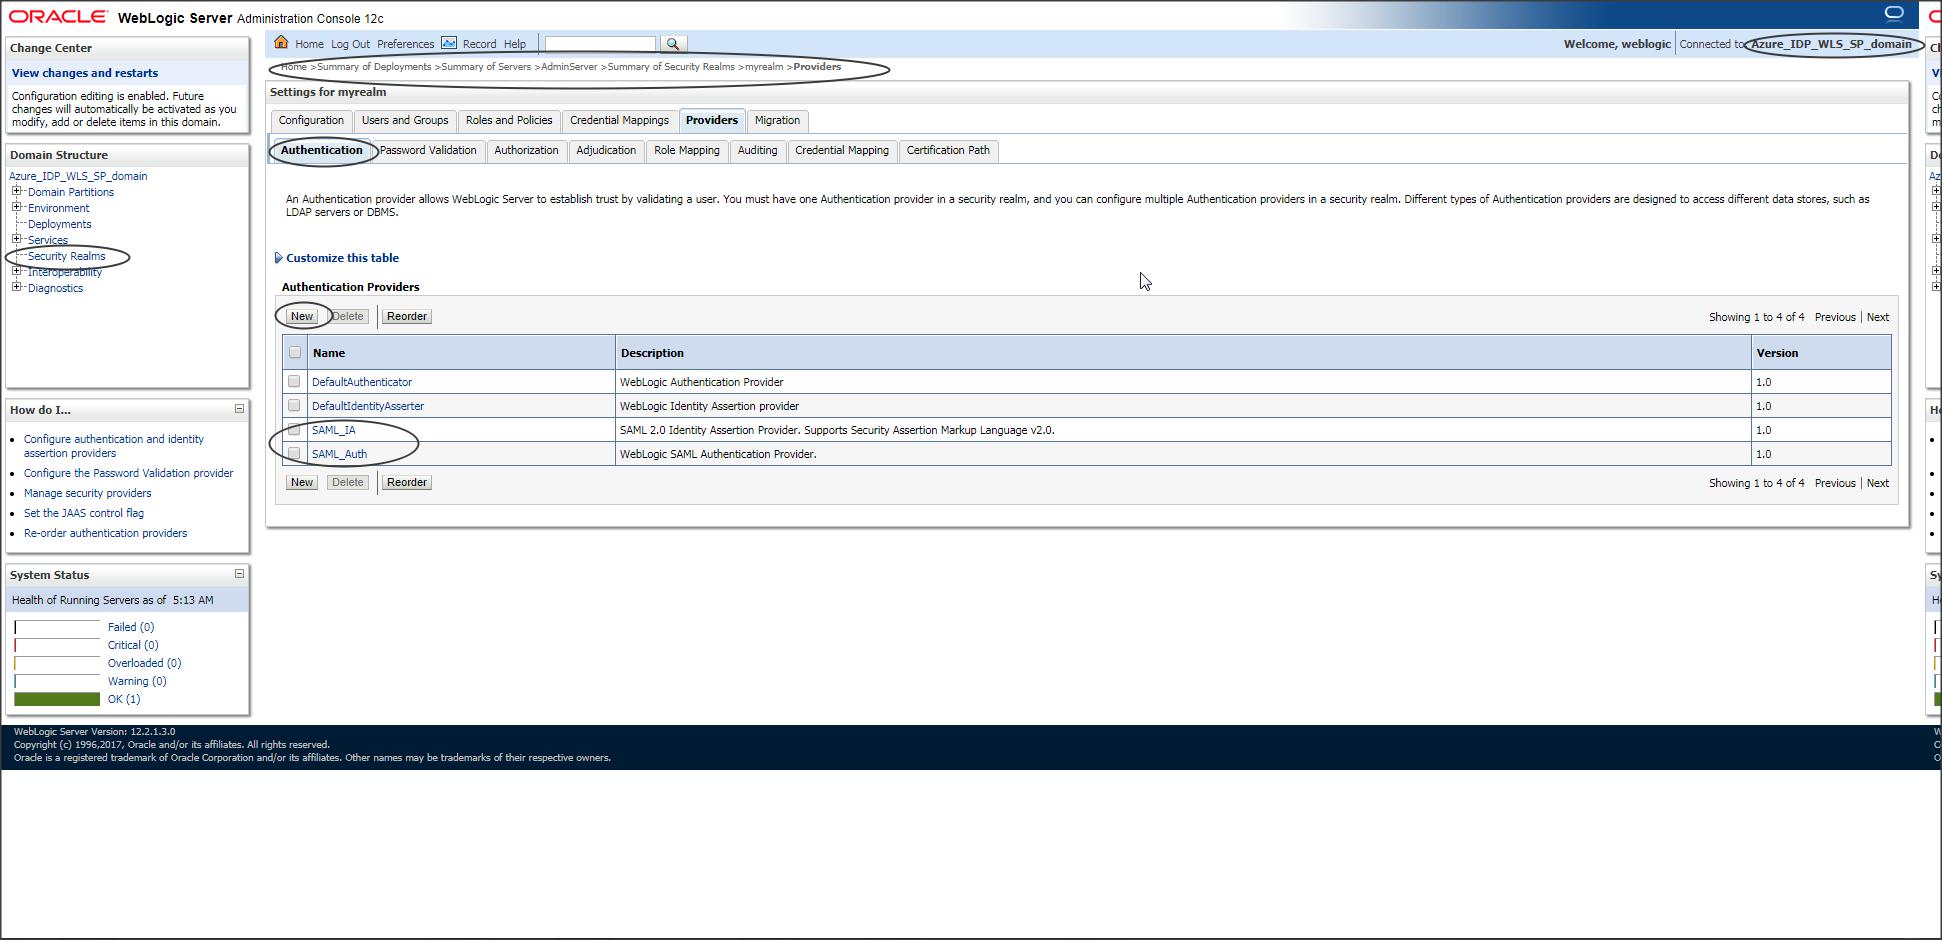
Step W-1:
Create SAML Identity Provider and SAML Authentication provider in Weblogic.
SAML Identity Provider is required to understand/accept the SAML token sent from Azure to WLS.
SAML Authentication Provider is an optional provider which can be created if you want to make use of the “Virtual User” feature in WebLogic.
Step W-2 :
Restart the servers.
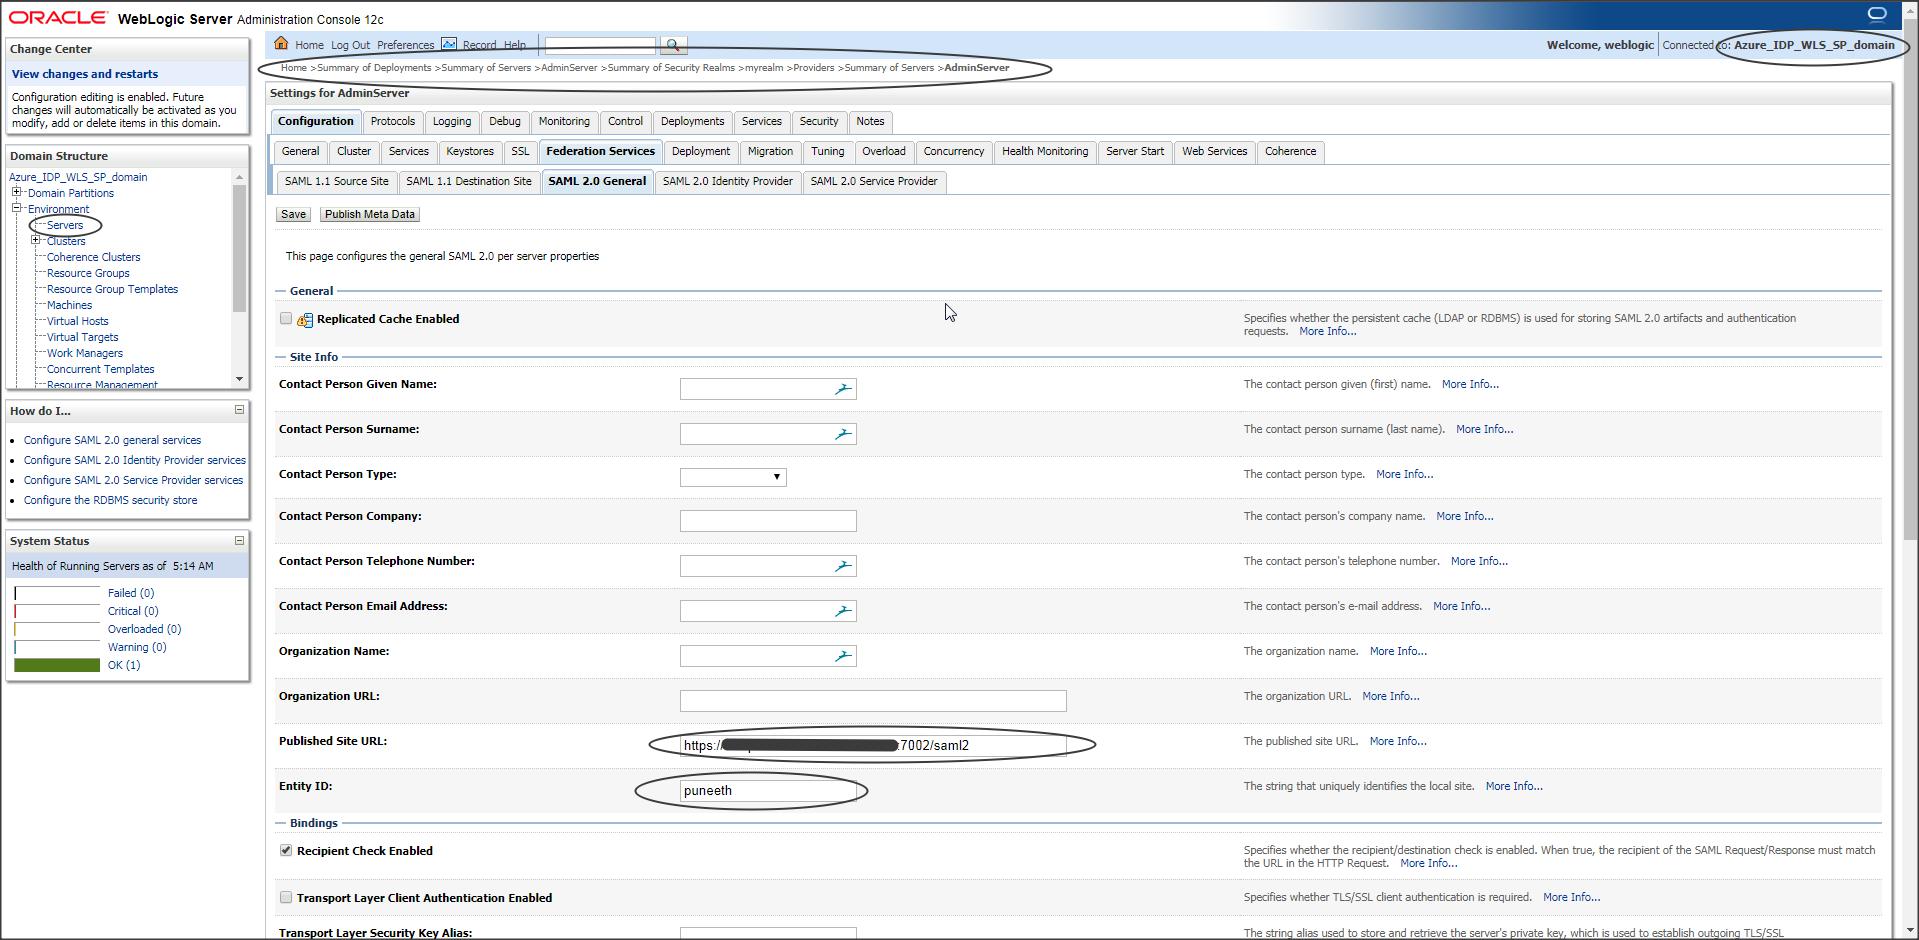
After restart select Adminserver -> Federation Services -> SAML2.0 General :
NOTE :
In this example I am configuring SSO for the WLS console application which is deployed to the Admin Server by default, hence I need to update the SAML2.0 General tab under AdminServer.
If you have your custom application deployed on say MS1 then you need to update the SAML2.0 General tab of the managed server, say MS1.
Publish site URL should have the URL in the following format :
https://<publicly_accessible_host_or_IP>:<publicly_accessible_port>/saml2
If you have a Load Balancer behind Weblogic then Publish Site URL should contain the Load Balancer host and the port.
Irrespective of what application is deployed on Weblogic the Publish Site URL should always have the context as “/saml2”, because saml2.war is an internal application deployed in Weblogic and it cannot be changed.
Entity ID should be a unique name in WLS.
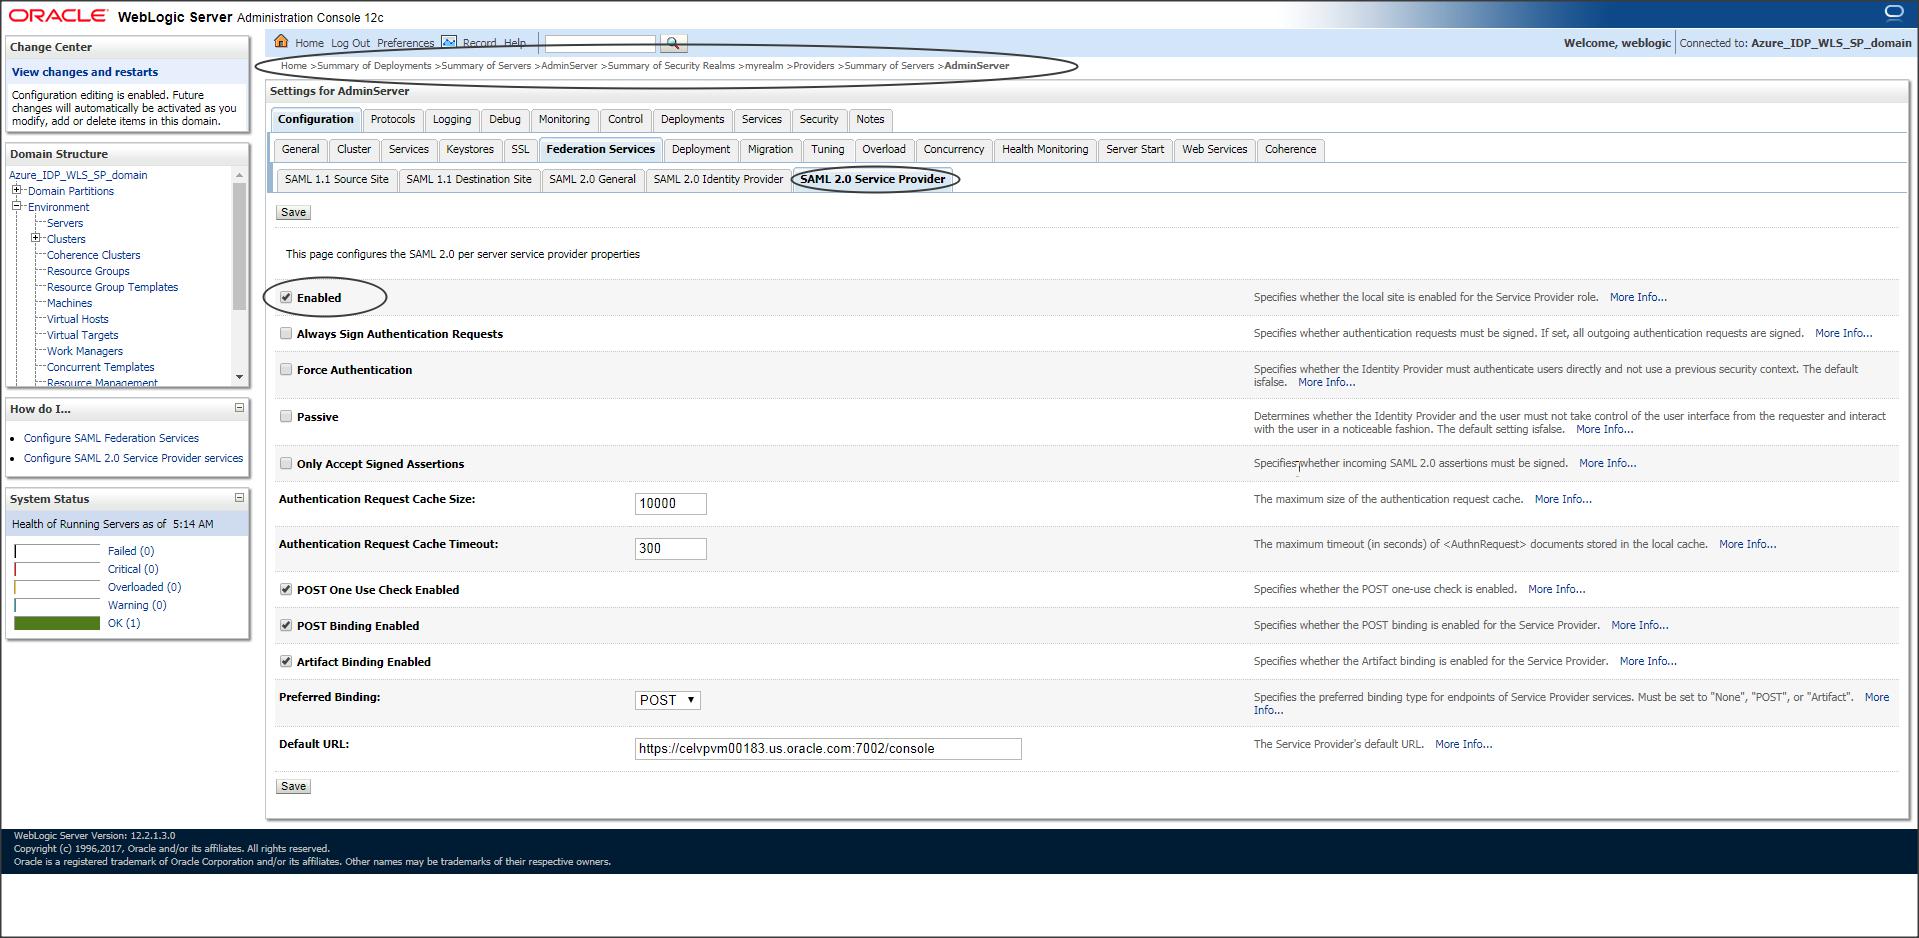
Step W-3 :
Enable SAML2.0 service provider.
Default URL is optional.
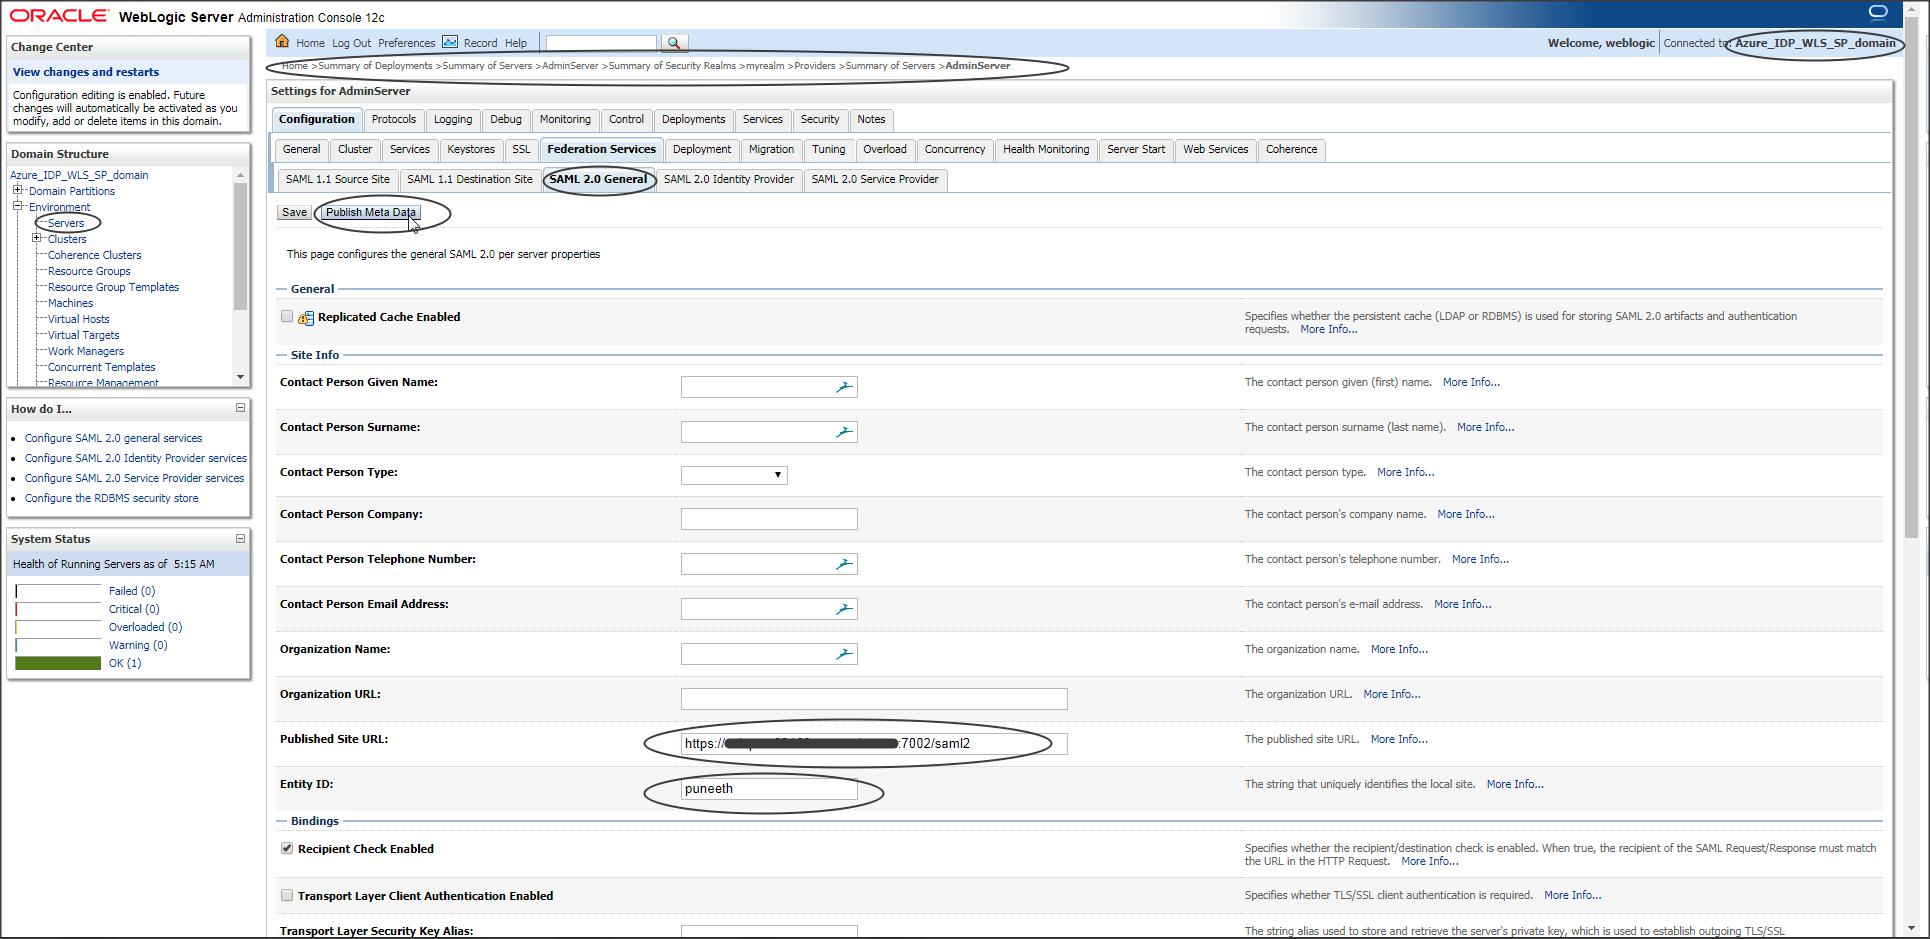
Step W-4:
Now go back to “SAML 2.0 General” tab and publish the SP metadata.
NOTE: The file name should have an extension .xml
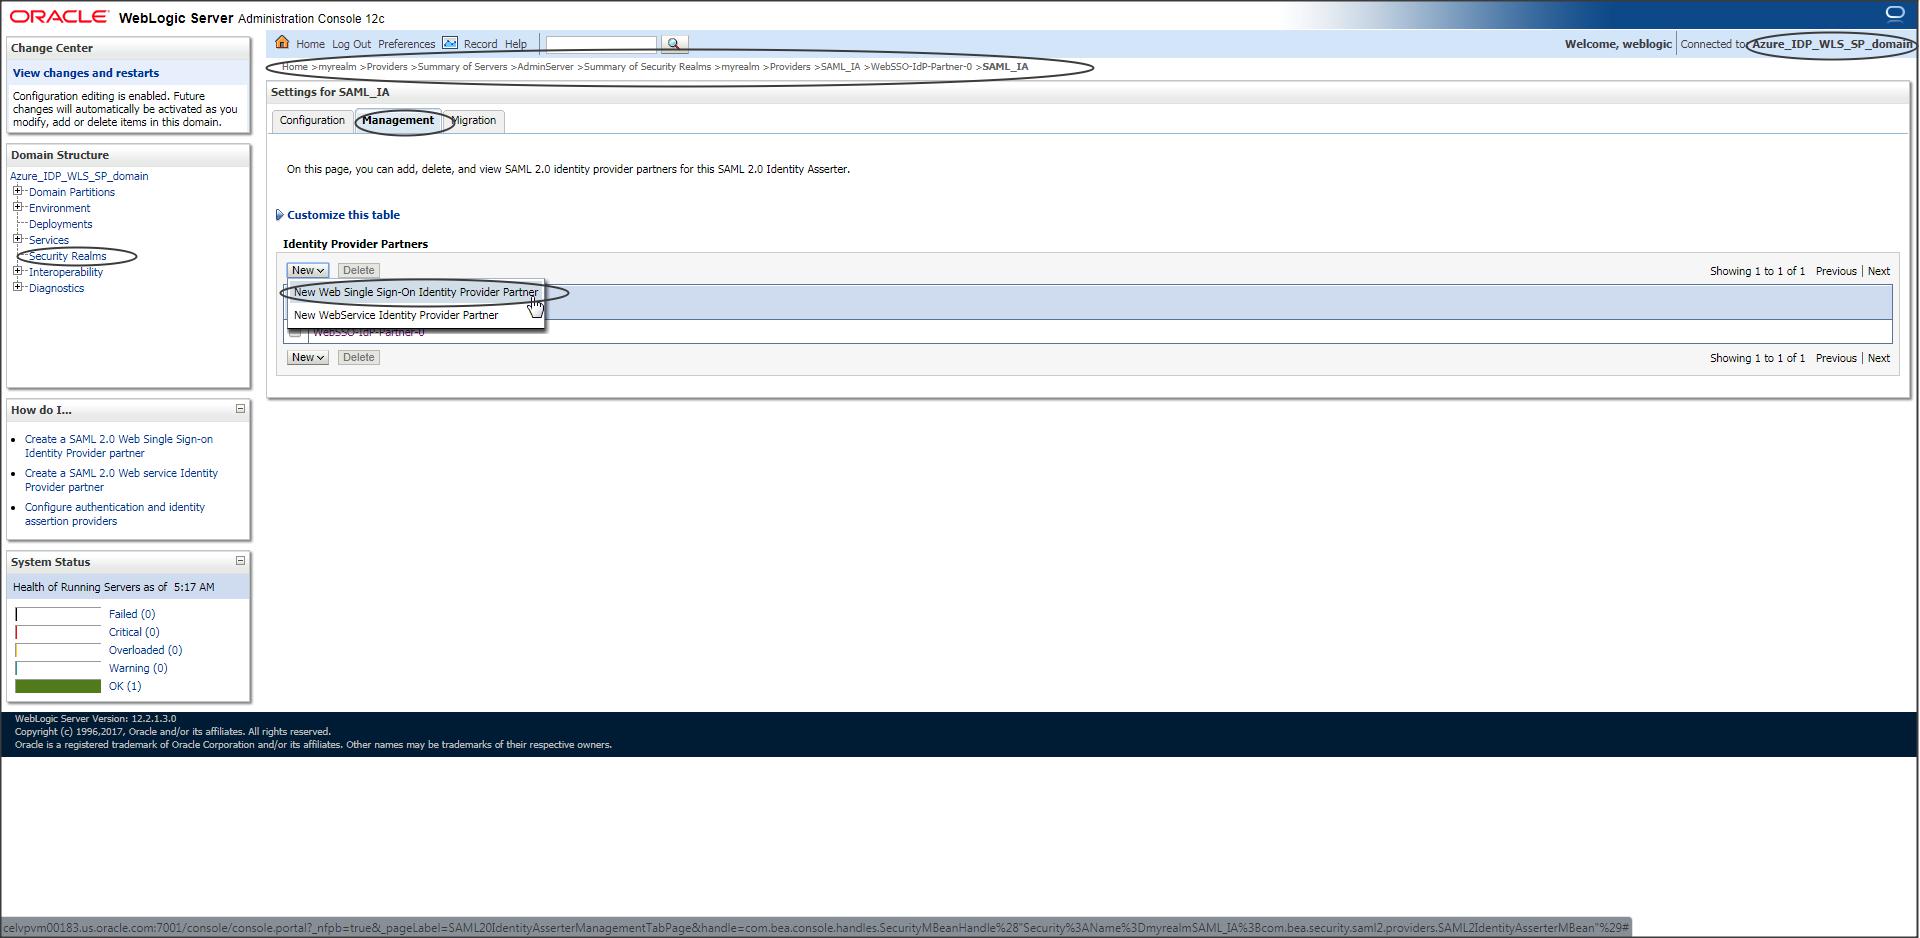
Step W-5 :
Now go to Security Realms -> Providers -> SAML Identity Asserter -> Management and create a new partner using the modified Azure IDP metadata.
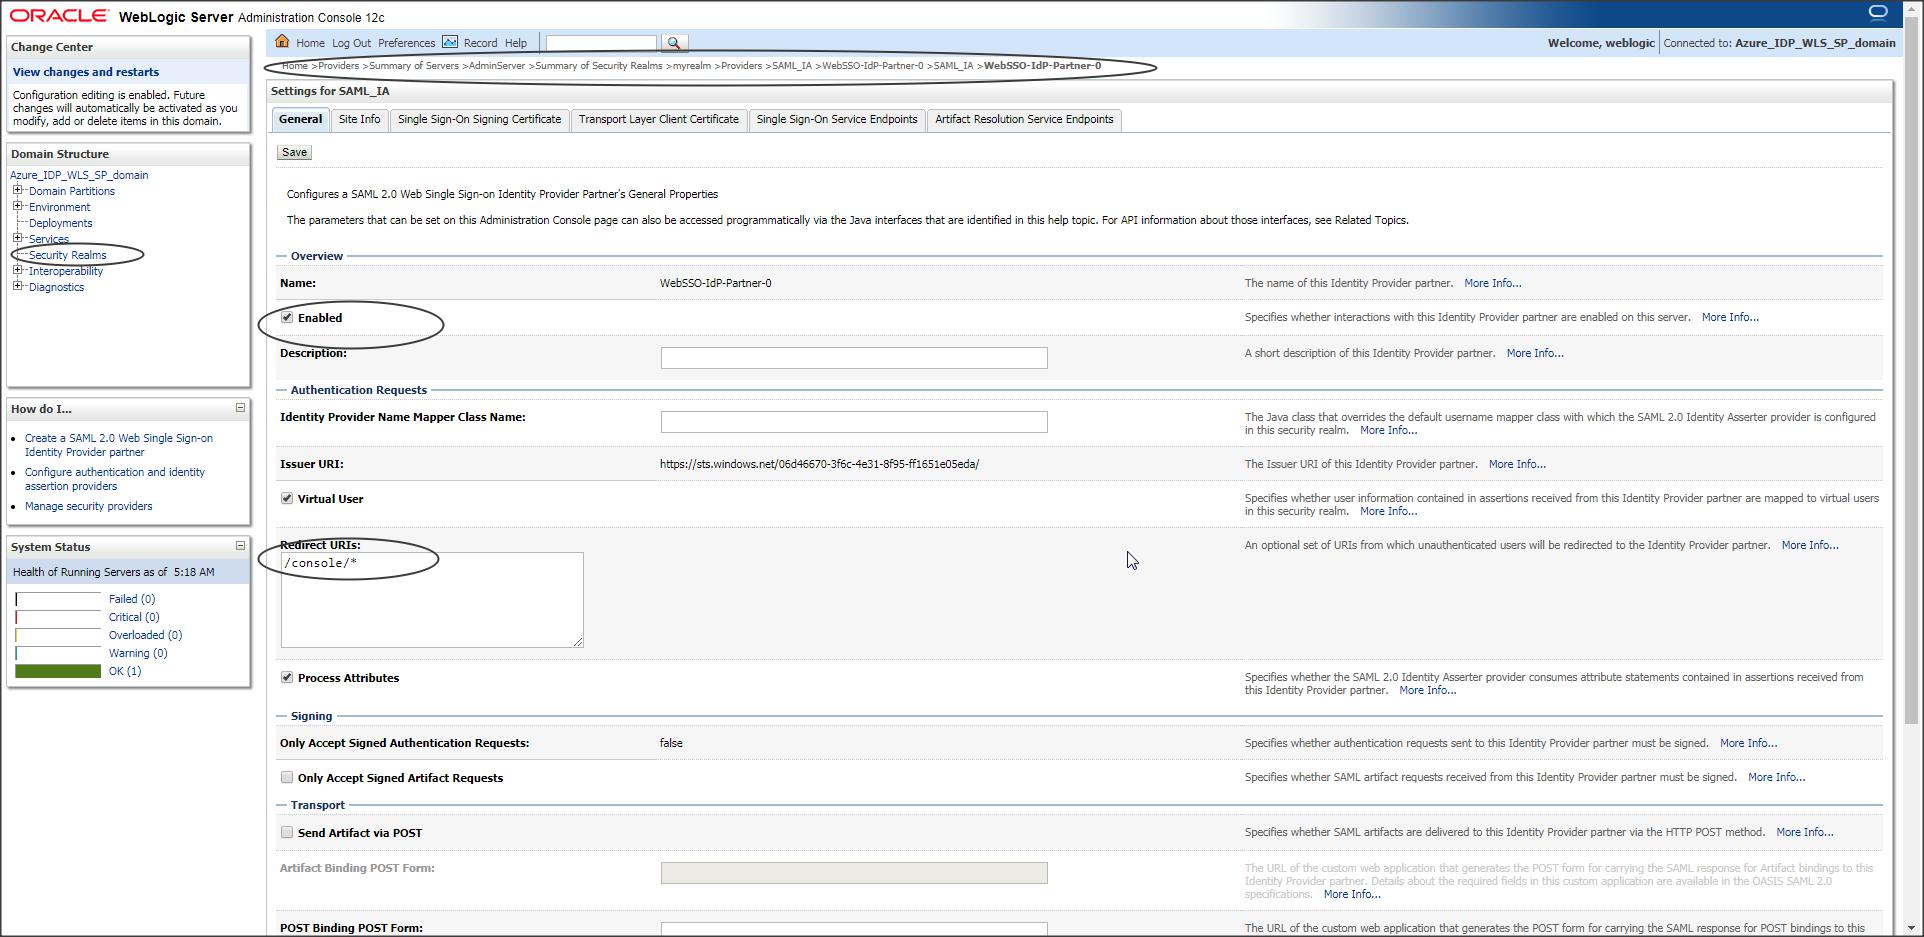
Step W-6 :
Enable the partner created and update the Redirect URI.
NOTE :
Redirect URI should be the context of the protected page of your application that needs to participate in SSO.
In our case it is “/console/*”
If you want to bypass SSO and access the WLS console directly use the following URL :
https://<host>:<port>/console/login/LoginForm.jsp
(continued) Azure IDP configuration :
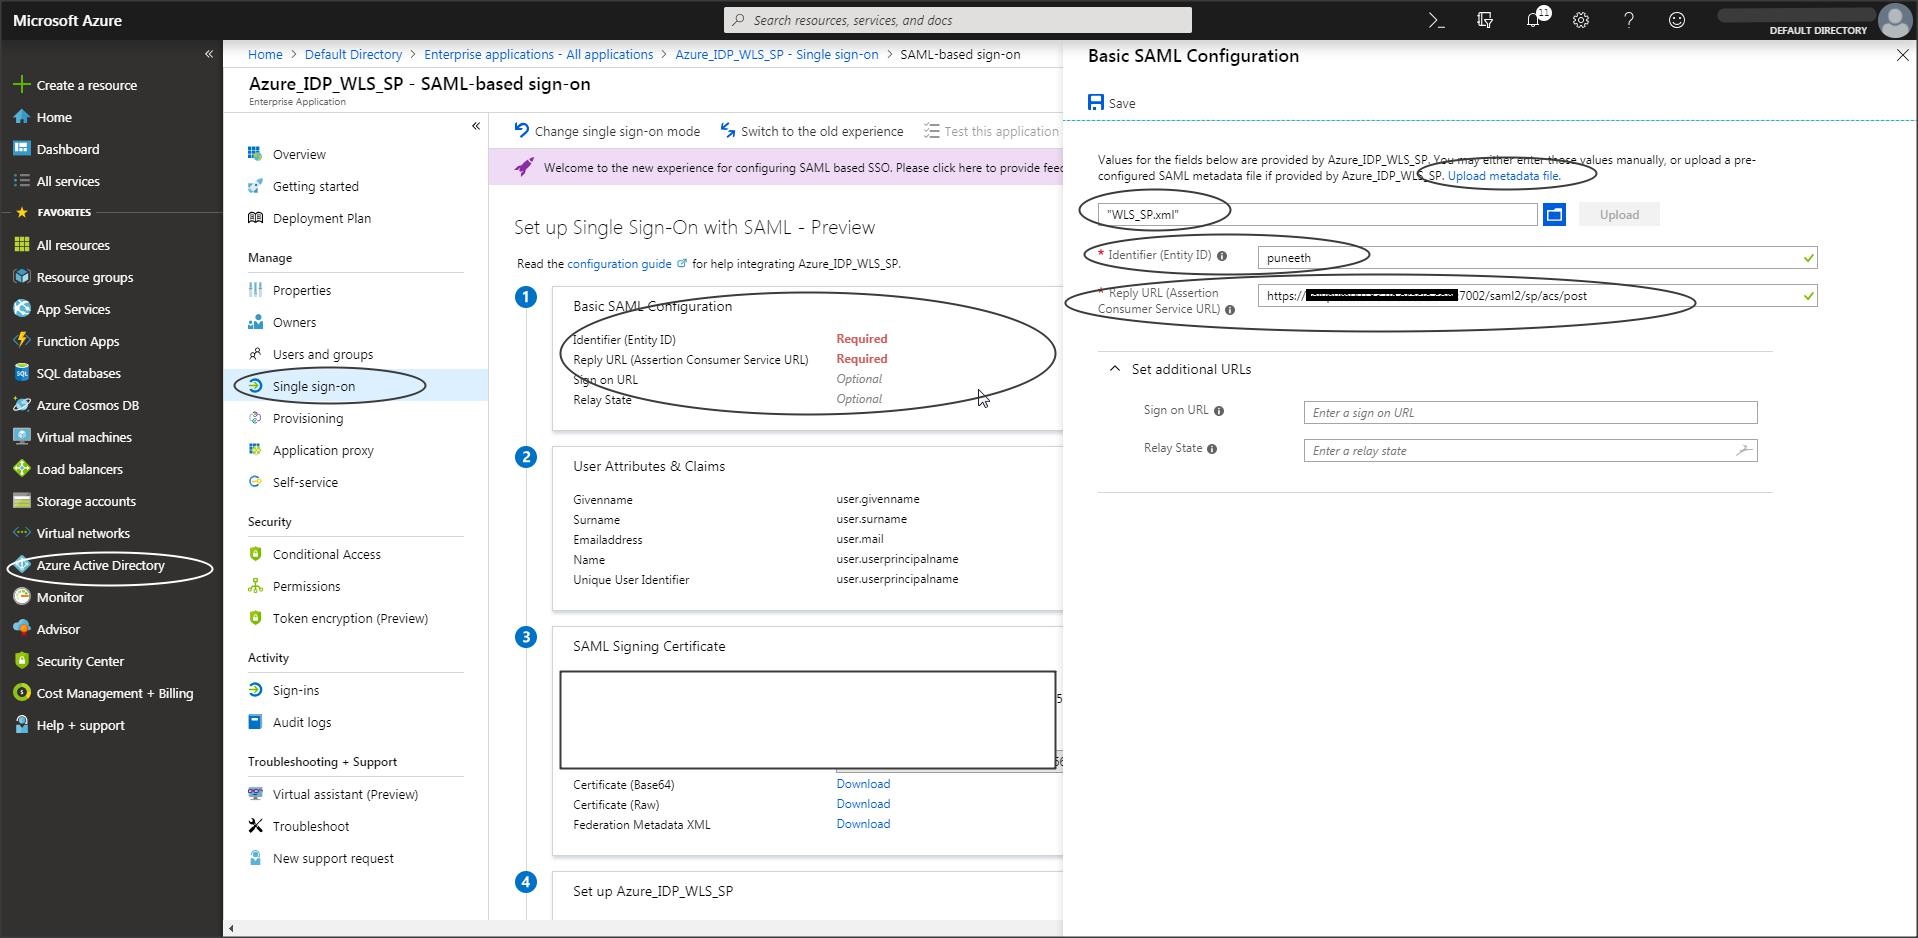
Step A-9 :
Now use the SP metadata and create a partner in Azure.
Step A-10 :
Since we are testing SSO using the console application, you need to change the cookie name for console application in Weblogic :
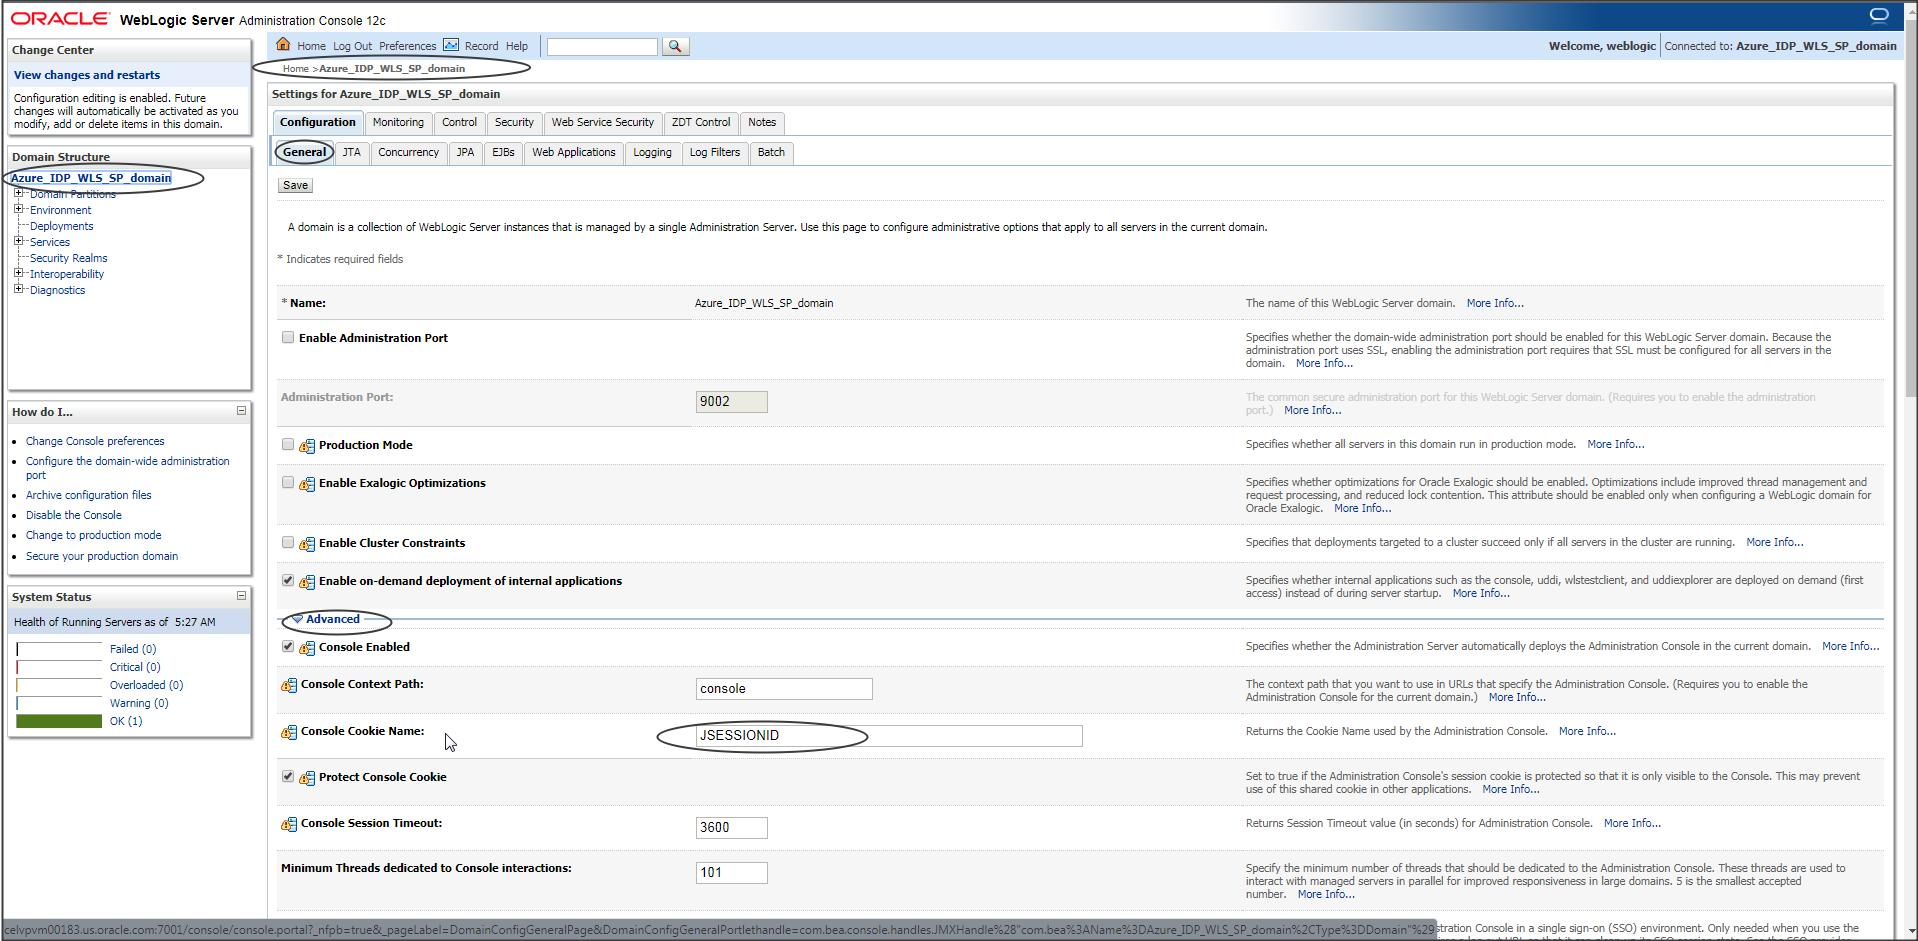
Now when you access the console page you should get redirected to Azure IDP login page :
<Additional Info>
If you would like to test SSO with a sample application (instead of WLS console), then :
Deploy the following sample application on Weblogic Server (Weblogic_SP_sample_App.zip)
DOWNLOAD “Weblogic_SP_sample_App.zip”
NOTE: You can just unzip the above zip file and deploy the application in an exploded format in WLS.(There is no need to create a war file).
To enable this application to participate in SSO add the redirect URI as shown below :
Login to console -> security realms -> myrealm -> Providers -> <saml_IA> -> management -> <partner_name> ->
Redirect URIs : /Weblogic_SP_sample_App/restricted/protected_page.jsp
Demo :
Have a look at the following video which shows how to install the sample application and enable Virtual User feature in WebLogic :
NOTE: The video shows a sample application from JCS SAML blog but it holds good for the sample application used in this blog as well.
NOTE :
Known Issues :
1)
Issue : Signature verification of a SAML Assertion may fail if multiple IdP partners are configured with the same Issuer URI.
Example : If you are configuring more than one Azure application for SAML SSO in the same WLS Domain, and utilizing the same Azure Tenant ID)
Error Trace :
<BEA-000000>
<SAML2Assert: Signature cryptographic validation not successful
org.opensaml.xmlsec.signature.support.SignatureException: Signature cryptographic validation not successful
at
org.opensaml.xmlsec.signature.support.provider.ApacheSantuarioSignatureValidationProviderImpl.validate(ApacheSantuarioSignatureValidationProviderImpl.java:79)
at
org.opensaml.xmlsec.signature.support.SignatureValidator.validate(SignatureValidator.java:54)
at
com.bea.security.saml2.util.SAML2Utils.verifySamlObjectSignature(SAML2Utils.java:365)
Solution :
Apply patch 32818117 (MULTIPLE AZURE SAML2 APPS FOR SAME AZURE TENANT WITHIN A WLS DOMAIN)
2)
Issue : Group attribute in saml assertion generated by azure idp is not honored by WLS.
Solution :
As per – https://docs.oasis-open.org/security/saml/v2.0/saml-core-2.0-os.pdf the NameFormat is an optional attribute.
Group from SAML assertion is not found by weblogic unless it has name format “urn:oasis:names:tc:SAML:2.0:attrname-format:basic”
Consider creating a custom SAML2 attribute mapper to process the attributes in application specific manner.
Link :https://docs.oracle.com/en/middleware/fusion-middleware/weblogic-server/12.2.1.4/scprg/saml.html#GUID-3808A141-AD00-4F59-B085-FD1AB2B3422A
Azure is the only 3rd party IDP provider that I have come across where-in WebLogic will not be able get the Group information from Assertion generated.
And the main reason for that is :
“Group from SAML assertion is not found by weblogic unless it has name format “urn:oasis:names:tc:SAML:2.0:attrname-format:basic” “
and Azure IDP cannot generate an assertion for Group attribute with name format “urn:oasis:names:tc:SAML:2.0:attrname-format:basic”
So you can either modify the DD of your application (principal-name) to include all users that need access to application (Group name will not work) or try the following workaround :
1.
Create all the users that need access to a particular application, in WLS embedded LDAP (from Users and Groups tab) and then create a group in embedded LDAP and add all the users to this newly created group.
If you are trying to access WLS console application then create the users and add them to “Administrators” group or provide “Admin” role to this user.
NOTE : You can have any password for these users as this will be used only for mapping the group with users. The actual authentication will still be via the saml token generated by IDP.
2.
Create all the users and groups that need access to application in an external LDAP like AD or DB.
Then configure this LDAP with WLS by creating a suitable Authentication Provider.
Make sure all the users and groups information is seen in Users and Groups tab.
NOTE : You can have any password for these users as this will be used only for mapping the group with users. The actual authentication will still be via the saml token generated by IDP.
NOTE : Virtual User option in WLS SP is only for Users and not Groups so that wouldnt help either.
