The Oracle Fusion Applications suite provides a comprehensive suite of SaaS solutions designed to optimize business operations across industries. With best-in-class tools for ERP, supply chain, HCM, and customer experience, they offer a unified platform with embedded AI for consistent processes and a single source of truth. Built on a modern, standards-based infrastructure, these applications enable seamless personalization, integration, and extension, helping businesses enhance customer engagement, improve agility, and adapt quickly to change.
Oracle APEX is the world’s most popular enterprise low-code application platform that enables you to build scalable, secure web and mobile apps with world-class features that can be deployed anywhere – cloud or on-premises.
Extending Oracle Fusion Applications with Oracle APEX lets you tailor the system to meet unique business needs not covered by the standard suite. APEX leverages the Oracle database, making it a quick, cost-effective way to add custom functionality while seamlessly integrating with Fusion data.
Key benefits of using APEX include its low-code development environment, which simplifies building applications with minimal coding, and its tight database integration for easy data access and manipulation. You can create custom user interfaces, streamline workflows, and rapidly prototype features to refine them before implementation. Additionally, APEX is included with your Oracle Database license, minimizing costs.
Common APEX use cases include creating tailored reports and dashboards, adding custom workflows, enforcing specific data validation rules, integrating third-party systems, and building industry-specific features. APEX enables businesses to extend Fusion Applications effectively, enhancing usability and aligning the system with their unique processes.
With APEX 24.2, the Fusion Integrated Starter App Wizard is introduced, making it easy to connect your Fusion instance with your database where APEX is hosted. Oracle manages complex security configurations in the backend, leveraging the preconfigured Fusion Integrated Starter app for secure connectivity. With the Database Tools Fusion Integration option, you can quickly establish this connection.
Integrating Oracle APEX with Fusion Applications
Requirements:
- Subscription to Fusion Application suite
- DBTools plugin version 1.100.0 and above
- An Oracle Database, preferably Oracle Autonomous Database
- SQLNet connections to that Oracle Database
Important Note: To integrate Oracle APEX with Fusion Applications, you will need the DBTools plugin version 1.100.0 or higher. This version will soon be available on Oracle Cloud Infrastructure. Stay tuned!
Note: Oracle APEX Application Development (APEX Service) does not support Fusion Application integrations since APEX workloads do not include SQLNet connections.
Integration Process:
Integrating Oracle APEX with Fusion Applications follows a simple three-step Process.
- Create a Connection using Database Tools Fusion Integration Wizard
- Verify whether DBMS Credentials Usage is set to yes at the instance level
- Create an Application with Integrations to Fusion Applications
Create a Connection using Database Tools Fusion Integration Wizard:
Database Tools is a managed service in Oracle Cloud Infrastructure (OCI) that enables you to create connections to any Oracle or MySQL Database service in OCI that can be reused by multiple users, resources, and services. The database connections can then be used to create a connection between the Oracle Fusion Applications instance and the Oracle Database where APEX resides.
The Database Tools service allows you to create connections to Oracle Database systems running in Oracle Cloud Infrastructure. Connections work with Autonomous Database (ADB) Shared, ADB Dedicated, Oracle Base Database (VM, BM, and Exadata DB Systems), and customer-managed Oracle Databases running on OCI compute instances.
To Create a Database Connection and Integrate APEX with Fusion Applications, perform the following steps:
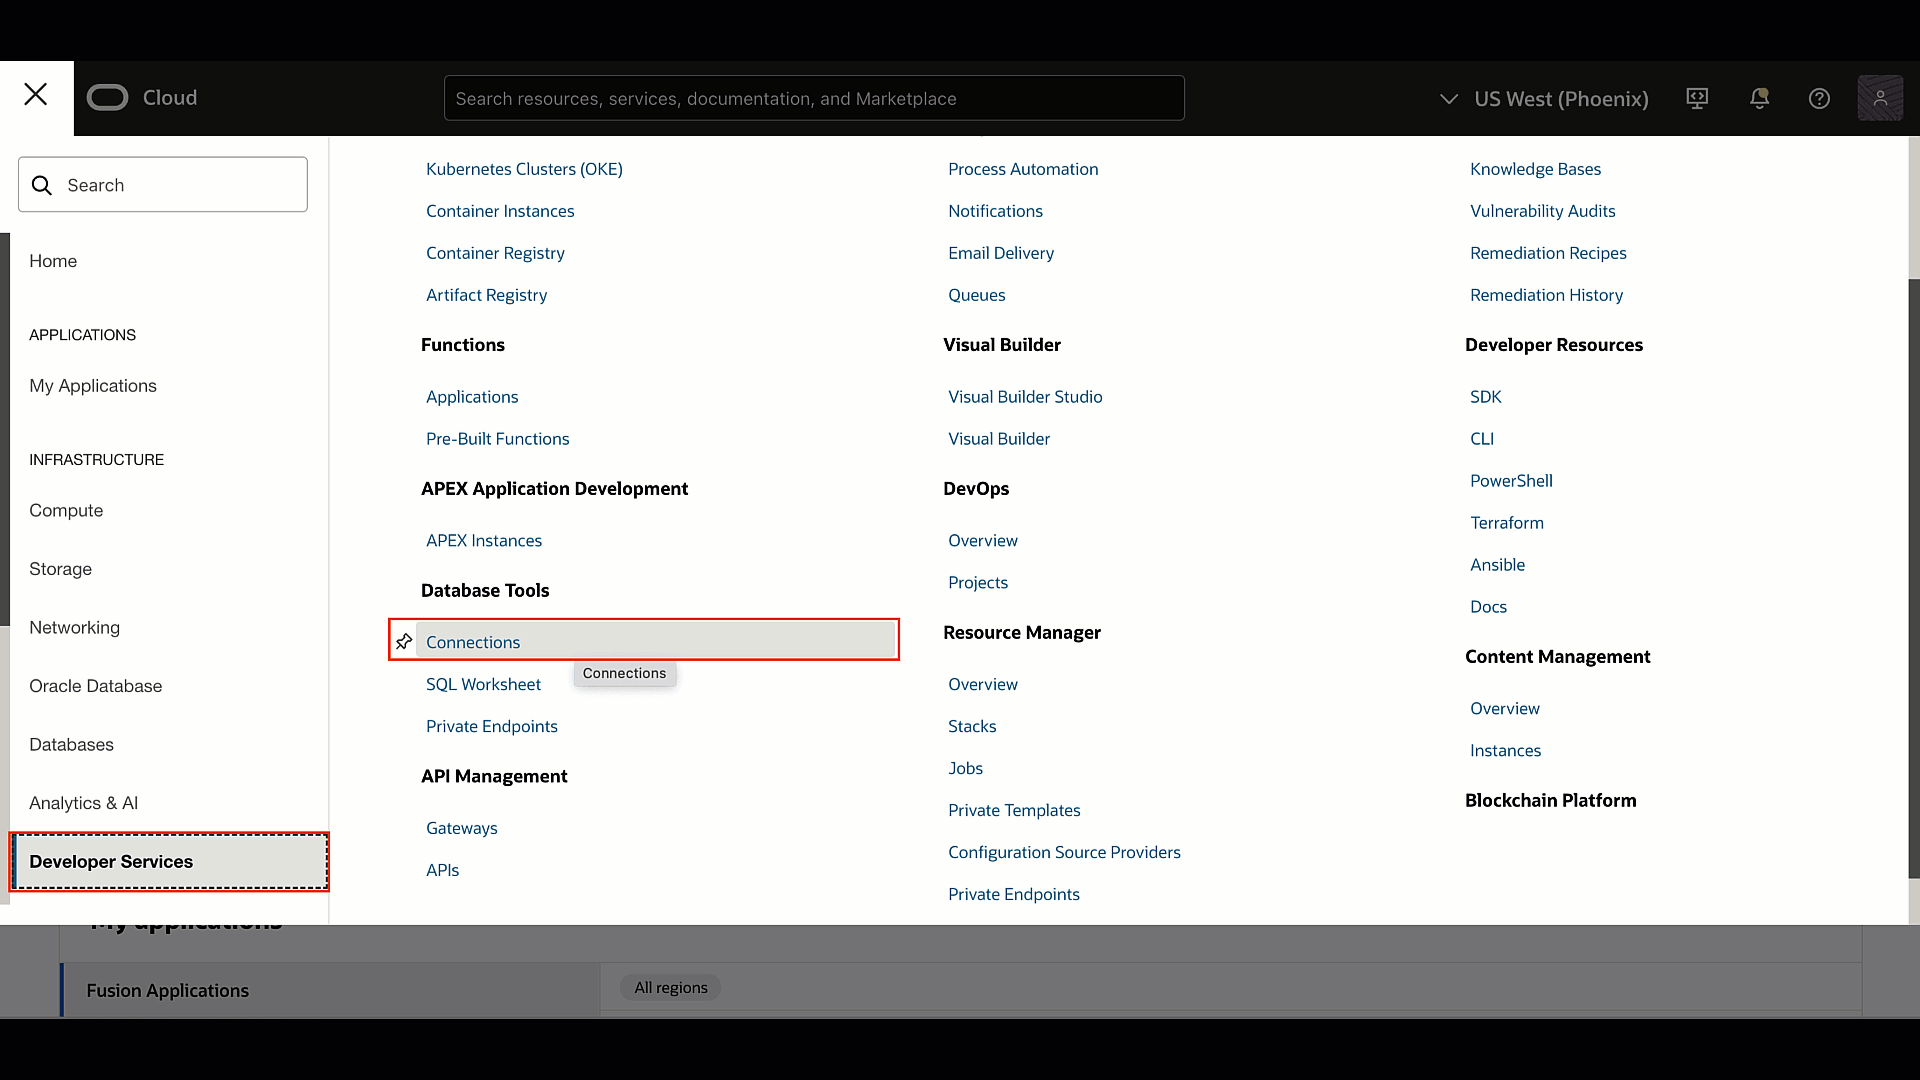
- Access Connections:
Navigate to Developer Services > Database Tools > Connections in the OCI console and click Create Connection. - Enter Basic Details:
- Name: Provide a descriptive name for the connection.
- Compartment: Select the compartment where the connection will be created.
- Select Database: You can either choose an existing database from your OCI tenancy. or Enter Database Information manually.
- Autonomous Database: Select from available options or search in another compartment.
- Oracle Database (Bare Metal, VM, Exadata): Choose the DB system, home, and database.
- Oracle Exadata on Oracle Public Cloud: Pick the VM cluster and database.
- Alternatively, enter database information manually.
- Provide User Credentials:
- Enter the User Name and optional Role (if applicable).
- Use existing or create a new Password Secret for authentication.
- Configure Connection String:
- For Oracle Databases: ‘HOSTNAME:DB_PORT/SERVICE_NAME’.
- Optionally, enable and configure a Private Endpoint if needed.
- Finalize the Connection: Review the details and click Create.
- Integrate APEX with Fusion Applications:
- Open the newly created connection and select Integrate APEX with Fusion Applications which may be located under the More Actions submenu.
- In the wizard, provide:
- Fusion Applications Environment Details.
- A unique name for the Confidential Application which will be created in IDCS.
- APEX Instance URL in the format: https://host[:port]/ords/apex.
- Review the details and click Integrate.
Ensure Users Are Added to the Fusion Application’s Associated Identity Domain
The steps outlined in the previous section using the Database Tools Fusion Integration Wizard create database credentials in the database where APEX is hosted. This process enables the establishment of Single Sign-On (SSO) authentication, which both Fusion and APEX utilize.
Before creating a Fusion Integration Application in APEX, ensure that your target users are added to the Fusion Application’s associated identity domain. Follow these steps to validate or add users:
- Access the Fusion Application’s Identity Domain:
- Log in to your OCI Console and select the Fusion Application used for integrating APEX with Fusion.
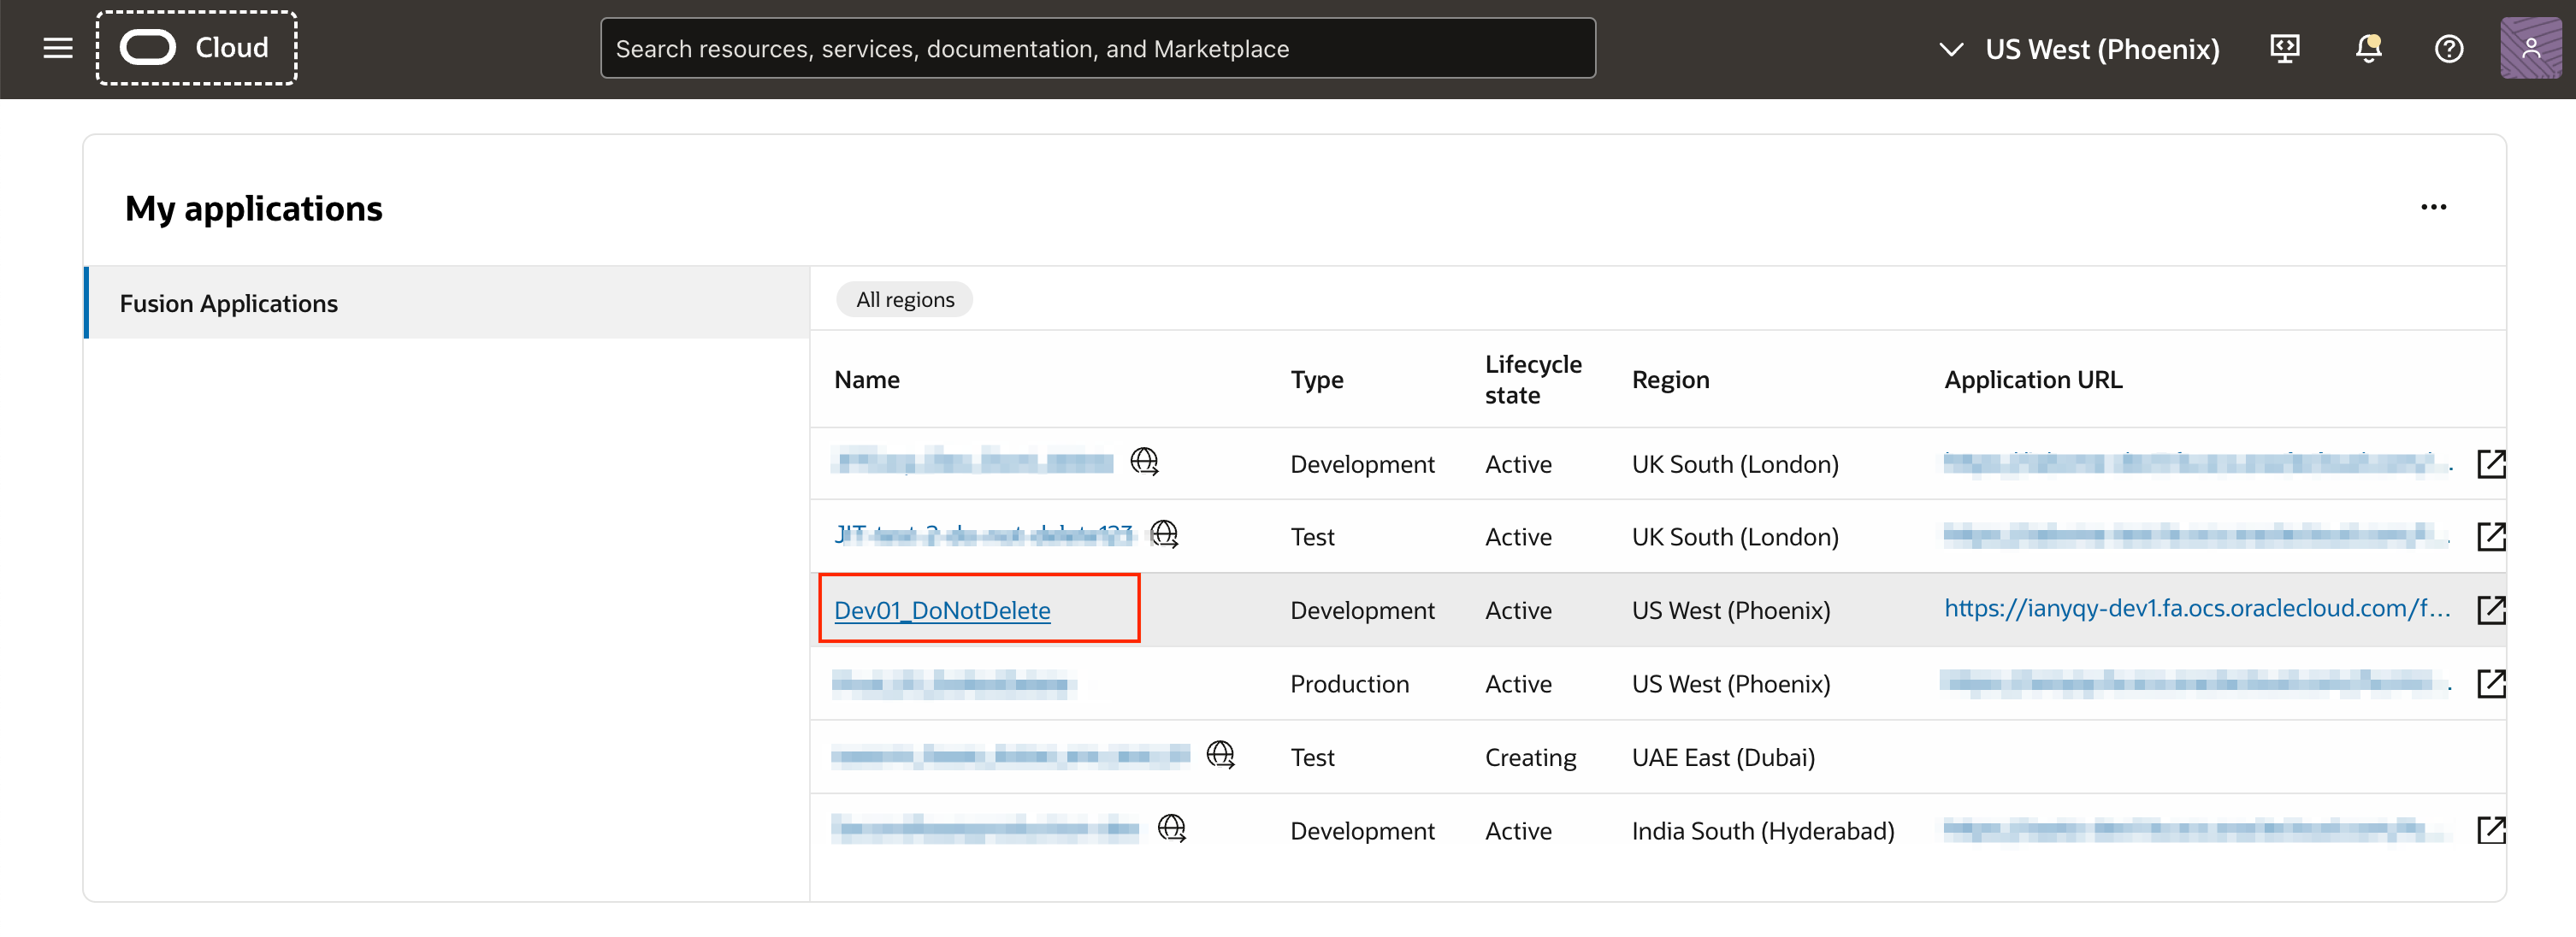
Fig. 2: Navigate to Fusion Applications on Oracle Cloud - Click the hyperlink or OCID next to the Associated Identity Domain
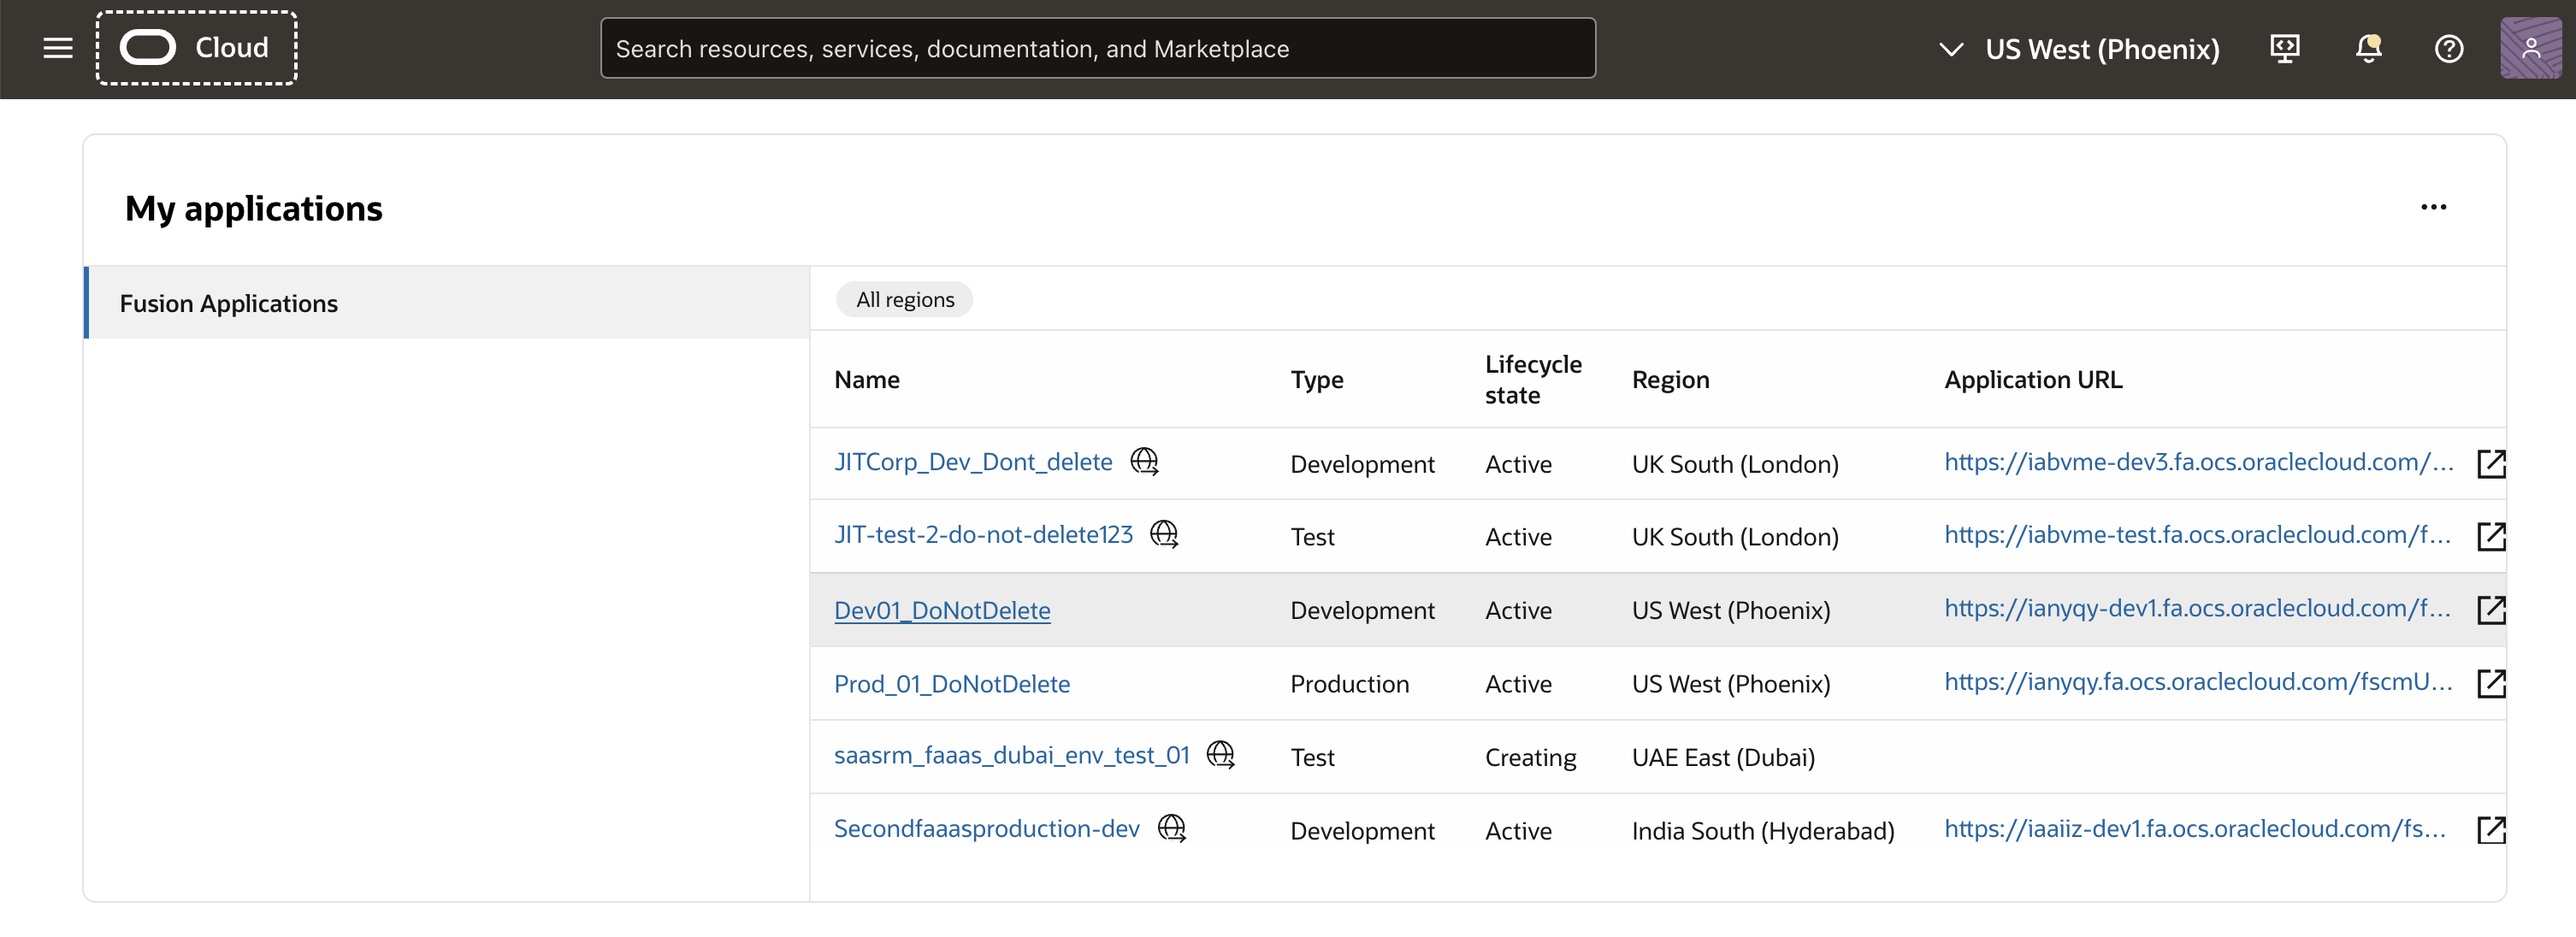
Fig. 3: click on the OCID of the Associated identity domain
- Log in to your OCI Console and select the Fusion Application used for integrating APEX with Fusion.
- Validate or Add Users:
- Check if the required users have already been added to the identity domain.
- If not, add the necessary users and assign them to the appropriate groups.
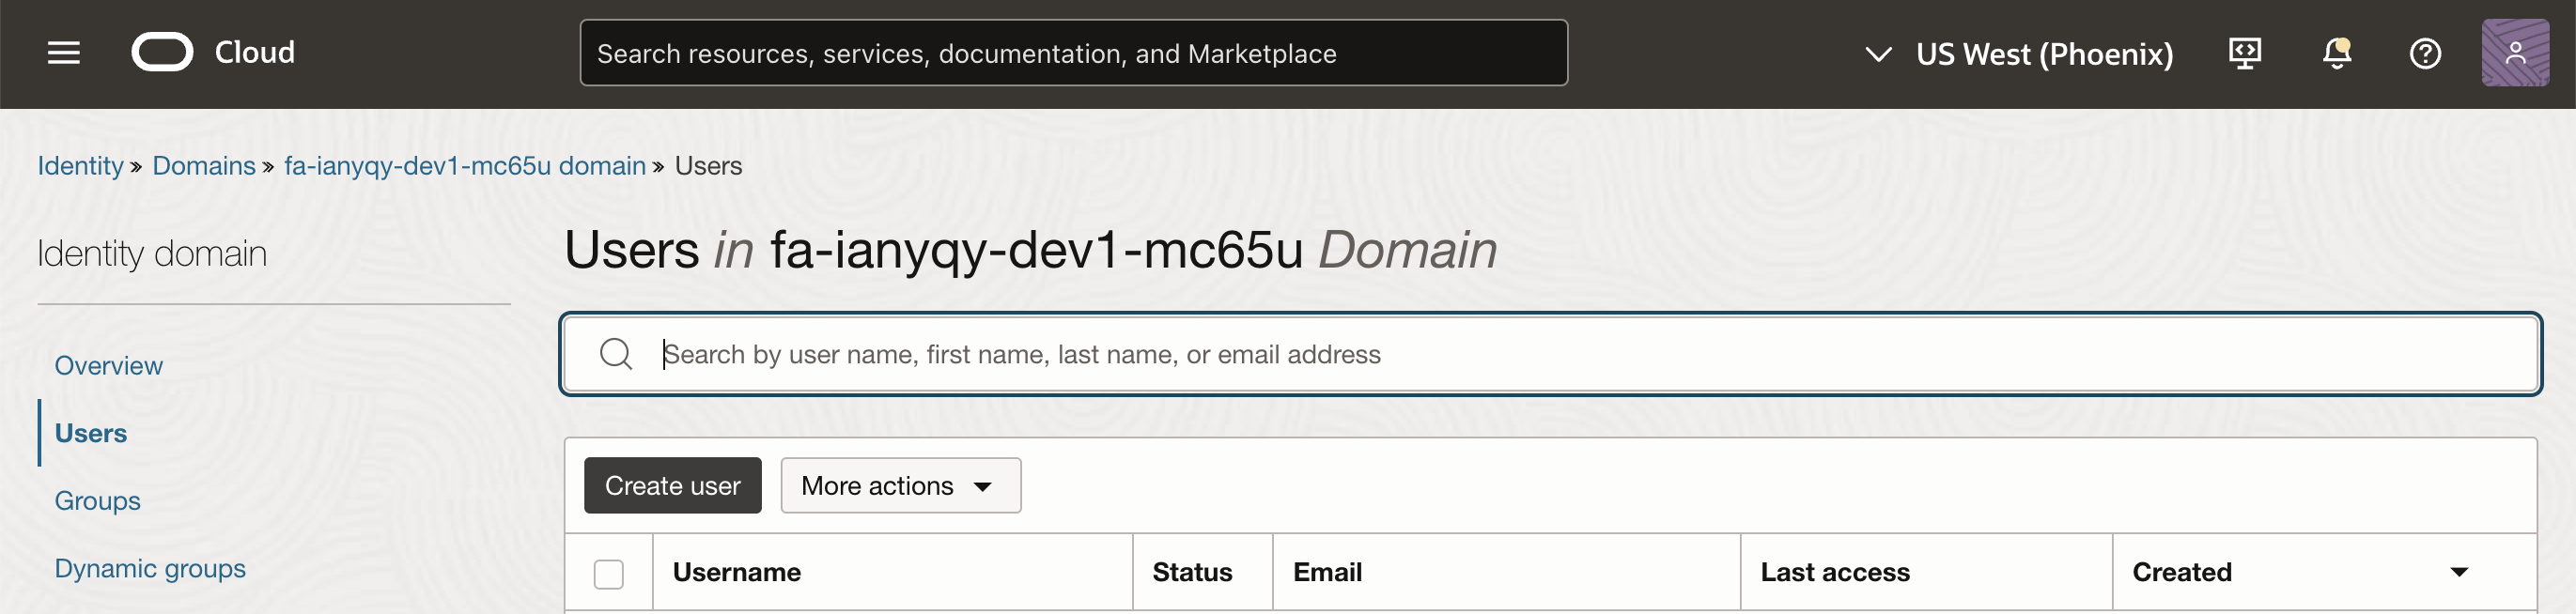
Fig. 4: Validate users on the Associated identity domain
By completing these steps, you ensure that all required users are ready for the integration process.
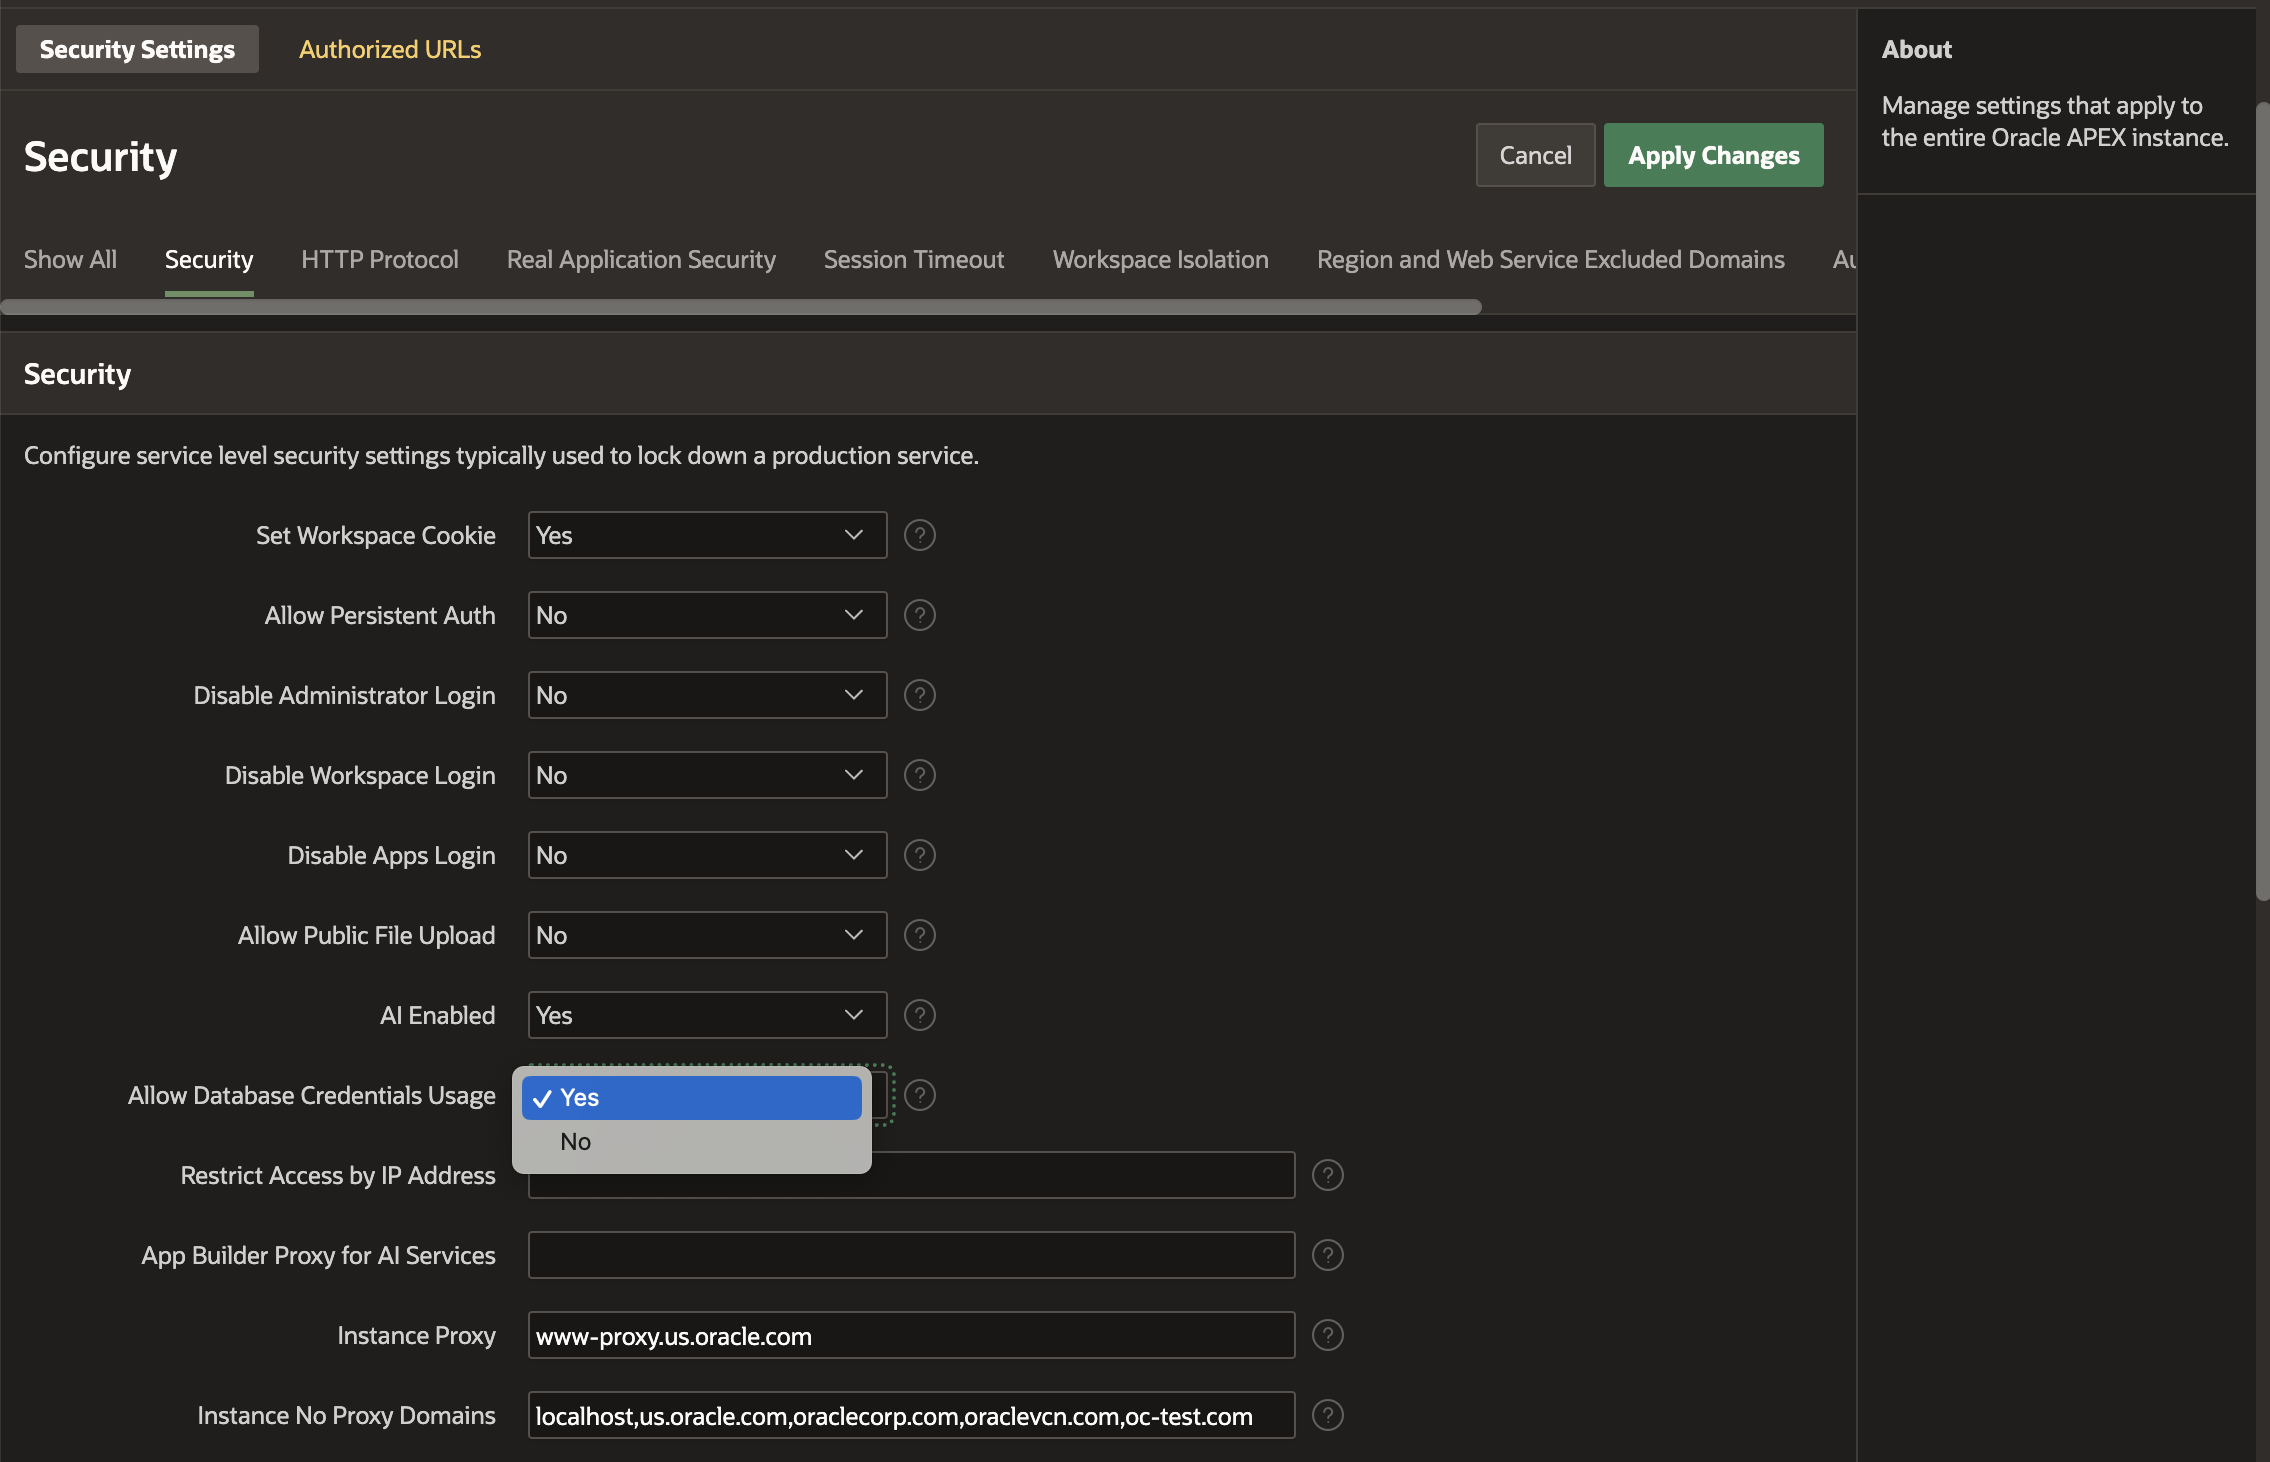
Verify whether DBMS Credentials Usage is set to yes at the instance level
To enable database credentials for all workspaces in APEX, the APEX_NNNNNN schema must have execute permissions on the credentials, and a public synonym prefixed with SYS must be created. The DBTools Fusion application wizard handles this setup by configuring credentials, granting privileges, and creating the required synonyms.
The DB tools Fusion Application Wizard will automatically enable database credentials for all workspaces in APEX. To verify this, navigate to the APEX Administration Services, navigate to Manage Instance > Instance Settings > Security, and check whether to Allow DBMS Credentials Usage to “Yes”.
Create an Application with Integrations to Fusion Applications
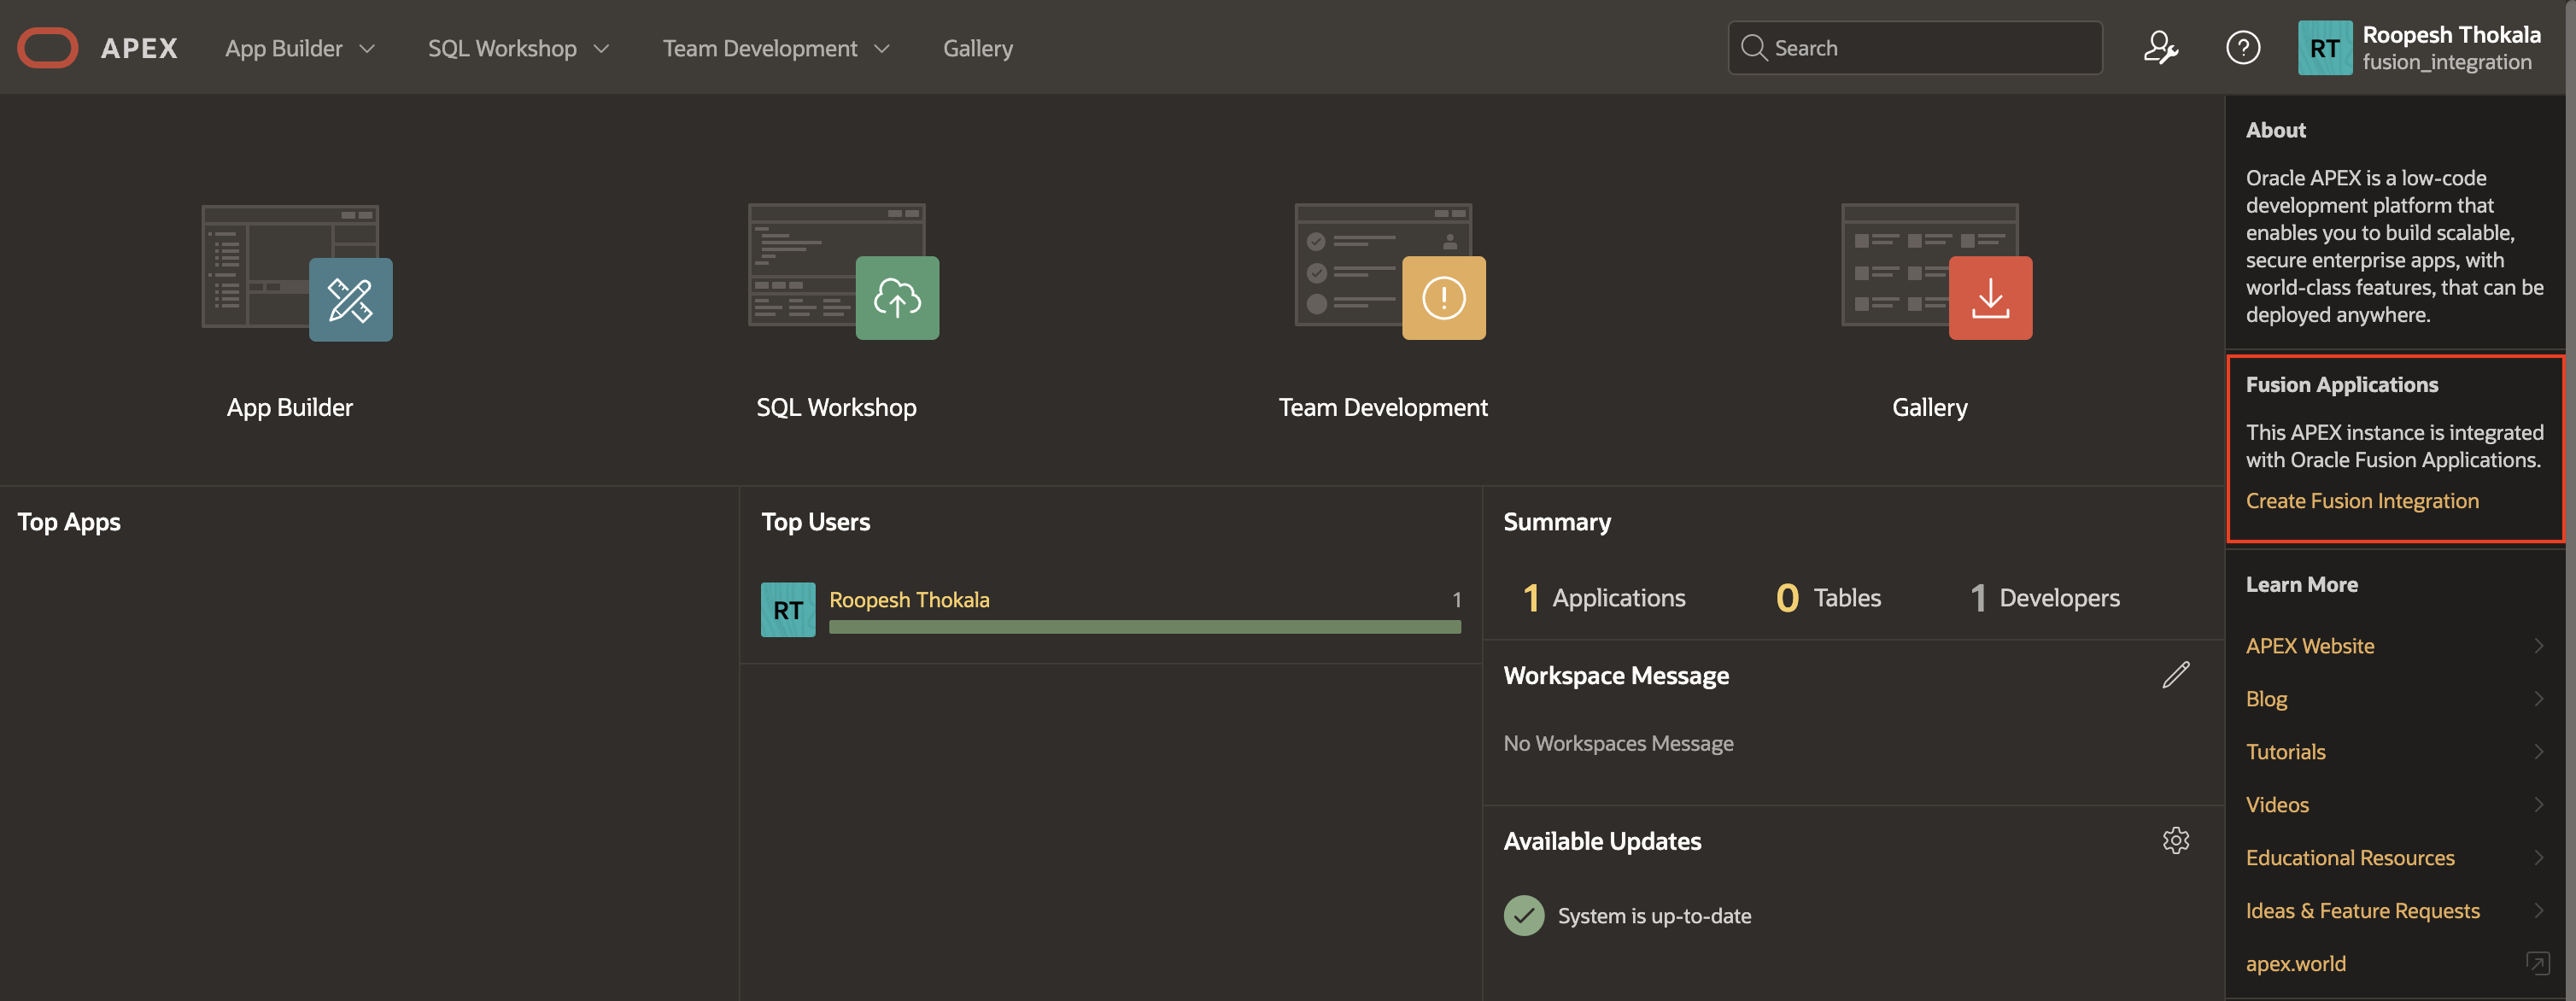
Before creating the Fusion Integrated Application in APEX, ensure that the Database Tools wizard has been successfully completed. If the integration between Oracle APEX and Fusion Applications is successful, the message “This APEX instance is integrated with Oracle Fusion Applications” will appear on the right side of the Workspace homepage in APEX.
Create Fusion Integrated Application
To create a Fusion Integration application in APEX, follow these steps:
- On the Workspace Home Page, click App Builder, then Create.
- Select Create Fusion Integration from the wizard.
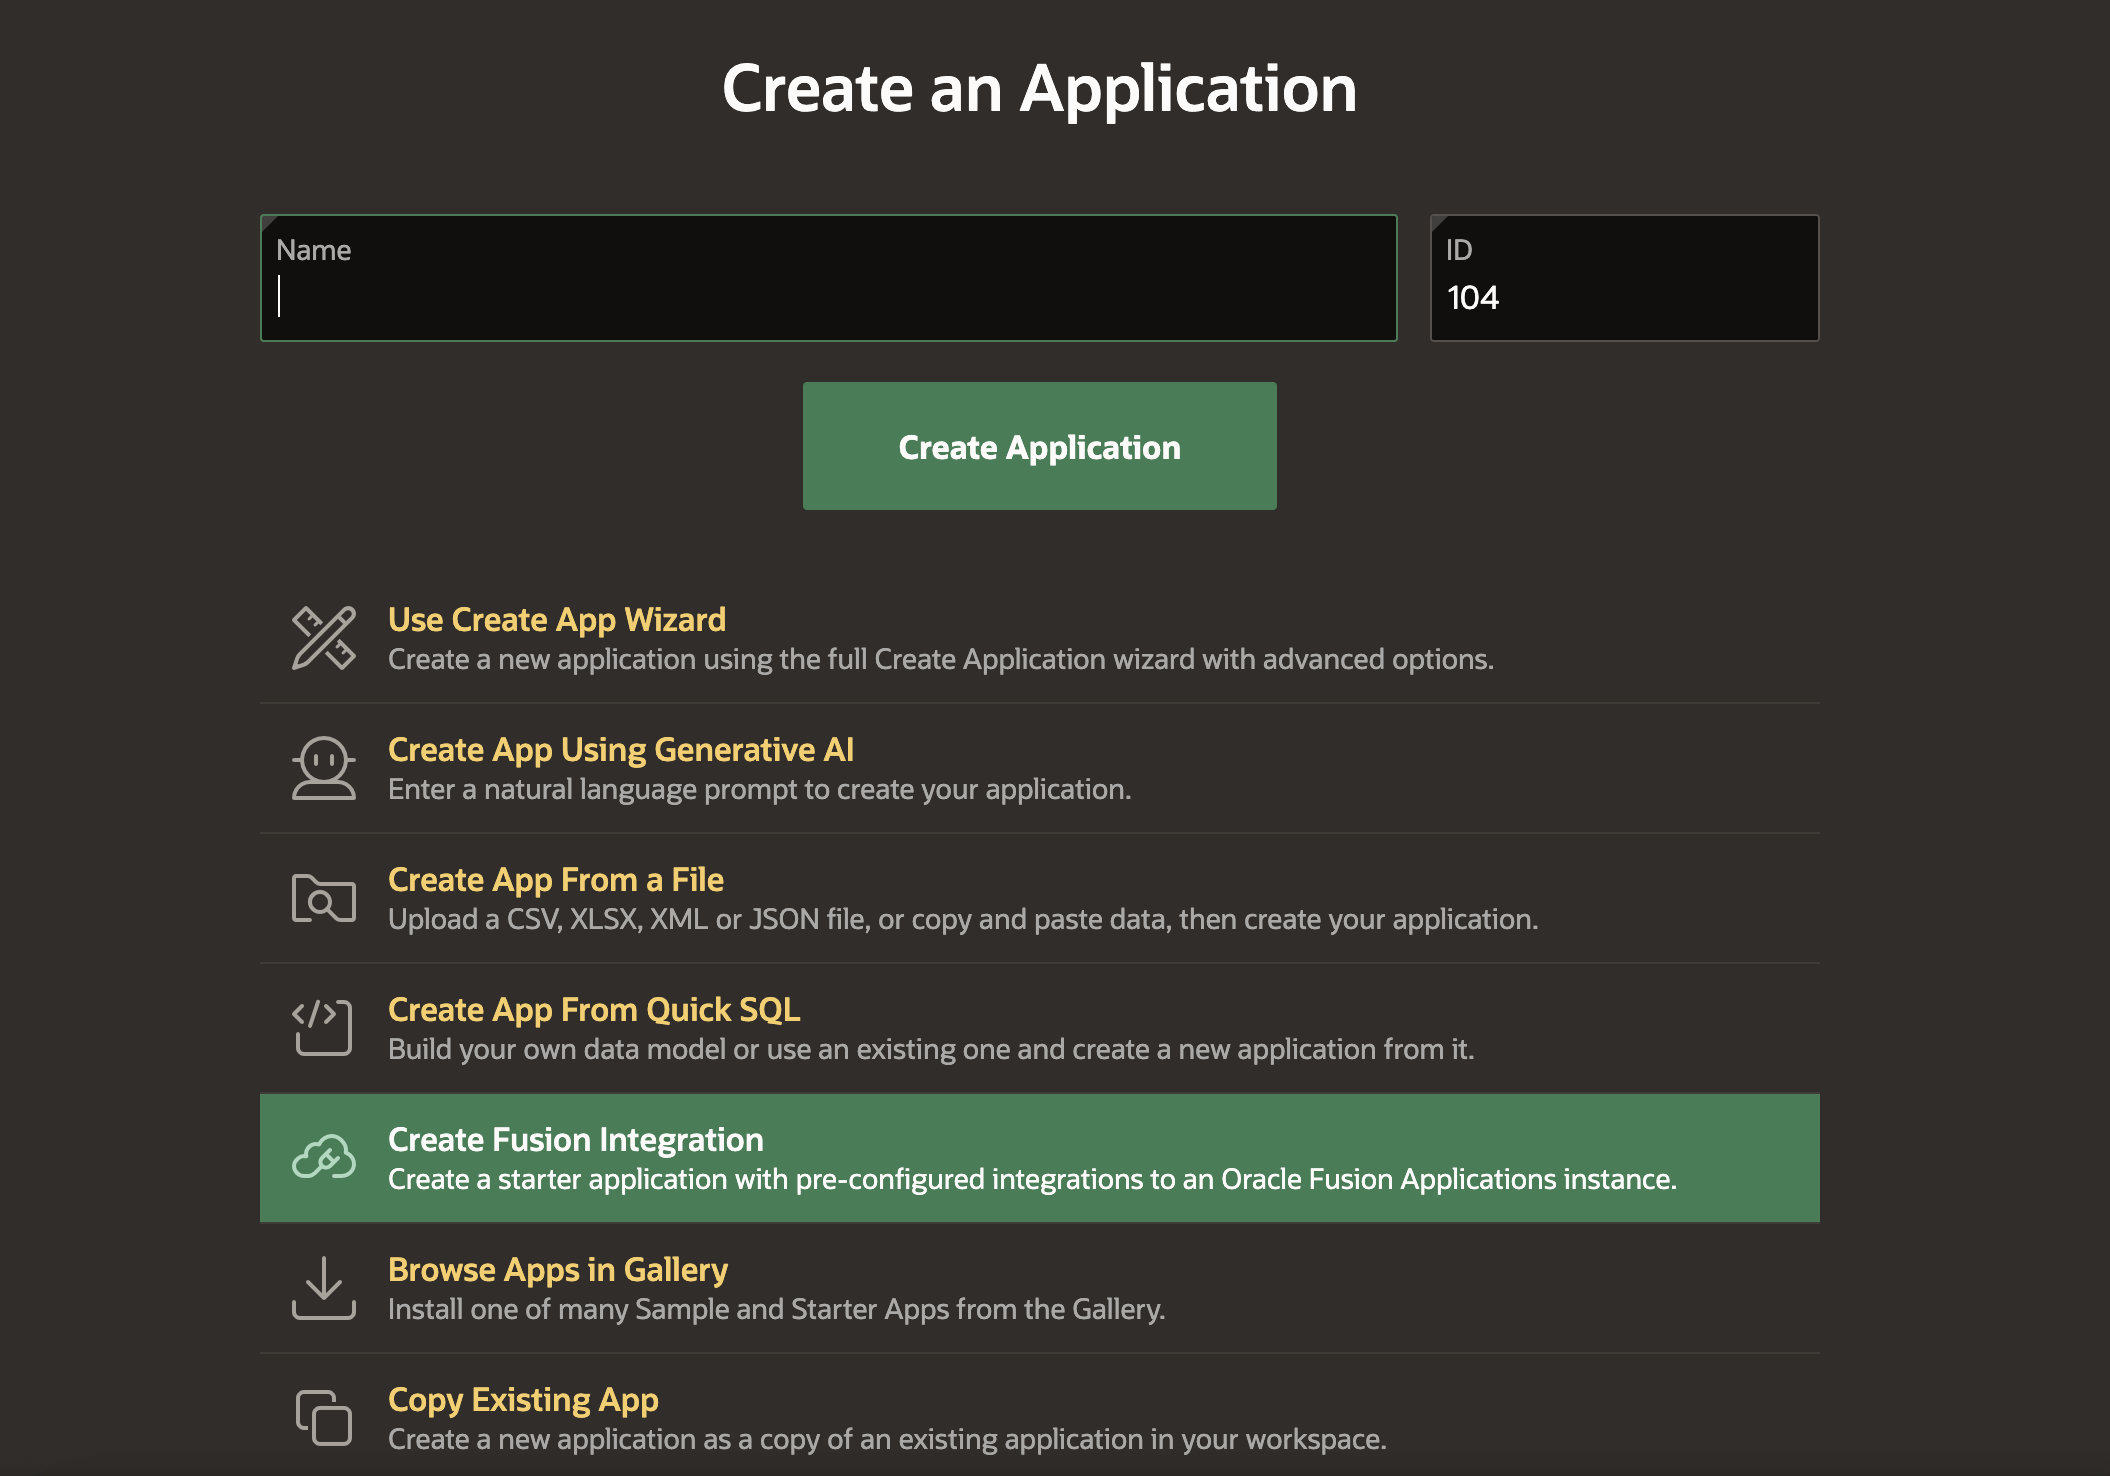
Fig. 7: Create Fusion Integration Application - In the Create Fusion Integration Wizard, under configurations, for:
- Fusion Instance Name: Choose the Fusion instance to integrate, configured earlier using the Database Tools Integration Wizard in OCI Console
- Base URL for REST APIs: This is auto-displayed based on the Fusion instance or Oracle OCI standards. Verify it matches your environment and update manually if needed.
- API Status: Once the Base URL is populated, APEX verifies the server connection. A status of 200-OK confirms success, while other statuses indicate a network issue that may require resolving ACL or ACE configurations. For more information, see Enabling Network Services in Oracle Database
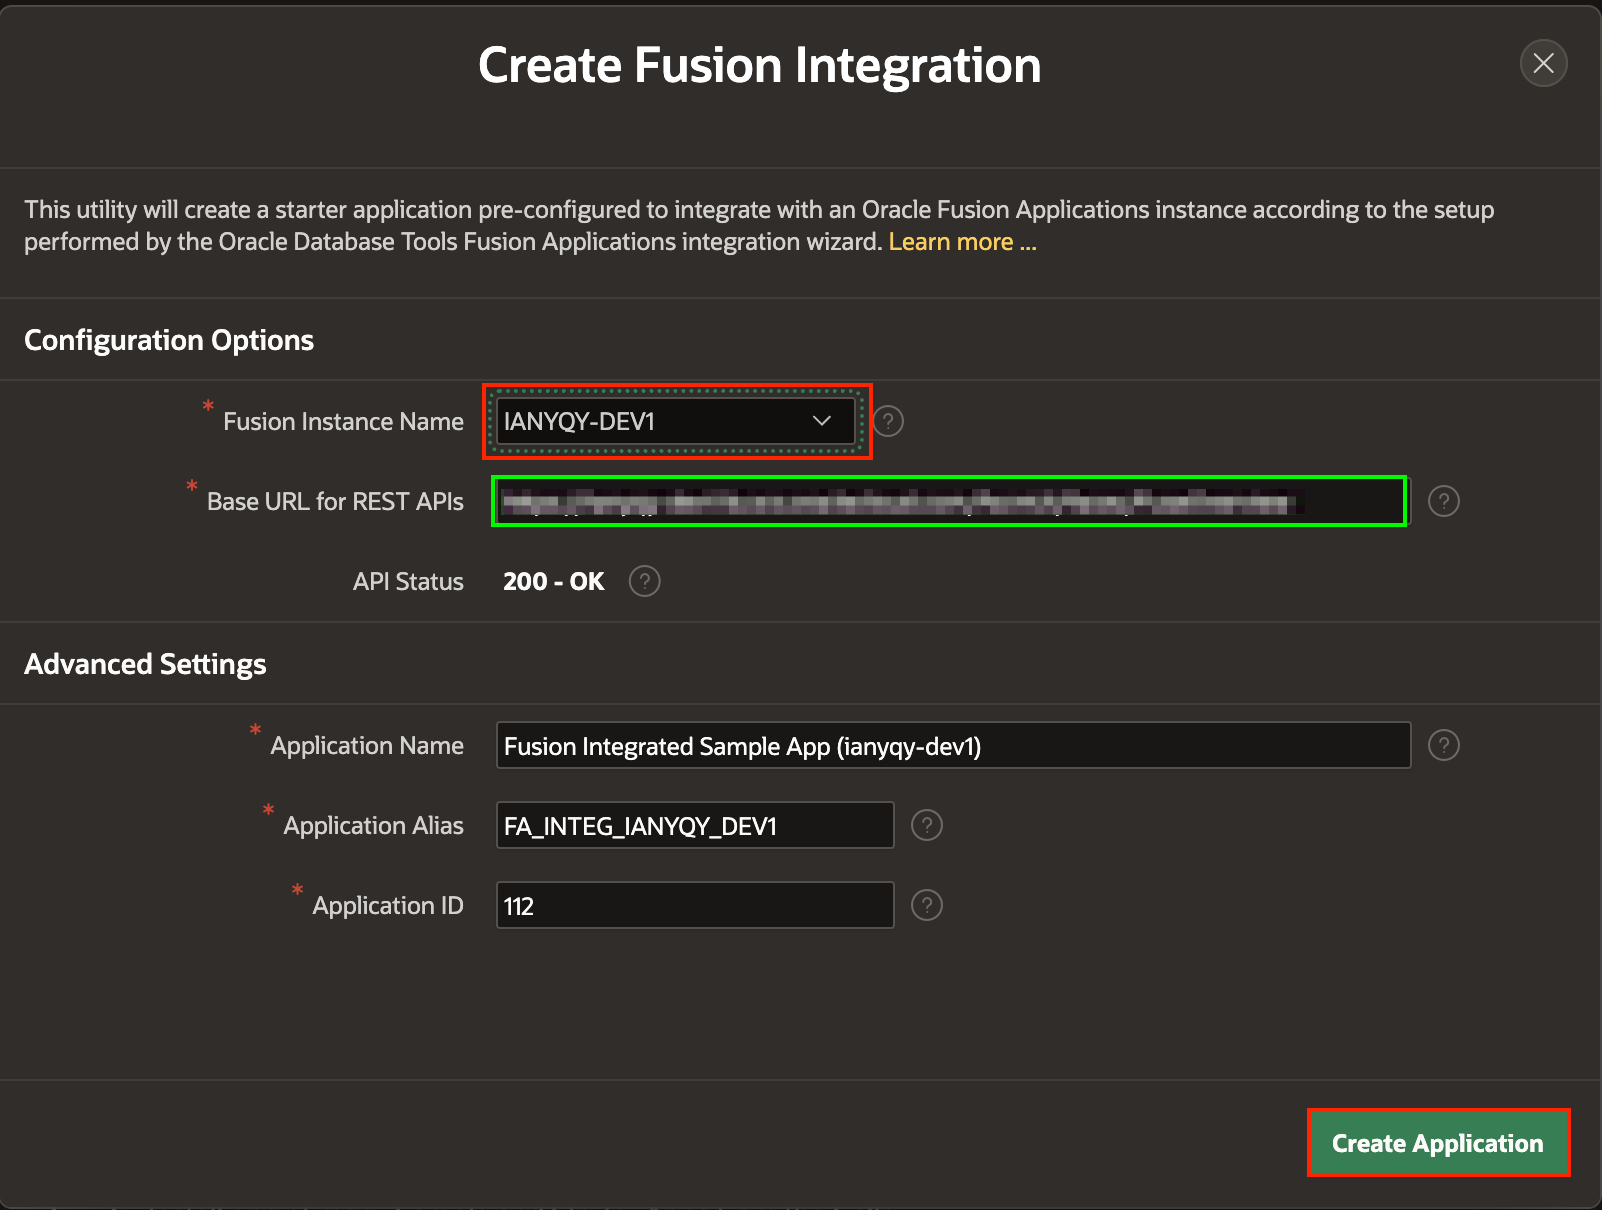
Fig. 8: Select Fusion Instance details
- Click Create Application to generate a starter app with pre-configured settings and database setup tasks. This provides a foundational app for further integration with Fusion Applications.
- Now, Click Run on the newly created Fusion Integrated Application and observe that the end application is enabled with Single Sign-On (SSO). Use your SSO credentials to log in to the application.
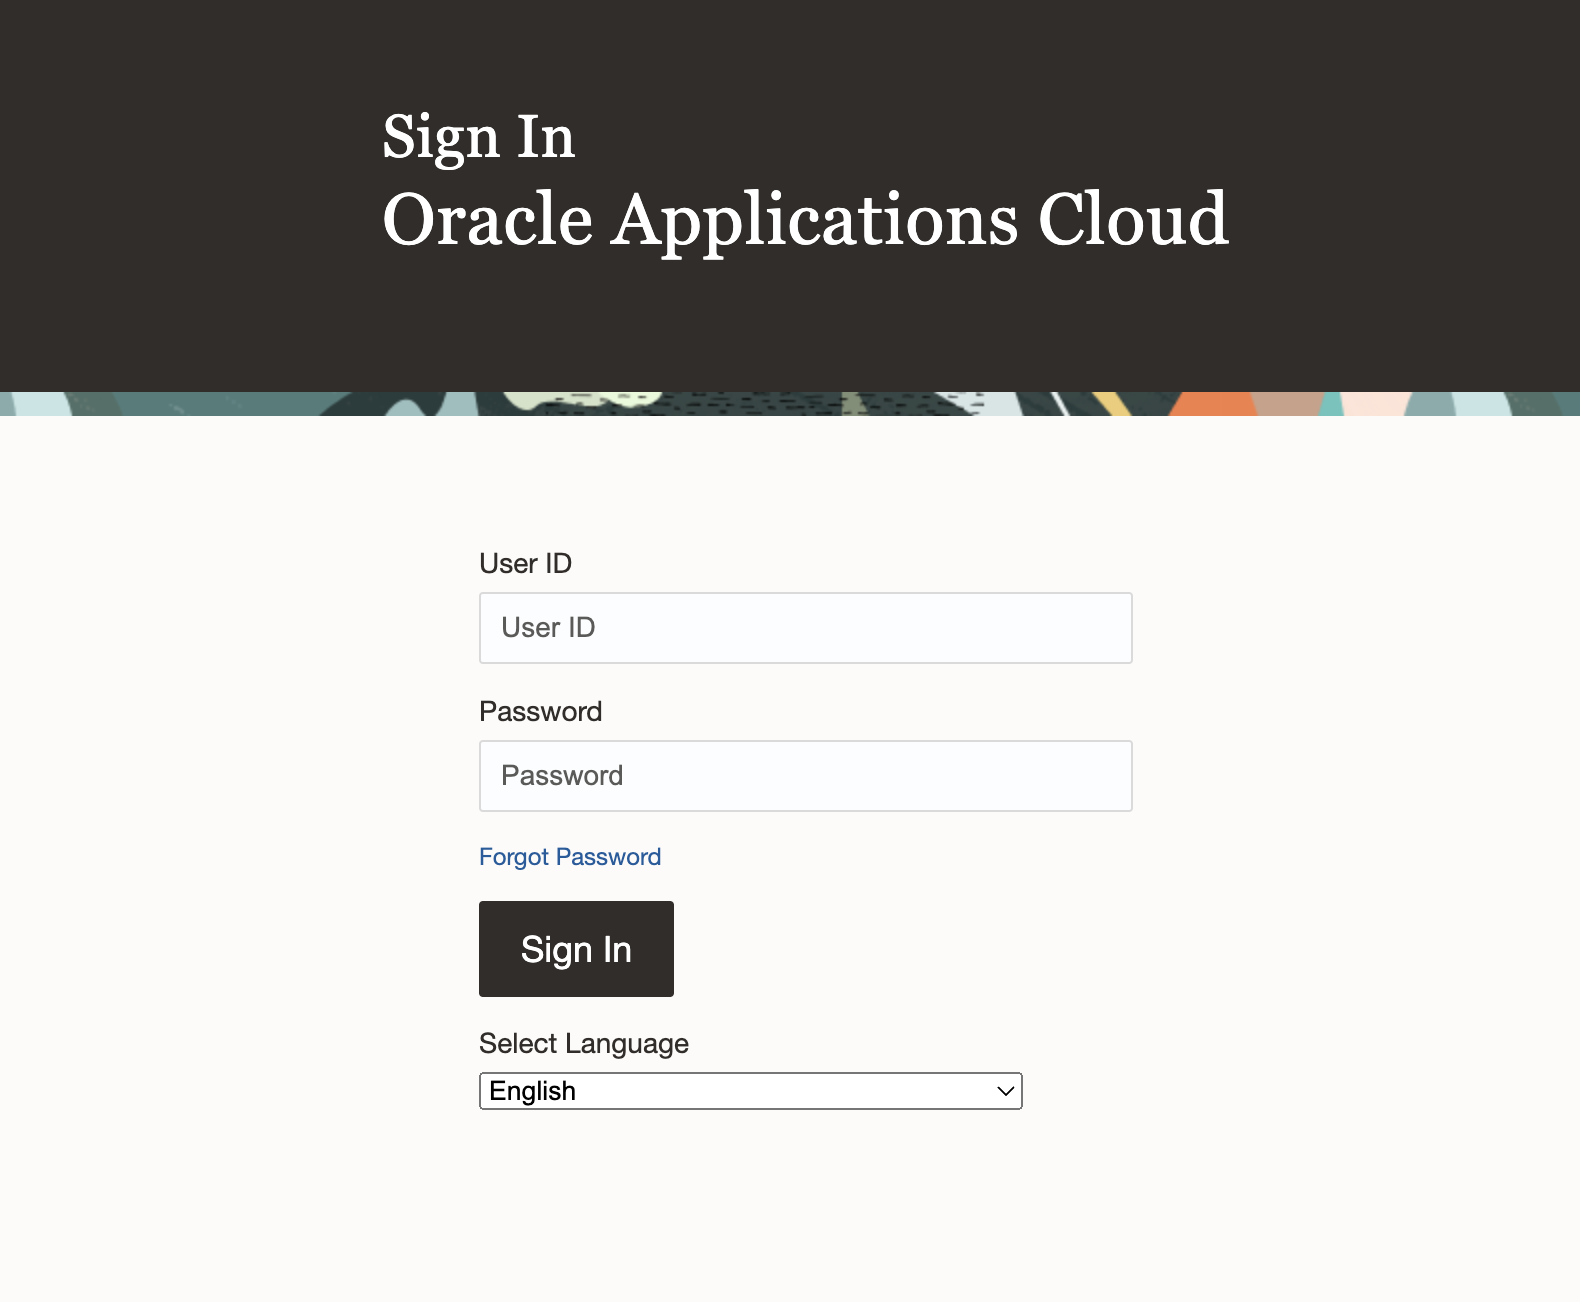
Fig. 9: Login using Single Sign-on details - Once you log into the application, you will notice that it displays key details about the currently logged-in user, such as the User Distinguished Name, Display Name, Account Type, and more. Additionally, you will find a convenient button that allows you to navigate effortlessly to the Fusion Application, enhancing the user experience
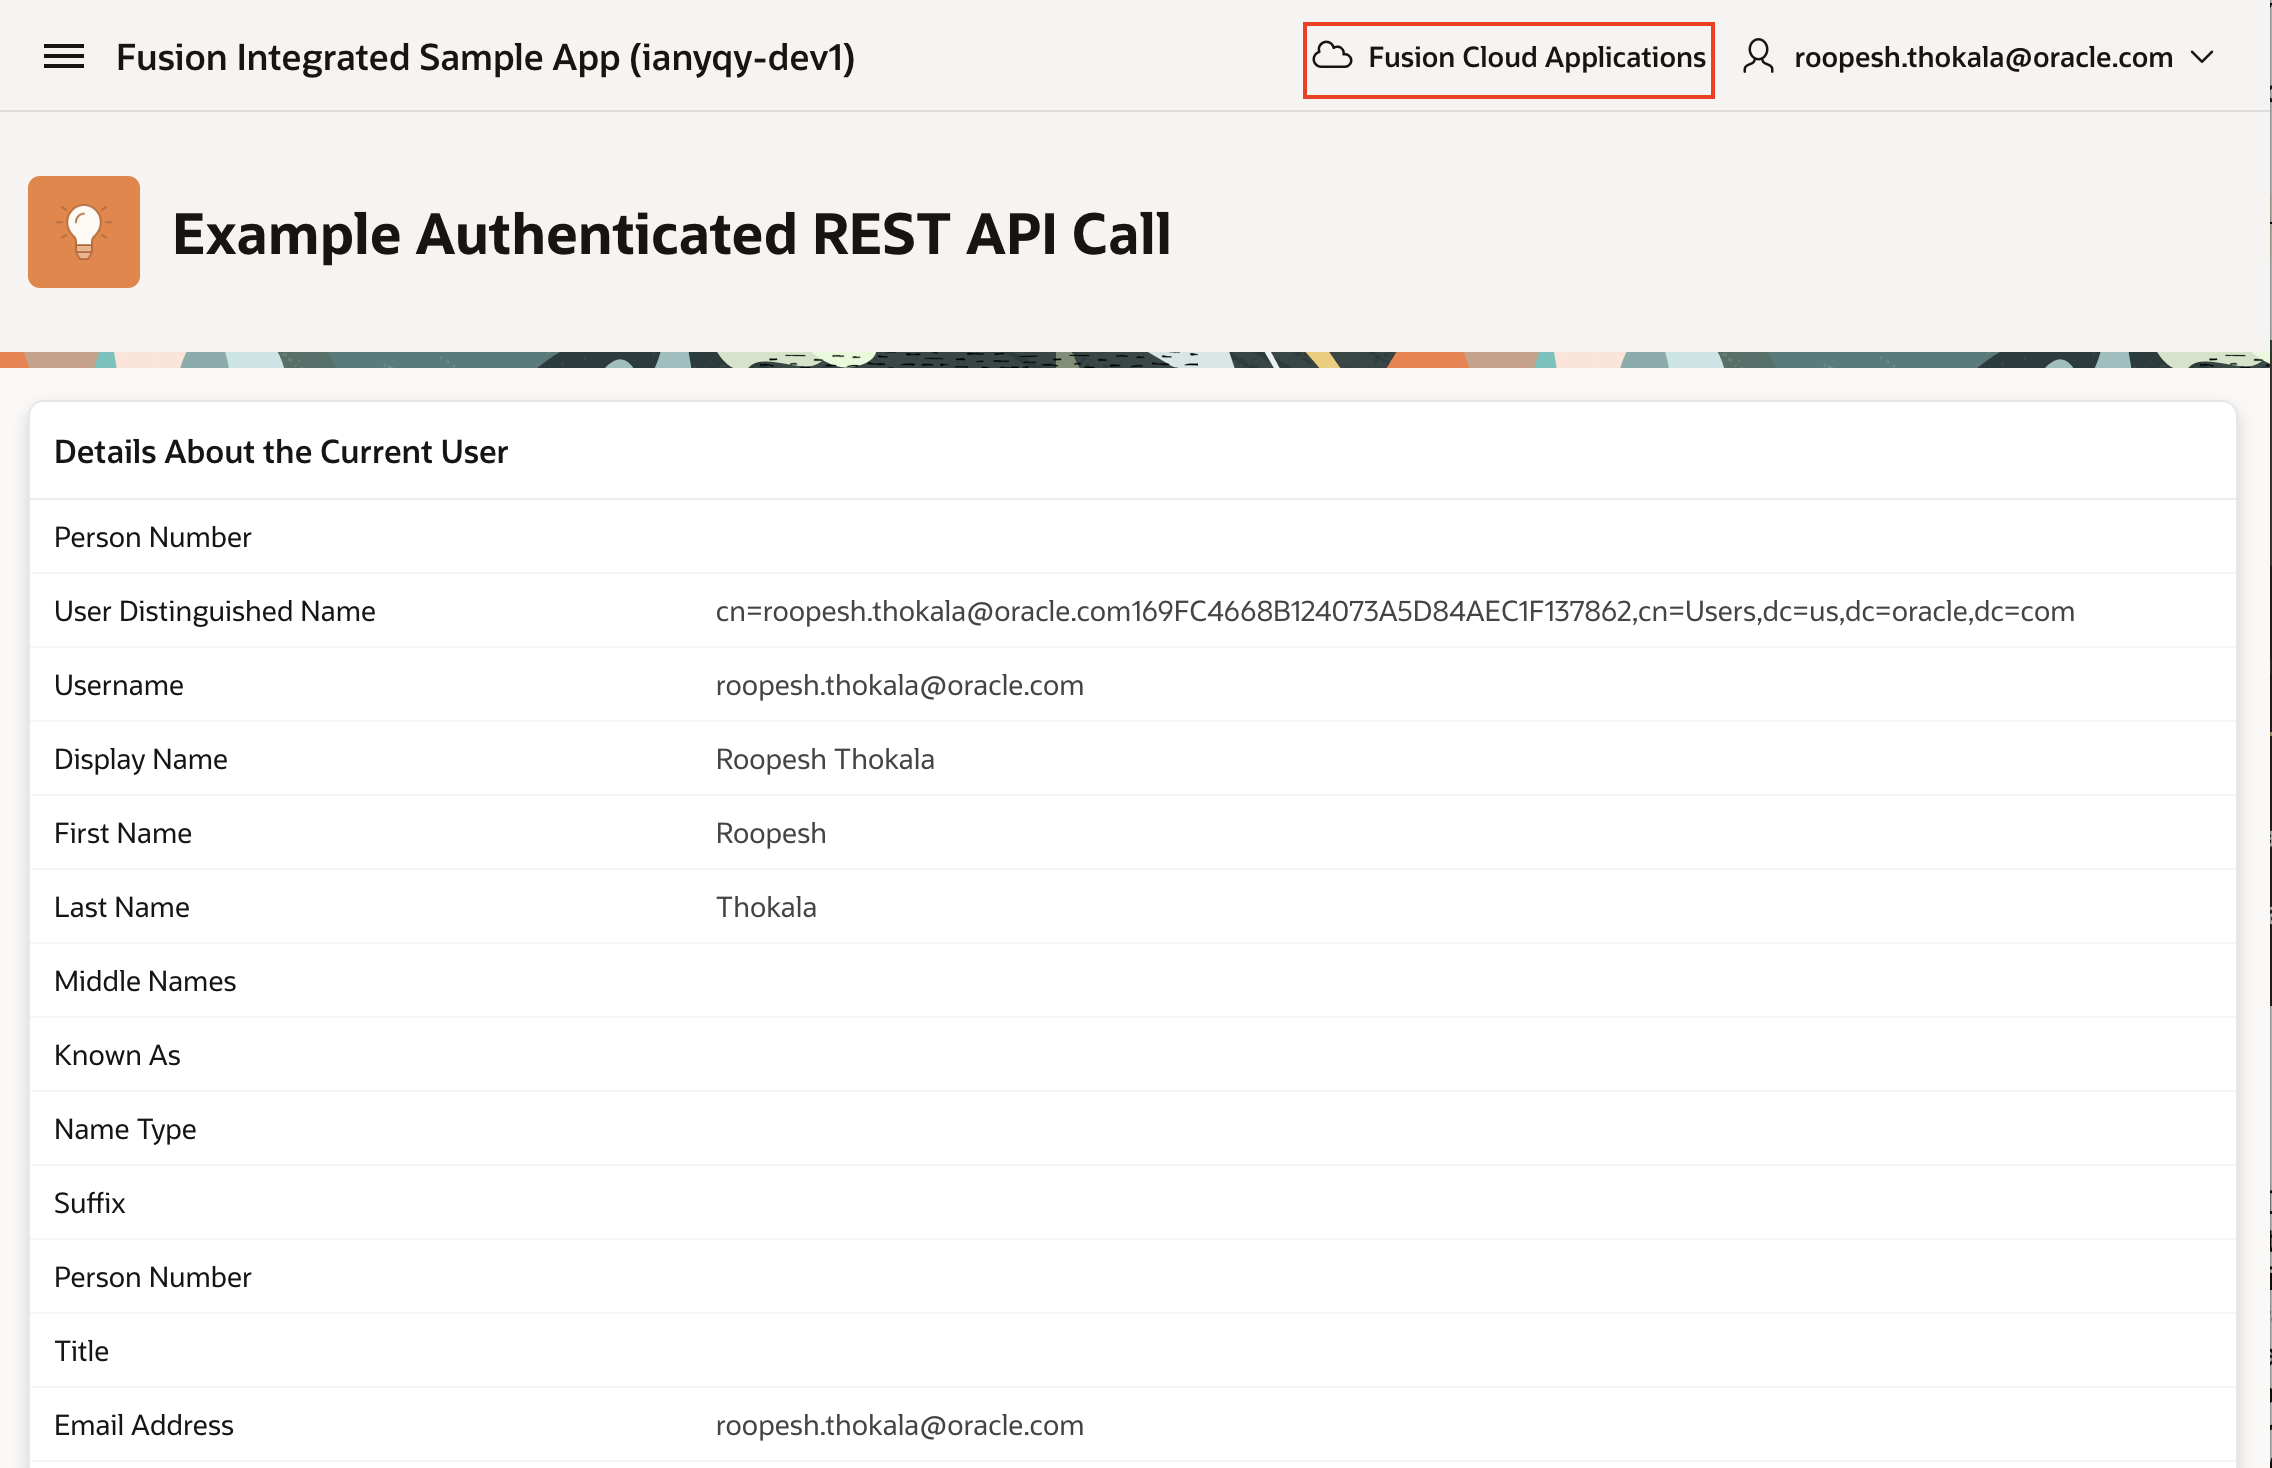
Fig. 10: Fusion Integrated APEX Application 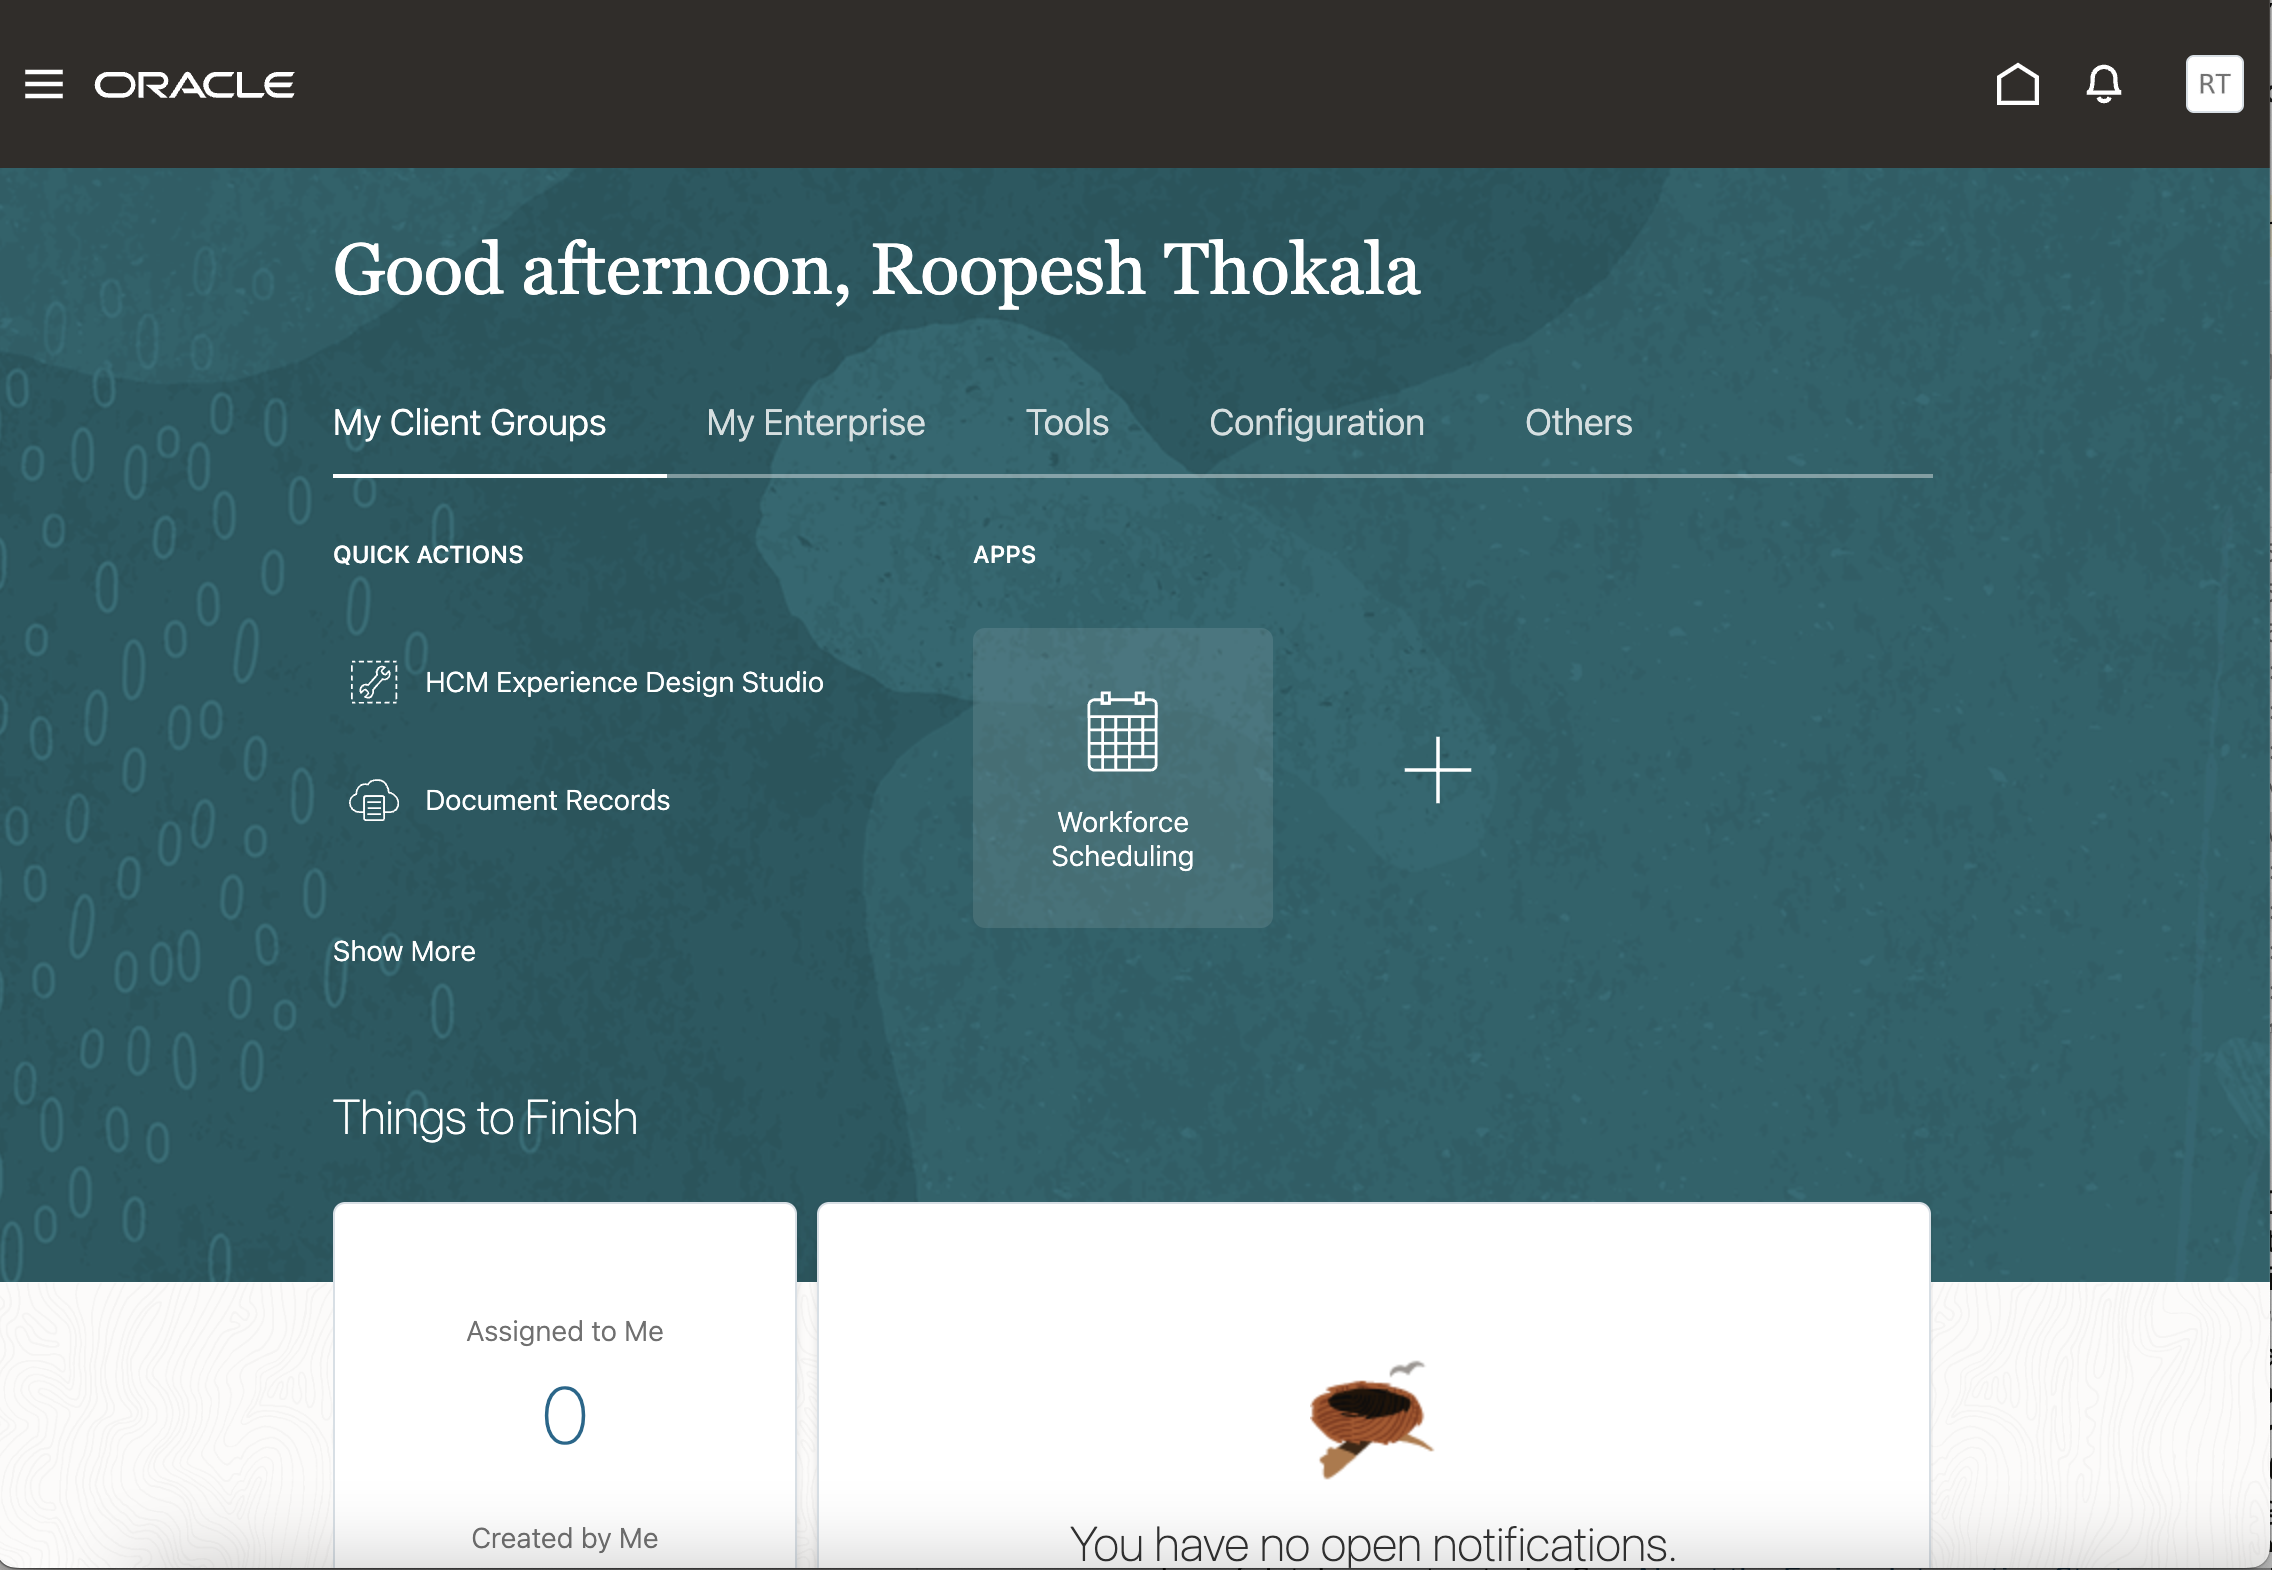
Fig. 11: Fusion Application with SSO Login
What Happens When You Create a Fusion Integration Application in APEX?
When you use the Create Application Wizard and select the Create Fusion Integration option, APEX sets up a starter application and performs several essential database configuration tasks to streamline integration with Fusion Applications:
- Remote Server: Creates a workspace-level remote server named in the format ‘APEX_FA_FUSION_INSTANCE_REST_APIS’, where ‘FUSION_INSTANCE’ corresponds to the system name from your Fusion Applications Cloud Console. This server is pre-configured to reference the base URL of Fusion REST API endpoints.
- Web Credential: Generates a web credential named ‘APEX_FA_FUSION_INSTANCE_DBMS_CRED’, which uses the database credentials created by the Database Tools Fusion Integration Wizard. This credential is utilized by the authentication scheme and the sample REST Data Source.
- Authentication Scheme: Creates a pre-configured OAuth-based authentication scheme named ‘APEX_FA_FUSION_INSTANCE_OAUTH’. This scheme includes placeholders for configuration parameters set at the instance level. You can reuse this scheme in other Fusion-integrated applications to enable Single Sign-On (SSO) easily.
- REST Data Source: Adds a sample REST Data Source named HCM Self Details that uses the remote server and web credentials to retrieve details about the currently signed-in user. This serves as an example for creating your own data sources to access other Fusion REST API endpoints.
By automating these steps, APEX simplifies the process of integrating Fusion Applications and provides you with a solid foundation for further customization.
Conclusion
This blog explains how Oracle APEX can be used to extend Oracle Fusion Applications to meet unique business requirements. Oracle Fusion provides a comprehensive suite of tools for ERP, HCM, supply chain, and customer experience, while APEX offers a low-code platform to create scalable, secure applications. With features like the Fusion Integrated Starter App Wizard, the integration process is simplified, automating tasks such as secure database connections, Single Sign-On (SSO) configuration, and REST API setup. This allows businesses to quickly build custom workflows, reports, and features, enhancing Fusion Applications and aligning them with specific needs.
Additional Resources
This blog post provides a High-level overview of how to enhance Oracle Fusion Applications with Oracle APEX. Stay tuned for a more detailed Technical Paper coming soon.